If you haven’t done tasks 4 & 5 yet, here is the link to my write-up of them: TryHackMe Brim — Task 4 Default Queries & Task 5 Use Cases
Getting the VM Started
Click the green button, labeled Start Machine, at the top of Task 1.
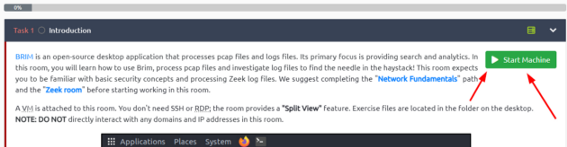
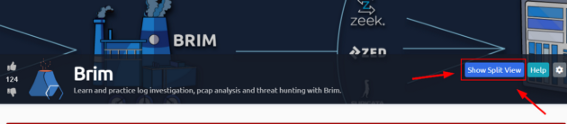
The screen should split in half if it doesn’t go to the top of the page. You will see a blue button labeled Show Split View, click this button.
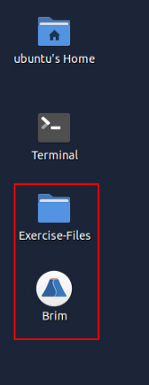
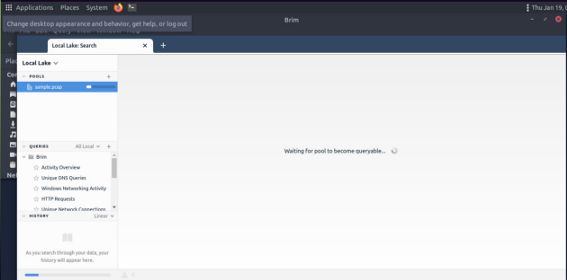
The screen should be split now, you have to wait for the VM to load. When it is finished loading it will look like it does below. You are ready to continue with the tasks ahead.On the desktop, double-click the Exercise-Files directory icon and Brim icon.
When both open, click and drag the task6-malware-c2.pcap file from the Exercise-Files directory to the Brim application.
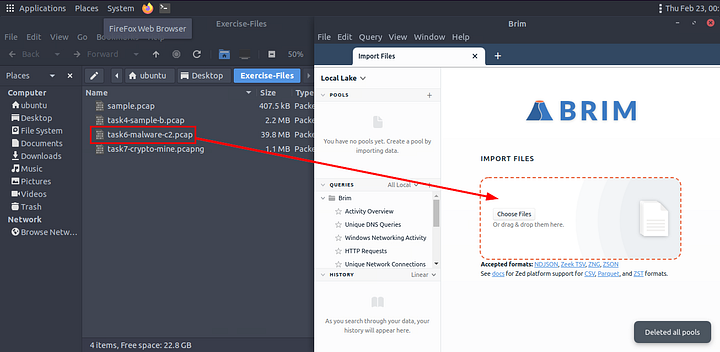
Then Brim will start to import the file.
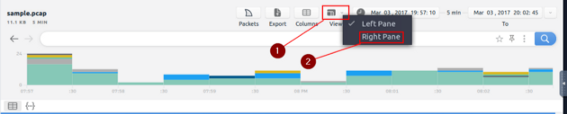
After the sample pcap loads, we first want to go to the view tab. It is the fourth tab on the right at the top of Brim. Click on it and a drop-down menu will appear, then click the Right Pane choice.
You are now ready to move on to the takes ahead.
Threat Hunting with Brim | Malware C2 Detection
It is just another malware campaign spread with CobaltStrike. We know an employee clicks on a link, downloads a file, and then network speed issues and anomalous traffic activity arises. Now, open Brim, import the sample pcap and go through the walkthrough.
Let’s investigate the traffic sample to detect malicious C2 activities!
Let’s look at the available logfiles first to see what kind of data artefact we could have. The image on the left shows that we have many alternative log files we could rely on. Let’s review the frequently communicated hosts before starting to investigate individual logs.
Query: cut id.orig_h, id.resp_p, id.resp_h | sort | uniq -c | sort -r count
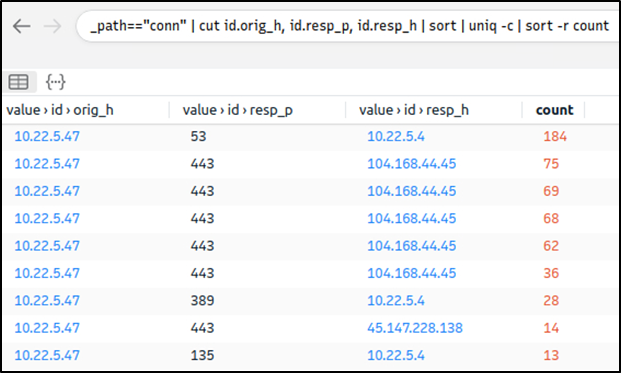
This query provides sufficient data that helped us decide where to focus. The IP addresses “10.22.xx” and “104.168.xx” draw attention in the first place. Let’s look at the port numbers and available services before focusing on the suspicious IP address and narrowing our search.
Query: _path=="conn" | cut id.resp_p, service | sort | uniq -c | sort -r count
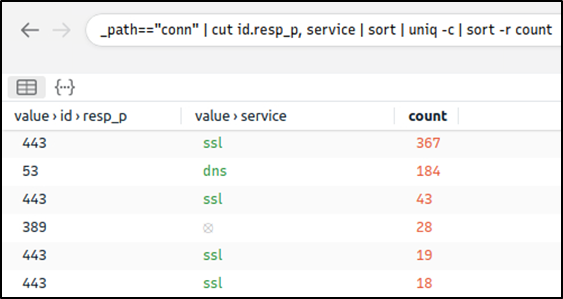
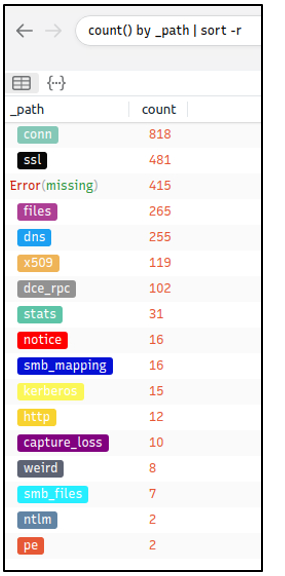
Nothing extremely odd in port numbers, but there is a massive DNS record available. Let’s have a closer look.
Query: _path=="dns" | count() by query | sort -r
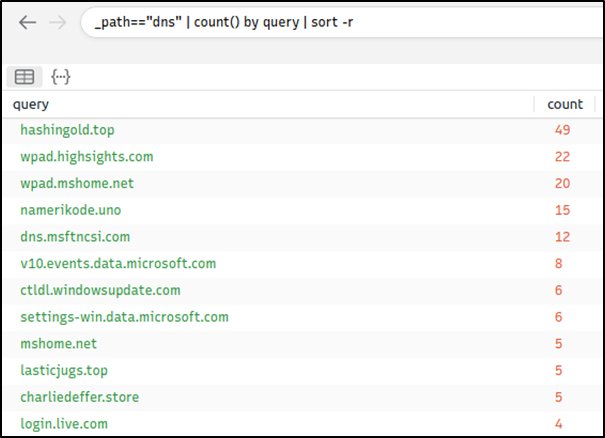
There are out-of-ordinary DNS queries. Let’s enrich our findings by using VirusTotal to identify possible malicious domains.
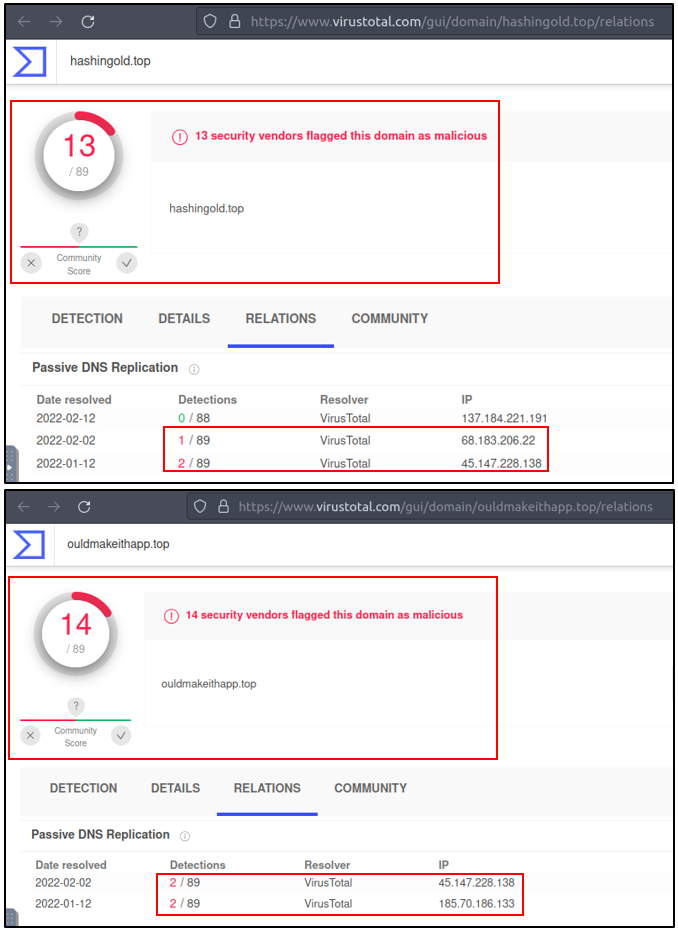
We have detected two additional malicious IP addresses (we have the IP 45.147.xx from the log files and gathered the 68.138.xx and 185.70.xx from VirusTotal) linked with suspicious DNS queries with the help of external research. Let’s look at the HTTP requests before narrowing down our investigation with the found malicious IP addresses.
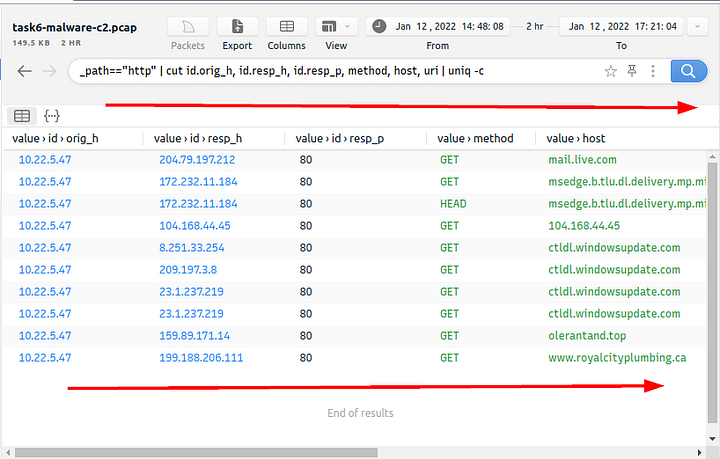
Query: _path=="http" | cut id.orig_h, id.resp_h, id.resp_p, method, host, uri | uniq -c | sort value.uri
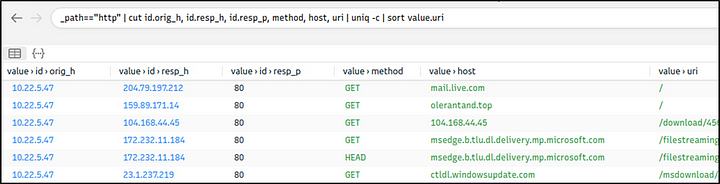
We detect a file download request from the IP address we assumed was malicious. Let’s validate this idea with VirusTotal and validate our hypothesis.
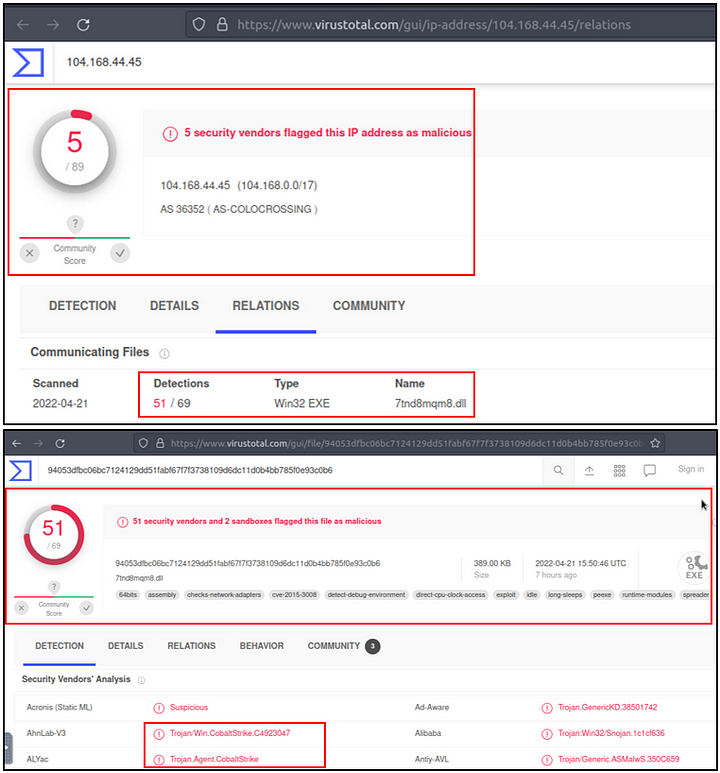
VirusTotal results show that the IP address “104.xx” is linked with a file. Once we investigated that file, we discover that these two findings are associated with CobaltStrike. Up to here, we’ve followed the abnormal activity and found the malicious IP addresses. Our findings represent the C2 communication. Now let’s conclude our hunt by gathering the low-hanging fruits with Suricata logs.
Query: event_type=="alert" | count() by alert.severity,alert.category | sort count
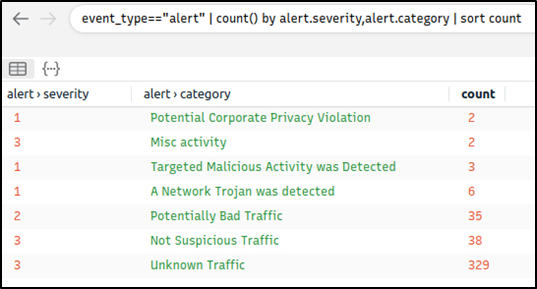
Now we can see the overall malicious activities detected by Suricata. Note that you can investigate the rest of the IP addresses to identify the secondary C2 traffic anomaly without using the Suricata logs. This task demonstrates two different approaches to detecting anomalies.
Investigating each alarm category and signature to enhance the threat-hunting activities and post-hunting system hardening operations is suggested. Please note, Adversaries using CobaltStrike are usually skilled threats and don’t rely on a single C2 channel. Common experience and use cases recommend digging and keeping the investigation by looking at additional C2 channels.
This concludes our hunt for the given case. Now, repeat this exercise in the attached VM and ask the questions below.
Answer the questions below
What is the name of the file downloaded from the CobaltStrike C2 connection?
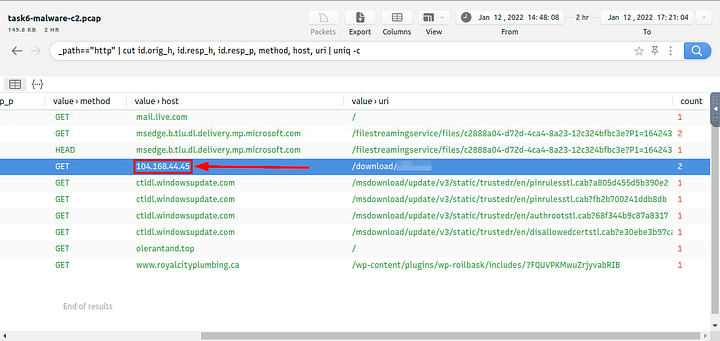
On Brim look at the Queries column on the left side of the tool. Inside this is HTTP Requests, it should be the fourth one down. Click on it.
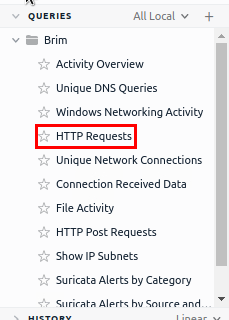
Move to the center of Brim now, we only have a handful of results. Start to scroll to the right.
Look for the Value>URI section, looking down there this section you will see /download/, what follows is the name of the file that was downloaded to the system, and thus the answer to the question. Type the answer into the TryHackMe answer field, then click submit.
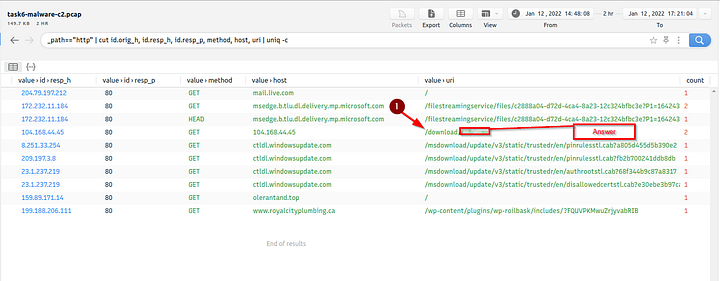
Answer: 4564.exe
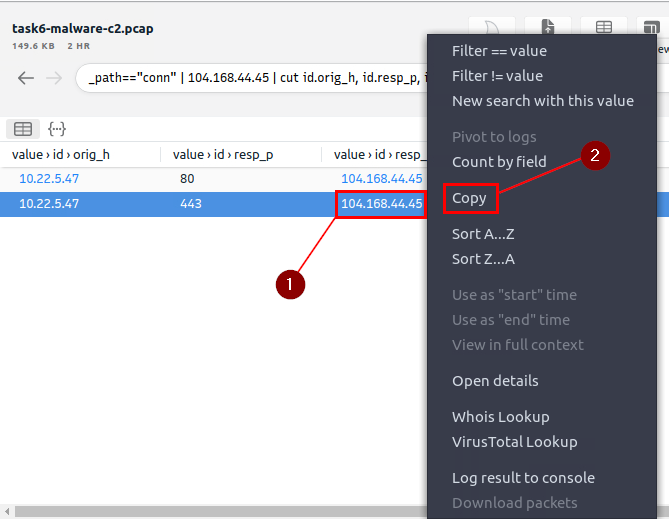
What is the number of CobaltStrike connections using port 443?
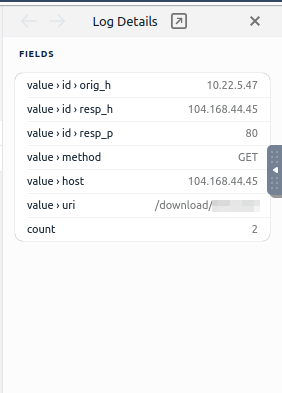
Going back to Brim, staying in the same row, move to the left to the host column. Click on the IP address, this is the IP address for CobaltStrike.
This will put the details into the Details panel on the Right side of Brim.
Now it’s time to build our filter so that we can find how many times a connection was made to CobaltStrike on port 443. So I will put the command filter here and then explain what it is doing, here is the command _path=="conn" | 104.168.44.45 | cut id.orig_h, id.resp_p, id.resp_h | sort | uniq -c. So first we are going to look at the conn path, then pipe that into the IP address for CobaltStrike. From the IP address, we then pipe the results into the cut function. The cut function then removes the id.orig_h, id.resp_p, id.resp_h to display in the main field, the results from cut are then piped into sort. Then Sort will then sort the results so far numerically, then those results are piped through uniq -c. Uniq will then remove any time an instance appears more than once., leaving one instance only, the -c will then show how many times the instance appears. Pressing enter will then run the filtering command.

Then, looking down at the results from the filter, you will have two results. Look at the results for port 443, it should be the second result. The amount of time the connection was made will be all the way to the right. Type the answer you find there into the TryHackMe answer field, then click submit.

Answer: 328
There is an additional C2 channel in used the given case. What is the name of the secondary C2 channel?
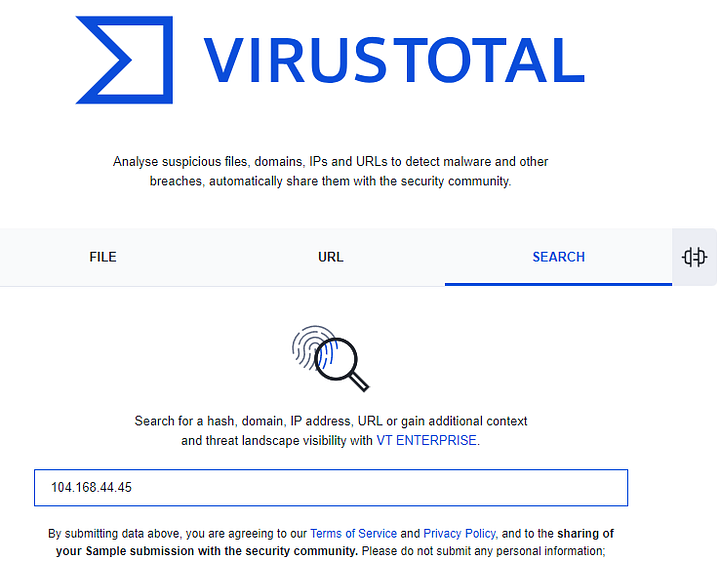
Heading back to Brim, go to the IP address of the Value>id>resp_h, and right-click on it. A drop-down menu will appear, click copy on this menu.
Open a new tab in your browser, and go to the website VirusTotal.com. Once there, click on the SEARCH button.
Now you will see a search bar in the bottom middle of the screen. Click on the search bar then press ctrl + v to paste IP address into it. After you have pasted in the IP address, press enter to search the IP address.
Once the page loads, click the RELATIONS tab.
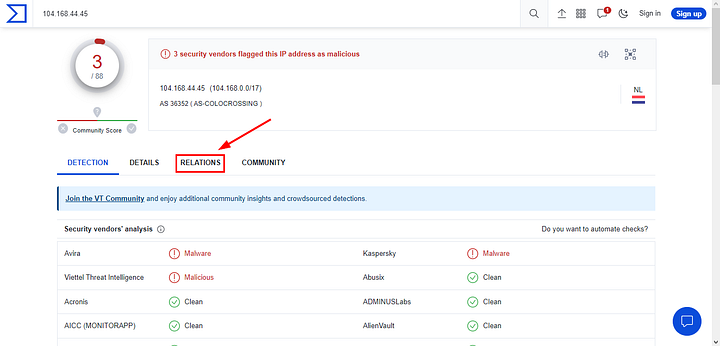
Now that you are on the RELATIONS tab, look down in the section labeled “Files Referring”. In this section you will see two files in the Name column. Since we already know that it is Cobalt Strike they were using, and DarkVNC would be another C2. So the other name in here is the name of the actual malware that will infect a system, and thus the answer to this question. Once you have found it, type the answer into the TryHackMe answer field, and click submit.
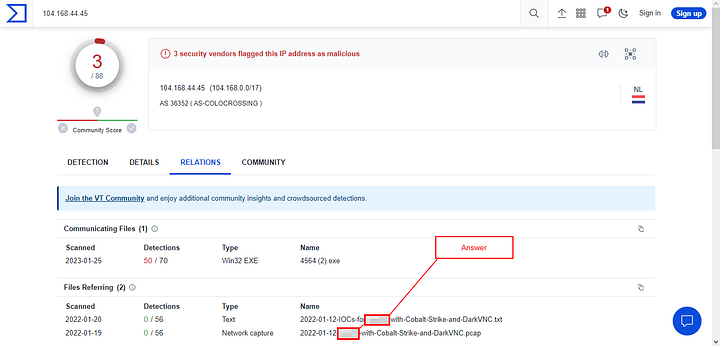
Answer: IcedID
| You have finished these tasks and can now move on to Task 7 Exercise: Threat Hunting with Brim | Crypto Mining. |