This is a premium room on TryHackMe. It was created by TryHackMe & arebel. Here it the link to said room, TryHackMe Room — Custom Alert Rules in Wazuh.
Learn how to create rules in Wazuh for your environment.

Task 1 Introduction
Wazuh is an open-source security detection tool that works on top of the ELK stack (Elasticsearch, Logstash, and Kibana) and is designed to identify threats using its alert rule system. This system uses rules to search for potential security threats or issues in logs from various sources, such as operating system logs, application logs, endpoint security logs, etc.
Out of the box, Wazuh has a comprehensive set of pre-configured rules. While these rules cover a wide range of potential security issues, there are still scenarios or risks unique to an organisation that these rules may not cover. To compensate for this, organisations can create custom alert rules, which is the focus of this room.
Learning objectives:
- Learn how important data is extracted from logs using Decoders.
- Learn how alerts are triggered using Rules.
- Learn how to add new rules to extend detection capabilities.
- Learn how to simulate a real-world attack to test existing rules.
Room Prerequisites
- Knowledge and experience with Wazuh — If you need an overview of its features, visit the Wazuh room.
- Familiarity with regular expressions — Wazuh decoders and rules rely heavily on regular expressions, so brush up by checking out the Regular Expressions room.
- Knowledge of Sysmon — We’ll use Sysmon logs as an example for this room.
Connecting to the machine
We will interact with the Wazuh dashboard and server installed on a virtual machine for this room.
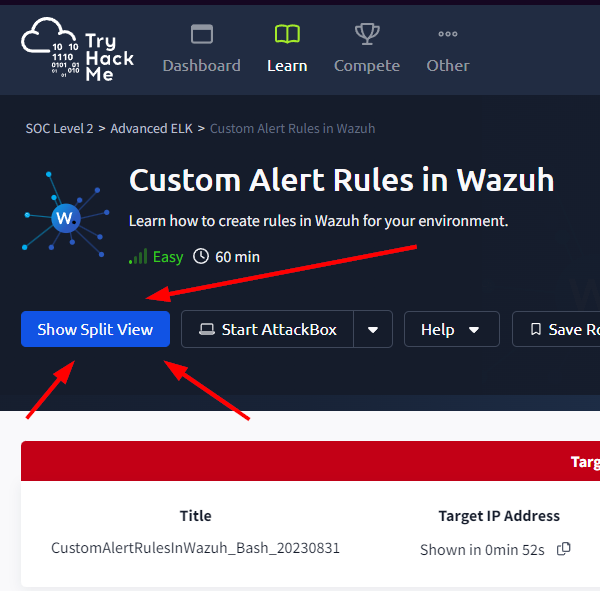
Start the virtual machine in split-screen view by clicking on the green “Start Machine” button on the upper right section of this task.
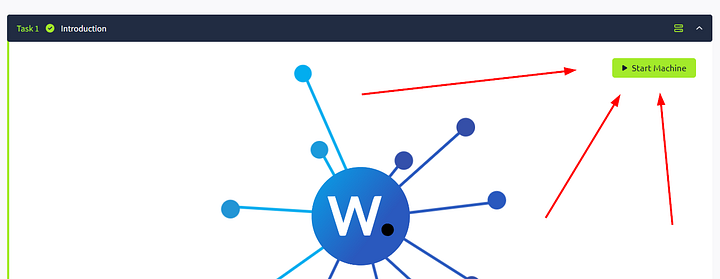
If the VM is not visible, use the blue Show Split View button at the top-right of the page.
Leave the VM running for 5 minutes for Wazuh to finish setting up. The steps to access the dashboard and server will be given in later tasks.
Task 2 Decoders
One of the many features of Wazuh is that it can ingest logs from different sources and generate alerts based on their contents. However, various logs can have varied data types and structures. To manage this, Wazuh uses Decoders that use regex to extract only the needed data for later use.
Understanding Decoders
To help us better understand what Decoders are and how they work, let us look at how logs from a tool like Sysmon (System Monitor) are processed. As a popular tool, there is already a pre-existing decoder for this listed in the windows_decoders.xml file on Wazuh’s Github page. This file can also be downloaded for your reference by clicking on the “Download Task Files” button on the top right corner of this task.
1
2
3
4
5
6
7
<decoder name="Sysmon-EventID#1_new">
    <parent>windows</parent>
    <type>windows</type>
    <prematch>INFORMATION\(1\).+Hashes</prematch>
    <regex>Microsoft-Windows-Sysmon/Operational: \S+\((\d+)\)</regex>
    <order>id</order>
</decoder>
Let’s break down the parts of this Decoder block:
- decoder name — The name of this decoder. (Note: Multiple decoder blocks can have the same name; think of this as though they are being grouped together).
- parent — The name of the parent decoder. The parent decoder is processed first before the children are
- prematch — Uses regular expressions to look for a match. If this succeeds, it will process the “regex” option below.
- regex — Uses regular expressions to extract data. Any string in between a non-escaped open and closed parenthesis is extracted.
- order — Contains a list of names to which the extracted data will be stored.
There are a whole lot more options that can be set for decoders. For now, we are only interested in the ones listed above. If you want to check out all the options, you can visit the Wazuh documentation’s Decoder Syntax page.
For us to know what data is to be extracted, we need to look at an example log entry from Sysmon:
1
Mar 29 13:36:36 WinEvtLog: Microsoft-Windows-Sysmon/Operational: INFORMATION(1): Microsoft-Windows-Sysmon: SYSTEM: NT AUTHORITY: WIN-P57C9KN929H: Process Create:  UtcTime: 2017-03-29 11:36:36.964  ProcessGuid: {DB577E3B-9C44-58DB-0000-0010B0983A00}  ProcessId: 3784  Image: C:\Windows\System32\WindowsPowerShell\v1.0\powershell.exe  CommandLine: "C:\Windows\System32\WindowsPowerShell\v1.0\powershell.exe" "-file" "C:\Users\Alberto\Desktop\test.ps1"  CurrentDirectory: C:\Users\Alberto\Desktop\  User: WIN-P57C9KN929H\Alberto  LogonGuid: {DB577E3B-89E5-58DB-0000-0020CB290500}  LogonId: 0x529cb  TerminalSessionId: 1  IntegrityLevel: Medium  Hashes: MD5=92F44E405DB16AC55D97E3BFE3B132FA,SHA256=6C05E11399B7E3C8ED31BAE72014CF249C144A8F4A2C54A758EB2E6FAD47AEC7  ParentProcessGuid: {DB577E3B-89E6-58DB-0000-0010FA3B0500}  ParentProcessId: 2308  ParentImage: C:\Windows\explorer.exe  ParentCommandLine: C:\Windows\Explorer.EXE
The log entry above shows an example event a Wazuh agent installed in a Windows machine sent. It describes an event where the user ran a PowerShell script named test.ps1 from his system using the powershell.exe executable initiated by the Explorer process (C:\Windows\explorer.exe). As you can see, there’s a lot of data in there, and it is a decoder’s job to extract them.
Once this log entry is ingested, all appropriate decoder blocks will kick into action where they will first check the prematch option.
The decoder block above will check if any strings match the regular expression, “INFORMATION(1).+Hashes”.
If you feel your regex-fu needs some refreshing, let’s break down the step-by-step process of how this will go:
- First, the regex will look for the
INFORMATIONstring. - Followed by an escaped open parenthesis
\(. - Followed by a number
1. - Followed by an escaped close parenthesis
\). - And then any number of characters
.+. - Until it reaches the
Hashesstring.
If you check the expression above with the log entry, you will find out it is a match. And because it is a match, the decoder would process the regex option below. This time it will try to match the string, “Microsoft-Windows-Sysmon/Operational: \S+((\d+))”:
- First, the regex will look for the
Microsoft-Windows-Sysmon/Operational:string. - Followed by any string of any length
\S+. - Followed by an escaped open parenthesis.
- Followed by an open parenthesis
((Remember, this is where the extracted data will start). - Then by any digit character of any length
\d+. - Then a closing parenthesis
)(This is where the extracted data ends). - And finally followed by an escaped closing parenthesis
\).
After all of the above steps, the value of 1 will be extracted and stored in the id field as listed it the order option.
Testing the Decoder
We can quickly test decoders from the Wazuh dashboard using the “Ruleset Test” tool. But first, let’s access the dashboard:
- If you haven’t yet, run the virtual machine by pressing the “Start Machine” button on Task 1. Wait for a few minutes for Wazuh to load correctly.
- To access the Wazuh dashboard, you can do it in two ways:
- Connect via OpenVPN (More info here) and then type the machine’s IP
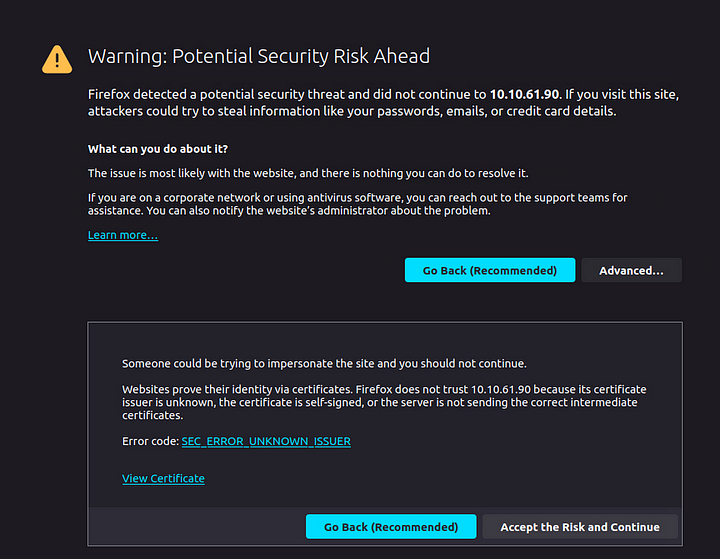
http://MACHINE_IPon your browser’s address bar. Log in to AttackBox VM, open the web browser inside AttackBox, and then type the machine’s IP
http://MACHINE_IPon the address bar.- You’ll encounter a Security alert, which you can safely ignore by clicking “Advanced > Accept the Risk and Continue”.
- When presented with the Wazuh login screen, enter
wazuhfor the username andTryHackMe!for the password.
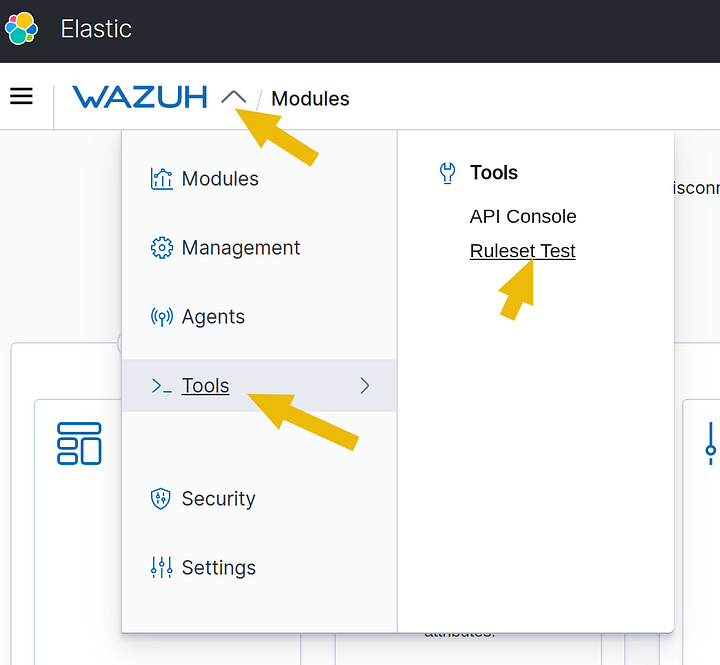
Once in the Wazuh dashboard, access the “Ruleset Test” tool page by doing the following:
- Click on the dropdown button on the Wazuh Logo
- Click on Tools > Ruleset Test
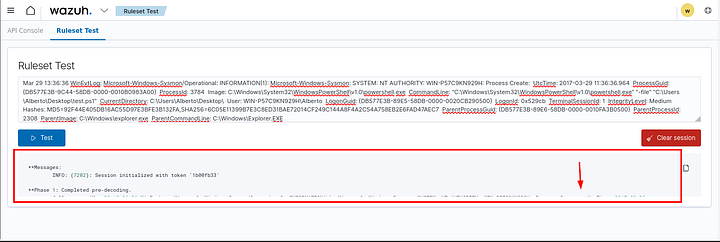
Once on the Ruleset Test page, paste the example Sysmon log entry above into the textbox and click the “Test” button. This will output the following results:
1
2
3
4
5
6
7
8
9
10
11
12
13
14
15
16
17
18
19
20
21
22
23
24
25
26
27
28
29
**Phase 1: Completed pre-decoding.
    full event:  Mar 29 13:36:36 WinEvtLog: Microsoft-Windows-Sysmon/Operational: INFORMATION(1): Microsoft-Windows-Sysmon: SYSTEM: NT AUTHORITY: WIN-P57C9KN929H: Process Create:  UtcTime: 2017-03-29 11:36:36.964  ProcessGuid: {DB577E3B-9C44-58DB-0000-0010B0983A00}  ProcessId: 3784  Image: C:\Windows\System32\WindowsPowerShell\v1.0\powershell.exe  CommandLine: "C:\Windows\System32\WindowsPowerShell\v1.0\powershell.exe" "-file" "C:\Users\Alberto\Desktop\test.ps1"  CurrentDirectory: C:\Users\Alberto\Desktop\  User: WIN-P57C9KN929H\Alberto  LogonGuid: {DB577E3B-89E5-58DB-0000-0020CB290500}  LogonId: 0x529cb  TerminalSessionId: 1  IntegrityLevel: Medium  Hashes: MD5=92F44E405DB16AC55D97E3BFE3B132FA,SHA256=6C05E11399B7E3C8ED31BAE72014CF249C144A8F4A2C54A758EB2E6FAD47AEC7  ParentProcessGuid: {DB577E3B-89E6-58DB-0000-0010FA3B0500}  ParentProcessId: 2308  ParentImage: C:\Windows\explorer.exe  ParentCommandLine: C:\Windows\Explorer.EXE
    timestamp: Mar 29 13:36:36
    hostname: WinEvtLog:
    program_name: WinEvtLog


**Phase 2: Completed decoding.
    name: windows
    parent: windows
    data: {
      "srcuser": "WIN-P57C9KN929H\\Alberto",
      "id": "1",
      "sysmon": {
            "processGuid": "{DB577E3B-9C44-58DB-0000-0010B0983A00    }",
            "processId": "3784",
            "image": "C:\\Windows\\System32\\WindowsPowerShell\\v1.0\\powershell.exe",
            "commandLine": "\"C:\\Windows\\System32\\WindowsPowerShell\\v1.0\\powershell.exe\" \"-file\" \"C:\\Users\\Alberto\\Desktop\\test.ps1\"",
            "currentDirectory": "C:\\Users\\Alberto\\Desktop\\",
            "logonGuid": "{DB577E3B-89E5-58DB-0000-0020CB290500}",
            "logonId": "0x529cb",
            "terminalSessionId": "1",
            "integrityLevel": "Medium",
            "hashes": "92F44E405DB16AC55D97E3BFE3B132FA,SHA256=6C05E11399B7E3C8ED31BAE72014CF249C144A8F4A2C54A758EB2E6FAD47AEC7",
            "parentProcessGuid": "{DB577E3B-89E6-58DB-0000-0010FA3B0500}",
            "parentProcessId": "2308",
            "parentImage": "C:\\Windows\\explorer.exe"
      }
}
As you can see in the output above, this output has three stages. For the topic of Decoders, we will focus on the first two phases for now.
- Phase 1 is the pre-decoding phase. The event log is parsed, and the header details like timestamp, hostname, and program_name are retrieved. This is done automatically on the backend by Wazuh.
- Phase 2 is the decoding phase, where the decoders do their magic. When done, all the extracted data from the declared decoder blocks are displayed here. For example, we can see in the results that the “id” field has been assigned the value of 1, which shows that the decoder works.
As for the other data like “processGuid”, “processId”, etc.), they were extracted by a separate decoder block, like the one below:
1
2
3
4
5
6
7
<decoder name="Sysmon-EventID#1_new">
    <parent>windows</parent>
    <type>windows</type>
    <regex offset="after_regex">ProcessGuid: (\.*) \s*ProcessId: (\.*) \s*Image: (\.*) \s*CommandLine: (\.*)\s+CurrentD</regex>
    <order>sysmon.processGuid, sysmon.processId, sysmon.image, sysmon.commandLine</order>
</decoder>
You will notice more values in the order option in this decoder. Each named value corresponds to the number of data enclosed in the parenthesis found in the regex option. In this case, the data in the first pair of parenthesis() will be stored on sysmon.processGuid, the second on sysmon.processId, and so on.
Answer the questions below
Looking at the Sysmon Log, what will the value of sysmon.commandLine be?
Back on Wazuh, you want to look at the results box. Scroll down in said box till you find sysmon.commandline or using the find feature (ctrl + f ) type sysmon.commandline.
or

Once you find the row starting with sysmon.commanLine, you will see the asnwer in the rest of the row. The answer will include the double qoutes ( “ ) and everything inbetween. After you have copied the answer, paste it into the THM answer field. Then click Submit.

ANSWER: “C:\Windows\System32\WindowsPowerShell\v1.0\powershell.exe” “-file” “C:\Users\Alberto\Desktop\test.ps1”
What would the extracted value be if the regex is set to “User: \S*”?
Now to be honest, it took me a couple of time reading the question to realize what THM wants us to do. We are not changing the windows_decoder. We need to understand the regex THM gives us. Then using that understanding look at the SysmonLog either above or in Wazuh.
Let’s look at the regex! It starts with User: , which looks for the word/string user followed by a colon ( : ) and a whitespace. Then we have \S*, which looks for any number of non-whitespace characters.
Using this knowledge we can start parsing the SysmonLog for User:. After you have found User: in the SysmonLog example, the answer will be what follows. Copy and paste the answer into the THM answer field. Then click Submit.
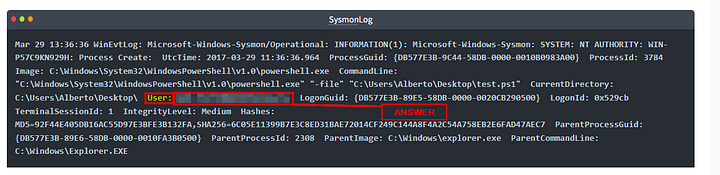
ANSWER: WIN-P57C9KN929H\Alberto
Task 3 Rules
Rules contain defined conditions to detect specific events or malicious activities using the extracted data from decoders. An alert is generated on the Wazuh dashboard when an event matches a rule.
In this task, we will look at the pre-existing Sysmon rules defined in the sysmon_rules.xml rule file found on Wazuh’s Github page. This file can also be downloaded for your reference by clicking on the “Download Task Files” button on the top right corner of this task.
The downloaded file contains multiple rule blocks, but we will focus primarily on blocks that look for suspicious Sysmon events with an ID of 1.
Understanding Rules
Here is an example of an alert rule that looks for the “svchost.exe” string in the “sysmon.image” field:
1
2
3
4
5
6
7
8
9
<rule id="184666" level="12">
        <if_group>sysmon_event1</if_group>
        <field name="sysmon.image">svchost.exe</field>
        <description>Sysmon - Suspicious Process - svchost.exe</description>
        <mitre>
          <id>T1055</id>
        </mitre>
    <group>pci_dss_10.6.1,pci_dss_11.4,...</group>
</rule>
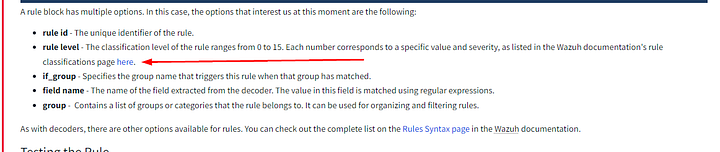
A rule block has multiple options. In this case, the options that interest us at this moment are the following:
- rule id — The unique identifier of the rule.
- rule level — The classification level of the rule ranges from 0 to 15. Each number corresponds to a specific value and severity, as listed in the Wazuh documentation’s rule classifications page here.
- if_group — Specifies the group name that triggers this rule when that group has matched.
- field name — The name of the field extracted from the decoder. The value in this field is matched using regular expressions.
- group — Contains a list of groups or categories that the rule belongs to. It can be used for organizing and filtering rules.
As with decoders, there are other options available for rules. You can check out the complete list on the Rules Syntax page in the Wazuh documentation.
Testing the Rule
Go back to the “Ruleset Test” page. Paste the exact log entry we used in the previous task. The result should be the same, but this time, we will focus on Phase 3 of the output.
1
2
3
4
5
6
7
8
9
10
11
12
13
14
15
**Phase 3: Completed filtering (rules).
    id: 184665
    level: -
    description: Sysmon - Event 1
    groups: ["sysmon","sysmon_event1"]
    firedtimes: 1
    gdpr: "-"
    gpg13: "-"
    hipaa: "-"
    mail: "-"
    mitre.id: "-"
    mitre.technique: "-"
    nist_800_53: "-"
    pci_dss: "-"
    tsc: "-"
Phase 3 shows what information an alert would contain when a rule is triggered, like “id”, “level”, “description”, etc.
Right now, the output shows that the triggered rule ID is 184665. This is not the rule block that we examined above, which has the ID of 184666. The reason for this is that 184666 is looking for “svchost.exe” in the “sysmon.image” field option. For this rule to trigger, we need to change “C:\Windows\System32\WindowsPowerShell\v1.0\powershell.exe” to “C:\WINDOWS\system32\svchost.exe”, as shown below:
1
Mar 29 13:36:36 WinEvtLog: Microsoft-Windows-Sysmon/Operational: INFORMATION(1): Microsoft-Windows-Sysmon: SYSTEM: NT AUTHORITY: WIN-P57C9KN929H: Process Create:  UtcTime: 2017-03-29 11:36:36.964  ProcessGuid: {DB577E3B-9C44-58DB-0000-0010B0983A00}  ProcessId: 3784  Image: C:\WINDOWS\system32\svchost.exe  CommandLine: "C:\Windows\System32\WindowsPowerShell\v1.0\powershell.exe" "-file" "C:\Users\Alberto\Desktop\test.ps1"  CurrentDirectory: C:\Users\Alberto\Desktop\  User: WIN-P57C9KN929H\Alberto  LogonGuid: {DB577E3B-89E5-58DB-0000-0020CB290500}  LogonId: 0x529cb  TerminalSessionId: 1  IntegrityLevel: Medium  Hashes: MD5=92F44E405DB16AC55D97E3BFE3B132FA,SHA256=6C05E11399B7E3C8ED31BAE72014CF249C144A8F4A2C54A758EB2E6FAD47AEC7  ParentProcessGuid: {DB577E3B-89E6-58DB-0000-0010FA3B0500}  ParentProcessId: 2308  ParentImage: C:\Windows\explorer.exe  ParentCommandLine: C:\Windows\Explorer.EXE
When this is done, press the “Test” button again to run the Ruleset Test. The output should now be different, especially in Phase 3:
1
2
3
4
5
6
7
8
9
10
11
12
13
14
15
16
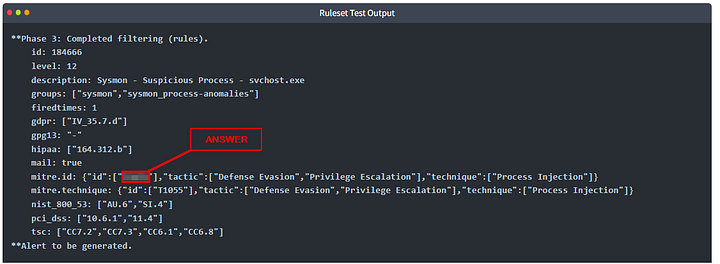
**Phase 3: Completed filtering (rules).
id: 184666
level: 12
description: Sysmon - Suspicious Process - svchost.exe
groups: ["sysmon","sysmon_process-anomalies"]
firedtimes: 1
gdpr: ["IV_35.7.d"]
gpg13: "-"
hipaa: ["164.312.b"]
mail: true
mitre.id: {"id":["T1055"],"tactic":["Defense Evasion","Privilege Escalation"],"technique":["Process Injection"]}
mitre.technique: {"id":["T1055"],"tactic":["Defense Evasion","Privilege Escalation"],"technique":["Process Injection"]}
nist_800_53: ["AU.6","SI.4"]
pci_dss: ["10.6.1","11.4"]
tsc: ["CC7.2","CC7.3","CC6.1","CC6.8"]
**Alert to be generated.
Because our rule now matches the log, the triggered Rule is now 184666. There is now also more information on the output thanks to the mitre and group options in the rule block.
Answer the questions below
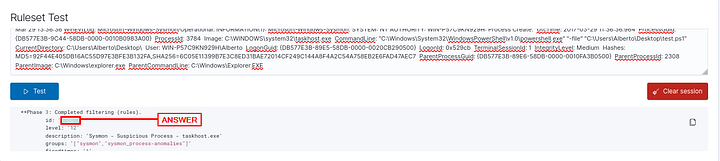
From the Ruleset Test results, what is the ID of rule id 184666?
Since you can find this answer above, I won’t be sharing it here. As the question states, From the Ruleset Test results. We will be looking at the final code block above. Look through the results till you see mitre.id. Once you find it, look to the right. Right after “id”:, in brackets ( [ ) and double qoutes ( “ ) you will find the answer. Copy or type the answer into the THM answer field. Then click Submit.
According to the Wazuh documentation, what is the description of the rule with a classification level of 12?
We need to first get to the Wazuh Documentation page. The link is shared above in the Understanding Rules section. In the breakdown of the different parts of the rule block. You will find a link in the rule level description. Click on that link.
You will now be on the Wazuh Documentation Rules Classsification Page. As you can see, there is a chart that has Level, Title, and Description. Scroll down the page till you see Level 12.

Once you reach Level 12, look to the column to right. This is the answer to the question. Copy and Paste or Type the answer into the THM answer field. Then click Submit.
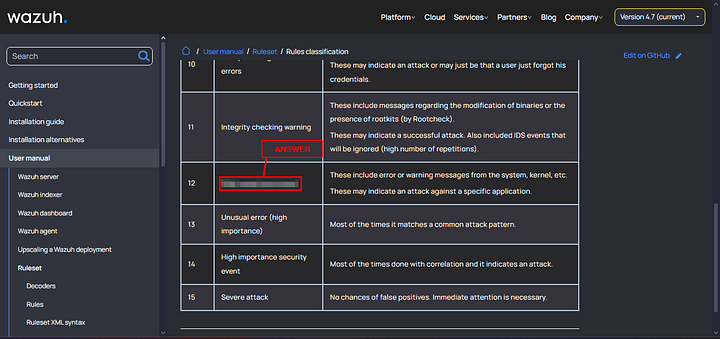
ANSWER: High importance event
In the Ruleset Test page, change the value of “sysmon.image” to “taskhost.exe’, and press the “Test” button again. What is the ID of the rule that will get triggered?
Head back over to Wazuh. In the question the value we want to change is sysmon.image. The logs are sysmon logs which takes care of the first part of this. Which leaves image, meaning in the log file we need to look for Image:. After you have parsed the Log File and found Image:, follow the program path which ends with svcho_st.exe._

Now we need to change svchost.exe to taskhost.exe. Once you have done this, click the blue Test button on the left side of the screen.

Once the test has finished running. Scroll down to Phase 3: in output section. When you have reached the the Phase 3: section, the first row you will see in the ouput is id:. The answer can be found within the single qoutes ( ‘ ). Once you see it copy and paste or type the answer into the THM answer field. Then click Submit.
ANSWER:184736
Task 4 Rule Order
In Wazuh, rules are processed based on several factors determining rule order. One factor that will be discussed that is relevant to making custom rules is the “if” condition prerequisites.
We’ve seen the if_group option in the previous task, but there are other “if” condition prerequisites like the if_sid option shown below:
1
2
3
4
5
<rule id="184667" level="0">
    <if_sid>184666</if_sid>
    <field name="sysmon.parentImage">\\services.exe</field>
    <description>Sysmon - Legitimate Parent Image - svchost.exe</description>
</rule>
- if_sid — Specifies the ID of another rule that triggers this rule. In this example, the rule is triggered if an event with the ID of
184666has been triggered.
These “if” condition prerequisites are considered the “parent” that must be evaluated first. Because of this parent-child relationship, it is essential to note that Wazuh Rules are triggered from a top-to-down manner. When rules are processed, the condition prerequisites are checked, and the rule order is updated.
Testing the Rule Order
Go back to the “Ruleset Test” page. Paste the exact log entry we used in the previous task. We want to trigger Rule ID 184667, so our Sysmon log entry should have the value of “sysmon.parentImage” changed to C:\\Windows\\services.exe.
The log entry should now look like the one below:
1
Mar 29 13:36:36 WinEvtLog: Microsoft-Windows-Sysmon/Operational: INFORMATION(1): Microsoft-Windows-Sysmon: SYSTEM: NT AUTHORITY: WIN-P57C9KN929H: Process Create:  UtcTime: 2017-03-29 11:36:36.964  ProcessGuid: {DB577E3B-9C44-58DB-0000-0010B0983A00}  ProcessId: 3784  Image: C:\WINDOWS\system32\svchost.exe  CommandLine: "C:\Windows\System32\WindowsPowerShell\v1.0\powershell.exe" "-file" "C:\Users\Alberto\Desktop\test.ps1"  CurrentDirectory: C:\Users\Alberto\Desktop\  User: WIN-P57C9KN929H\Alberto  LogonGuid: {DB577E3B-89E5-58DB-0000-0020CB290500}  LogonId: 0x529cb  TerminalSessionId: 1  IntegrityLevel: Medium  Hashes: MD5=92F44E405DB16AC55D97E3BFE3B132FA,SHA256=6C05E11399B7E3C8ED31BAE72014CF249C144A8F4A2C54A758EB2E6FAD47AEC7  ParentProcessGuid: {DB577E3B-89E6-58DB-0000-0010FA3B0500}  ParentProcessId: 2308  ParentImage: C:\Windows\services.exe  ParentCommandLine: C:\Windows\Explorer.EXE
Pressing the “Test” button would then output the following:
1
2
3
4
5
6
7
8
9
10
11
12
13
14
15
**Phase 3: Completed filtering (rules).
    id: 184667
    level: -
    description: Sysmon - Legitimate Parent Image - svchost.exe
    groups: ["sysmon","sysmon_process-anomalies"]
    firedtimes: 1
    gdpr: "-"
    gpg13: "-"
    hipaa: "-"
    mail: "-"
    mitre.id: "-"
    mitre.technique: "-"
    nist_800_53: "-"
    pci_dss: "-"
    tsc: "-"
We can see that the triggered rule is 184667, which is what we expected. What is not shown in the output, however, is that before 184667 was triggered, Wazuh first checked if_sid and found that Rule ID184666 was a prerequisite. Before rule ID 184666, Wazuh then saw that it has if_group set to sysmon_event1, which is associated with Rule ID 184665. This goes on and on until all the chains of prerequisites are satisfied.
Answer the questions below
In the sysmon_rules.xml file, what is the Rule ID of the parent of 184717?
We need to head back to the privious task (Task 3 Rules) to start finding this answer. At the top of the task you will see a link that will take you to the sysmon_rules.xml Github page. Click on this link.

Once on the page we want to use the find feature of your browser. Press ctrl + f, a search box should appear. Type into it 184717. You should get one result.

You should be taken directly to it. But in the question it is asking what the Parent of this event is. From what we read above, we know that events work from the top down. Which means that the event above the ID we looked up is the Parent to it. Look at the id= of the event above 184717. The number between the double quotes ( “ ) is the answer. Type or Copy and Paste it into the THM answer field. Then click Submit.
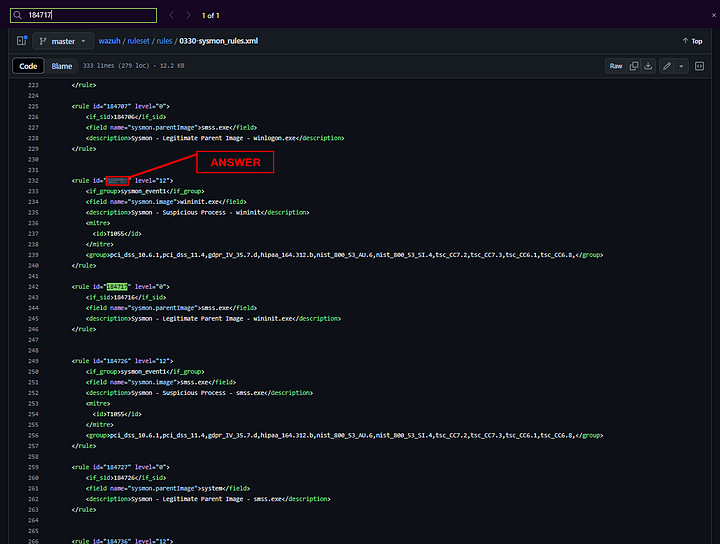
ANSWER: 184716
Task 5 Custom Rules
As mentioned before, the pre-existing rules are comprehensive. However, it cannot cover all use cases, especially for organizations with unique needs and requirements. To compensate for this, we can modify or create new rules to customize them for our needs.
There are several reasons why we want to have custom rules:
- You want to enhance the detection capabilities of Wazuh.
- You are integrating a not-so-well-known security solution.
- You use an old version of a security solution with an older log format.
- You recently learned of a new attack and want to create a specific detection rule.
- You want to fine-tune a rule.
We’ve previously looked at how Wazuh processes Sysmon logs from Windows, so this time, let’s look at the rules for auditd for Linux machines and whether it can detect file creation events via Syscalls. This time we will be looking at the auditd_rules.xml rule file found on Wazuh’s Github page. This file can also be downloaded for your reference by clicking on the “Download Task Files” button on the top right corner of this task.
To help us better understand how to build our custom rule, let’s look at an example of an auditd log:
1
type=SYSCALL msg=audit(1479982525.380:50): arch=c000003e syscall=2 success=yes exit=3 a0=7ffedc40d83b a1=941 a2=1b6 a3=7ffedc40cce0 items=2 ppid=432 pid=3333 auid=0 uid=0 gid=0 euid=0 suid=0 fsuid=0 egid=0 sgid=0 fsgid=0 tty=pts0 ses=2 comm="touch" exe="/bin/touch" key="audit-wazuh-w" type=CWD msg=audit(1479982525.380:50):  cwd="/var/log/audit" type=PATH msg=audit(1479982525.380:50): item=0 name="/var/log/audit/tmp_directory1/" inode=399849 dev=ca:02 mode=040755 ouid=0 ogid=0 rdev=00:00 nametype=PARENT type=PATH msg=audit(1479982525.380:50): item=1 name="/var/log/audit/tmp_directory1/malware.py" inode=399852 dev=ca:02 mode=0100644 ouid=0 ogid=0 rdev=00:00 nametype=CREATE type=PROCTITLE msg=audit(1479982525.380:50): proctitle=746F756368002F7661722F6C6F672F61756469742F746D705F6469726563746F7279312F6D616C776172652E7079
The log describes an event wherein a touch command (probably as root user) was used to create a new file called malware.py in the /var/log/audit/tmp_directory1/ directory. The command was successful, and the log was generated based on an audit rule with the key “audit-wazuh-w”.
When Wazuh ingests the above log, the pre-existing rule below will get triggered because of the value of <match>:
1
2
3
4
5
6
<rule id="80790" level="3">
    <if_group>audit_watch_write</if_group>
    <match>type=CREATE</match>
    <description>Audit: Created: $(audit.file.name)</description>
    <group>audit_watch_write,audit_watch_create,gdpr_II_5.1.f,gdpr_IV_30.1.g,</group>
</rule>
Adding Local Rules
For this exercise, let’s create a custom rule that will override the above rule so we have more control over the information we display.
To do this, you need to do the following:
- Connect to the server using SSH at
MACHINE_IPand usethmfor the username andTryHackMe!the password. The credentials and connection details are listed in Task 1 of this room.

- Use the
sudo sucommand to become the root user.

- Open the file
/var/ossec/etc/rules/local_rules.xmlusing your favourite editor.

- Paste the following text at the end of the file: ```
1
2
3
4
5
6
7
8
9
10
11
12
13
14
15
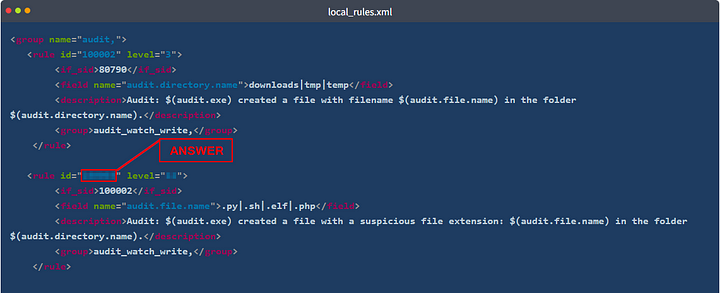
The rule above will get triggered if a file is created in the downloads, tmp, or temp folders. Let’s break this down so we can better understand:
- **group name=”audit,” **— We are setting this to the same value as the grouped rules in audit_rules.xml.
- **rule id=”100002" **— Each custom rule needs to have a unique ID. Custom IDs start from `100001` onwards. Since there is already an existing example rule that uses `100001`, we are going to use `100002`.
- **level=”3"** — We are setting this to 3 (Successful/Authorized events) because a file created in these folders isn’t necessarily malicious.
- **if_sid** — We set the parent to rule ID `80790` because we want that rule to be processed before this one.
- **field name=”audit.directory.name” **— The string here is matched using regex. In this case, we are looking for tmp, temp, or downloads matches. This value is compared to the `audit.cwd` variable fetched by the auditd decoder.
- **description **— The description that will appear on the alert. Variables can be used here using the format `$(variable.name)`.
- **group** — Used for grouping this specific alert. We just took the same value from rule `80790`.
Save the file and run the code below to restart wazuh-manager so it can load the new custom rules:
systemctl restart wazuh-manager
Go back to the Wazuh dashboard, access the “Ruleset Test” page and paste the sample auditd log entry found above. If all goes well, you should see the following “Phase 3” output:
**Phase 3: Completed filtering (rules).
id: ‘100002’
level: ‘3’
description: ‘Audit: /bin/touch created a file with filename /var/log/audit/tmp_directory1/malware.py the folder /var/log/audit.’
groups: ‘[“audit”,”audit_watch_write”]’
firedtimes: ‘1’
mail: ‘false’
1
2
3
4
5
6
7
8
9
10
11
12
13
14
15
16
17
18
19
20
21
22
23
24
25
26
27
From the results above, we can see that the custom rules that we created triggered an alert successfully.
----------
## Answer the questions below
### What is the regex field name used in the local_rules.xml?
You can easily find the answer to this question above, because of which, I won’t be sharing the anwer here. Scroll up till you reach the breakdown of the custom rule we added. Parse down through till you see _field name=”audit.directory.name”_. Read through this line. Once you find the answer, copy and paste or type it into the THM answer field. The click _Submit_.

### Looking at the log, what is the current working directory (cwd) from where the command was executed?
Heading back over to Wazuh. We want to be looking in _Phase 2_ section. THM gave us the hint with _cwd_ in the question. As you can see once the _audit.{field_name}_ starts, the results are alphabetized. Meaning you should easily find the _audit.cwd_. When you do, the answer will be found in between the single qoutes ( ‘ ). Type or Copy and Paste it into the THM answer field. Then click _Submit_.

_ANSWER: /var/log/audit_
----------
## Task 6 Fine-Tuning
You can fine-tune the custom rule by adding more child rules, each focusing on specific related data from the logs. For example, you can use the values decoded by `auditd` decoder, as shown in the Phase 2 results of the previous test.
**Phase 2: Completed decoding.
name: ‘auditd’
parent: ‘auditd’
audit.arch: ‘c000003e’
audit.auid: ‘0’
audit.command: ‘touch’
audit.cwd: ‘/var/log/audit’
audit.directory.inode: ‘399849’
audit.directory.mode: ‘040755’
audit.directory.name: ‘/var/temp/downloads/tmp_directory1/’
audit.egid: ‘0’
audit.euid: ‘0’
audit.exe: ‘/bin/touch’
audit.exit: ‘3’
audit.file.inode: ‘399852’
audit.file.mode: ‘0100644’
audit.file.name: ‘/var/log/audit/tmp_directory1/malware.py’
….
1
We can use the above data to make our detection rules as broad or as specific as needed. The following is an expanded version of `local_rules.xml` that incorporates more of the log's data.
``` You can test these rules by updating the local_rules.xml file and checking the output on the Ruleset Test Page.
Answer the questions below
The answers can be found above in the local_rules.xml above. Below, I will explain how to find them.
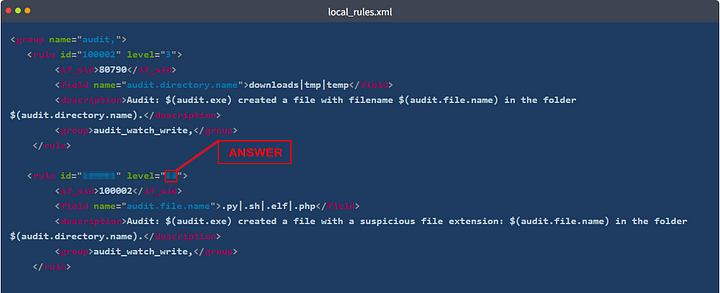
If the filename in the logs is “test.php”, what rule ID will be triggered?
You first want to parse the local_rules.xml code block, looking at each field name section. This will tell you what the rule is looking for, both with the name of the rule along with the regex it is using. Here is a list of the field names along with their regex:
_audit.directory.name — downloads tmp temp_ _audit.file.name — .py .sh .elf .php_ - audit.success — no
_audit.file.name — malware shell dropper linpeas_ - audit.file.name malware-checker.py
From the question, we know that the filename from the logs is test.php. Remember that Wazuh starts at the top and works it’s way down through the rules. We can see that it won’t match for the first rule, but the file ends with .php. Meaning it would match for the second rule. So now we need to look in the local_rules.xml code block at the second rule. The first row gives you the id and level. Once you see the id, copy and paste or type the answer into the THM answer field. Then click Submit.
If the filename in the logs is “malware-checker.sh”, what is the rule classification level in the generated alert?
Again, remembering that Wazuh looks at rules from the top down. It would match to the second rule again, since the file name ends with .sh. Even with the file name starting with malware-checker. Head back to the local_rules.xml code block, and to the second rule. The first row gives you the id and level. Once you see the level, copy and paste or type the answer into the THM answer field. Then click Submit.
Task 7 Conclusion
You should now know how to create custom rules to expand the detection capabilities for your organization. You would need to make many rules to cover a wide range of attacks, but these are all necessary to improve your security further.
As a recap, we learned the following:
- What decoders and rules are
- How decoders extract essential data from logs
- How rules use extracted data from decoders
- How rules are triggered and in what order
- How to customize rules
- How to test rules
While we’ve covered a lot in this room, note that this is just one aspect of the power that Wazuh offers. In future rooms, we hope to explore more of Wazuh’s robust features to help fortify an organization’s security posture.