This is from the Udemy course on learning PowerShell, what is ahead is a student assignment. Here is the link to said course:
Introduction to Windows PowerShell 5.1
I highly recommended it for anyone that wants to learn PowerShell!! So after this section in the course, the students have a PDF they can download with questions to answer. This is my answer to said questions, or how I got to the answers.
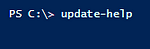
1. Update PowerShell Help
This one is a simple command of Update-Help.
But if you get an error, you can add to the command.

You can use the command Update-Help -Verbose -ErrorAction SilentlyContinue, this will update the PowerShell help along with allow you to see what is going on with Verbose. Not to mention silent any errors.

2. Create a persistent PSDrive on your computer called T: Be sure this drive remains in Windows explorer after you close PowerShell.
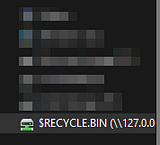
We learned about mapping PowerShell drives in the How to use PSDrive video, so looking back at that there is a command that you have to change around. Modifying Command #3 from that video, this is what I am coming up with New-PSDrive -Name ‘T’ -PSProvider FileSystem -Root “\\127.0.0.1C’$\’RECYCLE.BIN” -persist

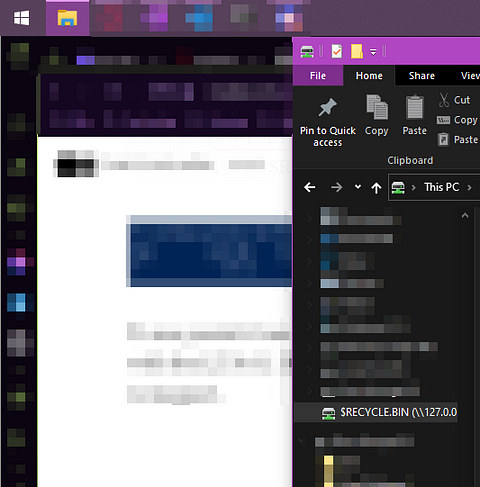
To use persist it must go to a remote PC, so to get around that we loop back with the 127.0.0.1 IP address. Now checking File explorer, we can see that it is mapped.
As you can kinda see PowerShell is not open put the drive still persist. Let’s move onto the next question and remove it.
Now that we have created the persistent PSDrive, we can move onto the next question.
3. Remove the PSDrive called T: from Windows explorer.
To be honest I was having lots of trouble with this. The command is Remove-PSDrive T , and press enter. That should be it but it wasn’t removing the drive. After looking into it I tried Remove-SmbMapping T:, it disconnected the drive but now I can’t delete it so I will be coming back to this one.
4. Create 5 folders add them, then remove them from the stack.
Starting in your directory of choice, for me, I had a Test directory in my C:. So in this directory we can make a new folder with the command mkdir {name of folder}. If you add a comma in between each name, you can add multiple folders at one, mkdir {name of folder}, {name of folder} .... . Doing this, I created all five folders.

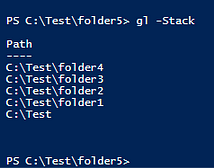
Now that all five folders are created, let’s add them to the stack. This can be achieved by using the pushd command, which pushes the folder onto the stack. So we start with the command pushd C:\Test\folder1 , we will see that our current working directory will change. But then just follow down the list till you have all the folders on the stack, replacing the last folder with the next one, as seen below.

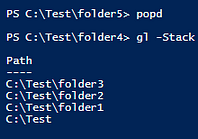
Using gl -Stack will show us the path/what’s currently in our stack, even though we did add folder5 it is in the stack, It is our current directory.
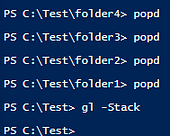
So we have added all the folders to stack, now let’s take them away. We can use the command popd which will pop the last item added to the stack off of the stack. We see that the current working directory changes, and if we run the command gl -Stack again, it changes.
Repeat the previous step four more times to empty the stack, and again type the command gl -Stack , and you will see nothing remains on the stack.
5. If you wanted to display all the files and folders in the root of your C: drive what cmdlet would you use? Demonstrate this.
To simple look at what is in the C:\ drive, we can use dir C:\, and press enter.
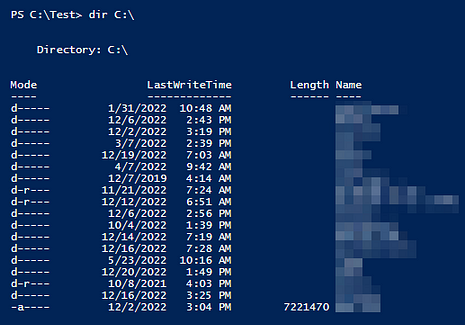
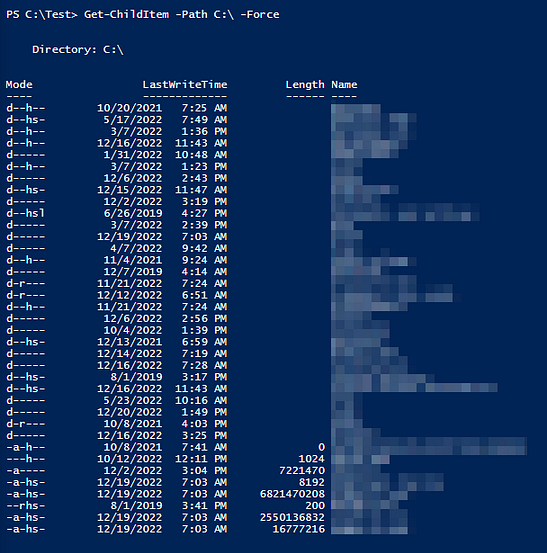
But it doesn’t seem like that is everything, so let us look into it further with a different command, Get-ChildItem -Path C:\ -Force. The Get-ChildItem command will get items from one or many directories, but since we used the parameter -Path it only got us items in the C:\ directory. After running this command, we see a big different in our results.
6. Using a PowerShell command create a folder named MYFolder and two txt files Carl1 and Carl2 on your C drive.
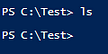
So I will be doing this in my C:\Test directory again, running ls we can see nothing is inside this directory.
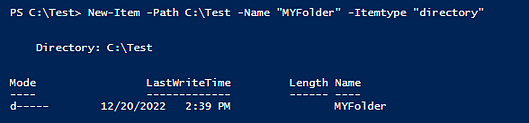
You can use two commands to make directories, the one I prefer is mkdir but the one that the question is asking for is the one I am going to demonstrate. Using the command New-Item -Path C:\Test -Name "MYFolder" -Itemtype "directory" , the New-Item will start the process of creating a new item, -Path tells PowerShell where to put it, -Name gives it a name, and finally -Itemtype defines what kind of item it is going to be.

After running the command, our output will look as it does below. We have then successfully created a folder, time to move on to the text files.
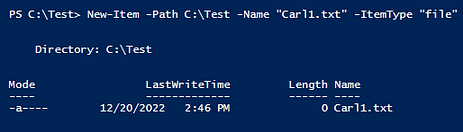
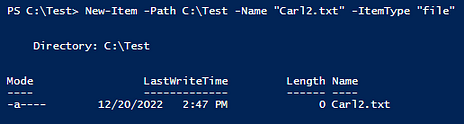
The syntax is quite similar to creating a folder, here is the command New-Item -Path C:\Test -Name "Carl1.txt" -Itemtype "file" . You only need to change the Name and the Itemtype. Do this twice, once for Carl1 and again for Carl2.
After you are done creating the folder and two text files, use the dir command to check the contents of the folder. You should see all three of them located inside.
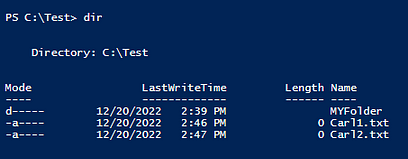
Now that we have created the MYFolder, and two text files, we can move onto the next question.
7. Use PowerShell to add content to one of the text files.
Start off by making sure nothing is on the text file, which it shouldn’t have anything since we just created it, by using the command notepad .\Carl1.txt

This will open up notepad, but nothing should be in it.

Then we want to add content using the command Add-Content C:\Test\Carl1.txt -Value "{put whatever text you want in here}" , press enter to run.

Run notepad .\Carl1.txt again, and notepad will open up. Now we have some text in our text file!!!

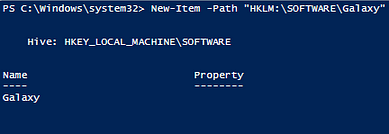
8. Use PowerShell to create a registry key called Galaxy. Add a new registry entry and a new property to the galaxy registry key. Add a value of 100 employees to Galaxy.
To create a new registry key, we can use a command we have previously used New-Item, but this time we are going to use the -Path and point it to the registry. Also, when working with the registry you need to be in admin mode with your PowerShell terminal, so make sure whatever you are using PowerShell in you have it open in admin mode. So the full command will be New-Item -Path "HKLM:\SOFTWARE\Galaxy, if you have the command correct it should look like it does below.
The key is now created, let us add 100 employees to it. To do this, we need to use the command New-ItemProperty, this will add a property to an item that has been created. In our case, the full command will be New-ItemProperty -Path HKLM:\SOFTWARE\Galaxy -Name NoOfEmployees -Value 100, if you ran the command properly it should look like it does below.

We have created the registry key, and added 100 employees to it. Time to move onto the next question.
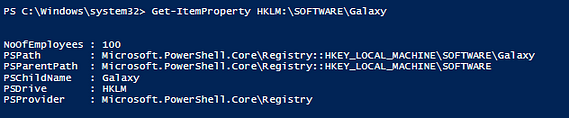
9. What Powershell cmdlet would you use to display all these registry entries? Demonstrate this.
For this we will use the Get- Powershell command, as in the previous question we used New-ItemProperty. This time it will be Get-ItemProperty HKLM:SOFTWARE\Galaxy. The Get- cmdlt with retrieve data of what is next in line, in our case it is ItemProperty, which is as it sounds the items that we retrieves’ properties. Lastly, we gave it the item with HKLM:\SOFTWARE\Galaxy, so putting it all together and running it, we see below we can see all the registry entries.
Time to move onto the next question.
10. Using PowerShell remove the Galaxy registry key.
Just like the previous question with the Get- to retrieve, we need to use the Remove- to remove. But like when we created it, we need to use Item not ItemProperty as we want to remove the whole thing not just a part of it. So the command we want to use is Remove-Item -Path "HKLM:\SOFTWARE\Galaxy". Press enter to run the command, if it was successful, you should not get a response, refer to the picture below, and the terminal will be ready for another command.

To test and see that it was removed, you can run the command from the previous question. You should get an error that states that the ItemProperty does not exist. You could also use the command Get-Item HKLM:\SOFTWARE\Galaxy, and you will get the same error. This means you have fully removed the registry key.

11. If you wanted to determine if the win.ini file existed in the C:\windows folder, what cmdlet would you use? Demonstrate this
For this we can use a cmdlt that will give us a True or False, with whether an item is located in said directory. The cmdlt is Test-Path, and can be used to see if a file is located somewhere or not. So the command would be Test-Path 'C:\Windows\win.ini', press enter to run the command. We get True, so then we know that the file does in fact existed in this directory.

Thank you for checking out these PowerShell questions, I hope you learned from them, as I definitely did as I answered them!! I should have more in the future. But for now CONGRATS!!!!!!!!