If you haven’t done task 4, 5, & 6 yet, here is the link to my write-up it: Task 4 First Interaction with Snort, Task 5 Operation Mode 1: Sniffer Mode, & Task 6 Operation Mode 2: Packet Logger Mode.
Getting the VM Started
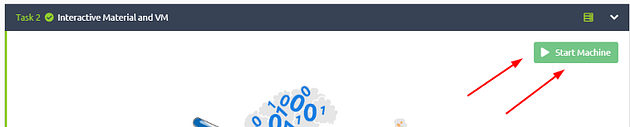
If you don’t have the VM started or running, head back to task 2. Once there click on the green button labeled Start Machine, in the top right of the task.
The screen should spit in half, if not scroll to the top of the page. You will see a blue button labeled Show Split View. Click this button to split the screen in half, with the TryHackMe room being on the Left and the Linux VM on the right


Getting the Terminal
Now before we can start, we need a terminal. On our Linux VM, you can find the terminal icon in the top left. Click the icon to open a terminal window.
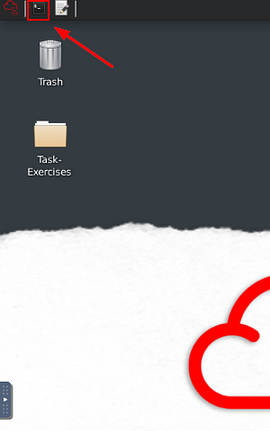
The terminal window will appear on the Linux VM screen.

Now you are ready to start the taskes ahead of you!!!!
Task 7 Operation Mode 3: IDS/IPS

Snort in IDS/IPS Mode
Capabilities of Snort are not limited to sniffing and logging the traffic. IDS/IPS mode helps you manage the traffic according to user-defined rules.
Note that (N)IDS/IPS mode depends on the rules and configuration. TASK-10 summarises the essential paths, files and variables. Also, TASK-3 covers configuration testing. Here, we need to understand the operating logic first, and then we will be going into rules in TASK-9.
Let’s run Snort in IDS/IPS Mode
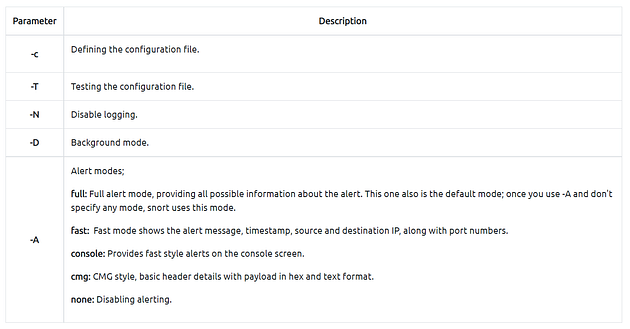
NIDS mode parameters are explained in the table below;
Let’s start using each parameter and see the difference between them. Snort needs active traffic on your interface, so we need to generate traffic to see Snort in action. To do this, use the traffic-generator script and sniff the traffic.
Once you start running IDS/IPS mode, you need to use rules. As we mentioned earlier, we will use a pre-defined ICMP rule as an example. The defined rule will only generate alerts in any direction of ICMP packet activity.
alert icmp any any <> any any (msg: "ICMP Packet Found"; sid: 100001; rev:1;)
This rule is located in “/etc/snort/rules/local.rules”.
Remember, in this module, we will focus only on the operating modes. The rules are covered in TASK9&10. Snort will create an “alert” file if the traffic flow triggers an alert. One last note; once you start running IPS/IDS mode, the sniffing and logging mode will be semi-passive. However, you can activate the functions using the parameters discussed in previous tasks. (-i, -v, -d, -e, -X, -l, -K ASCII) If you don’t remember the purpose of these commands, please revisit TASK4.
IDS/IPS mode with parameter “-c and -T”
Start the Snort instance and test the configuration file. sudo snort -c /etc/snort/snort.conf -T This command will check your configuration file and prompt it if there is any misconfiguratioın in your current setting. You should be familiar with this command if you covered TASK3. If you don’t remember the output of this command, please revisit TASK4.
IDS/IPS mode with parameter “-N”
Start the Snort instance and disable logging by running the following command: sudo snort -c /etc/snort/snort.conf -N
Now run the traffic-generator script as sudo and start ICMP/HTTP traffic. This command will disable logging mode. The rest of the other functions will still be available (if activated).
The command-line output will provide the information requested with the parameters. So, if you activate verbosity (-v) or full packet dump (-X) you will still have the output in the console, but there will be no logs in the log folder.
IDS/IPS mode with parameter “-D”
Start the Snort instance in background mode with the following command: sudo snort -c /etc/snort/snort.conf -D
Now run the traffic-generator script as sudo and start ICMP/HTTP traffic. Once the traffic is generated, snort will start processing the packets and accomplish the given task with additional parameters.
running in background mode
user@ubuntu$ sudo snort -c /etc/snort/snort.conf -D
Spawning daemon child…
My daemon child 2898 lives…
Daemon parent exiting (0)
The command-line output will provide the information requested with the parameters. So, if you activate verbosity (-v) or full packet dump (-X) with packet logger mode (-l) you will still have the logs in the logs folder, but there will be no output in the console.
Once you start the background mode and want to check the corresponding process, you can easily use the “ps” command as shown below;
running in background mode
user@ubuntu$ ps -ef | grep snort root 2898 1706 0 05:53 ? 00:00:00 snort -c /etc/snort/snort.conf -D
If you want to stop the daemon, you can easily use the “kill” command to stop the process.
running in background mode
user@ubuntu$ sudo kill -9 2898
Note that daemon mode is mainly used to automate the Snort. This parameter is mainly used in scripts to start the Snort service in the background. It is not recommended to use this mode unless you have a working knowledge of Snort and stable configuration.
IDS/IPS mode with parameter “-A”
Remember that there are several alert modes available in snort;
- console: Provides fast style alerts on the console screen.
- cmg: Provides basic header details with payload in hex and text format.
- full: Full alert mode, providing all possible information about the alert.
- fast: Fast mode, shows the alert message, timestamp, source and destination ıp along with port numbers.
- none: Disabling alerting.
In this section, only the “console” and “cmg” parameters provide alert information in the console. It is impossible to identify the difference between the rest of the alert modes via terminal. Differences can be identified by looking at generated logs.
At the end of this section, we will compare the “full”, “fast” and “none” modes. Remember that these parameters don’t provide console output, so we will continue to identify the differences through log formats.
IDS/IPS mode with parameter “-A console”
Console mode provides fast style alerts on the console screen. Start the Snort instance in console alert mode (-A console ) with the following command sudo snort -c /etc/snort/snort.conf -A console
Now run the traffic-generator script as sudo and start ICMP/HTTP traffic. Once the traffic is generated, snort will start generating alerts according to provided ruleset defined in the configuration file.
running in console alert mode
user@ubuntu$ sudo snort -c /etc/snort/snort.conf -A console Running in IDS mode ` –== Initializing Snort ==– ` Initializing Output Plugins! Initializing Preprocessors! Initializing Plug-ins! Parsing Rules file "/etc/snort/snort.conf" ... Commencing packet processing (pid=3743) 12/12-02:08:27.577495 [**] [1:366:7] ICMP PING *NIX [**] [Classification: Misc activity] [Priority: 3] {ICMP} 192.168.175.129 -> 142.250.187.110 12/12-02:08:27.577495 [**] [1:10000001:0] ICMP Packet found [**] [Priority: 0] {ICMP} 192.168.175.129 -> 142.250.187.110 12/12-02:08:27.577495 [**] [1:384:5] ICMP PING [**] [Classification: Misc activity] [Priority: 3] {ICMP} 192.168.175.129 -> 142.250.187.110 12/12-02:08:27.609719 [**] [1:10000001:0] ICMP Packet found [**] [Priority: 0] {ICMP} 142.250.187.110 -> 192.168.175.129 ^C*** Caught Int-Signal 12/12-02:08:29.595898 [**] [1:366:7] ICMP PING *NIX [**] [Classification: Misc activity] [Priority: 3] {ICMP} 192.168.175.129 -> 142.250.187.110 12/12-02:08:29.595898 [**] [1:10000001:0] ICMP Packet found [**] [Priority: 0] {ICMP} 192.168.175.129 -> 142.250.187.110 12/12-02:08:29.595898 [**] [1:384:5] ICMP PING [**] [Classification: Misc activity] [Priority: 3] {ICMP} 192.168.175.129 -> 142.250.187.110 =============================================================================== Run time for packet processing was 26.25844 seconds
Snort processed 88 packets.
IDS/IPS mode with parameter “-A cmg”
Cmg mode provides basic header details with payload in hex and text format. Start the Snort instance in cmg alert mode (-A cmg ) with the following command sudo snort -c /etc/snort/snort.conf -A cmg
Now run the traffic-generator script as sudo and start ICMP/HTTP traffic. Once the traffic is generated, snort will start generating alerts according to provided ruleset defined in the configuration file.
running in cmg alert mode
user@ubuntu$ sudo snort -c /etc/snort/snort.conf -A cmg Running in IDS mode ` –== Initializing Snort ==– ` Initializing Output Plugins! Initializing Preprocessors! Initializing Plug-ins! Parsing Rules file "/etc/snort/snort.conf" ... Commencing packet processing (pid=3743) 12/12-02:23:56.944351 [**] [1:366:7] ICMP PING *NIX [**] [Classification: Misc activity] [Priority: 3] {ICMP} 192.168.175.129 -> 142.250.187.110 12/12-02:23:56.944351 00:0C:29:A5:B7:A2 -> 00:50:56:E1:9B:9D type:0x800 len:0x62 192.168.175.129 -> 142.250.187.110 ICMP TTL:64 TOS:0x0 ID:10393 IpLen:20 DgmLen:84 DF Type:8 Code:0 ID:4 Seq:1 ECHO BC CD B5 61 00 00 00 00 CE 68 0E 00 00 00 00 00 ...a.....h...... 10 11 12 13 14 15 16 17 18 19 1A 1B 1C 1D 1E 1F ................ 20 21 22 23 24 25 26 27 28 29 2A 2B 2C 2D 2E 2F !"#$%&'()*+,-./ 30 31 32 33 34 35 36 37 01234567 =+=+=+=+=+=+=+=+=+=+=+=+=+=+=+=+=+=+=+=+=+=+=+=+=+=+=+=+=+=+=+=+=+=+=+=+=+
Let’s compare the console and cmg outputs before moving on to other alarm types. As you can see in the given outputs above, console mode provides basic header and rule information. Cmg mode provides full packet details along with rule information.
IDS/IPS mode with parameter “-A fast”
Fast mode provides alert messages, timestamps, and source and destination IP addresses. Remember, there is no console output in this mode. Start the Snort instance in fast alert mode (-A fast ) with the following command sudo snort -c /etc/snort/snort.conf -A fast
Now run the traffic-generator script as sudo and start ICMP/HTTP traffic. Once the traffic is generated, snort will start generating alerts according to provided ruleset defined in the configuration file.
running in fast alert mode
user@ubuntu$ sudo snort -c /etc/snort/snort.conf -A fast Running in IDS mode ` –== Initializing Snort ==– ` Initializing Output Plugins! Initializing Preprocessors! Initializing Plug-ins! Parsing Rules file "/etc/snort/snort.conf" ... Commencing packet processing (pid=3743) =+=+=+=+=+=+=+=+=+=+=+=+=+=+=+=+=+=+=+=+=+=+=+=+=+=+=+=+=+=+=+=+=+=+=+=+=+
Let’s check the alarm file;
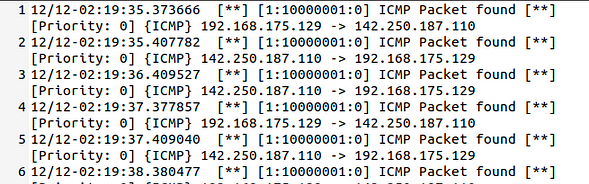
As you can see in the given picture above, fast style alerts contain summary information on the action like direction and alert header.
IDS/IPS mode with parameter “-A full”
Full alert mode provides all possible information about the alert. Remember, there is no console output in this mode. Start the Snort instance in full alert mode (-A full ) with the following command sudo snort -c /etc/snort/snort.conf -A full
Now run the traffic-generator script as sudo and start ICMP/HTTP traffic. Once the traffic is generated, snort will start generating alerts according to provided ruleset defined in the configuration file.
running in full alert mode
user@ubuntu$ sudo snort -c /etc/snort/snort.conf -A full Running in IDS mode ` –== Initializing Snort ==– ` Initializing Output Plugins! Initializing Preprocessors! Initializing Plug-ins! Parsing Rules file "/etc/snort/snort.conf" ... Commencing packet processing (pid=3744) =+=+=+=+=+=+=+=+=+=+=+=+=+=+=+=+=+=+=+=+=+=+=+=+=+=+=+=+=+=+=+=+=+=+=+=+=+
Let’s check the alarm file;

As you can see in the given picture above, full style alerts contain all possible information on the action.
IDS/IPS mode with parameter “-A none”
Disable alerting. This mode doesn’t create the alert file. However, it still logs the traffic and creates a log file in binary dump format. Remember, there is no console output in this mode. Start the Snort instance in none alert mode (-A none) with the following command sudo snort -c /etc/snort/snort.conf -A none
Now run the traffic-generator script as sudo and start ICMP/HTTP traffic. Once the traffic is generated, snort will start generating alerts according to provided ruleset defined in the configuration file.
running in none alert mode
user@ubuntu$ sudo snort -c /etc/snort/snort.conf -A none Running in IDS mode ` –== Initializing Snort ==– ` Initializing Output Plugins! Initializing Preprocessors! Initializing Plug-ins! Parsing Rules file "/etc/snort/snort.conf" ... Commencing packet processing (pid=3745) =+=+=+=+=+=+=+=+=+=+=+=+=+=+=+=+=+=+=+=+=+=+=+=+=+=+=+=+=+=+=+=+=+=+=+=+=+
As you can see in the picture below, there is no alert file. Snort only generated the log file.
IDS/IPS mode: “Using rule file without configuration file”
It is possible to run the Snort only with rules without a configuration file. Running the Snort in this mode will help you test the user-created rules. However, this mode will provide less performance.
running without configuration file
user@ubuntu$ sudo snort -c /etc/snort/rules/local.rules -A console Running in IDS mode 12/12-12:13:29.167955 [**] [1:10000001:0] ICMP Packet found [**] [Priority: 0] {ICMP} 192.168.175.129 -> 142.250.187.110 12/12-12:13:29.200543 [**] [1:10000001:0] ICMP Packet found [**] [Priority: 0] {ICMP} 142.250.187.110 -> 192.168.175.129 12/12-12:13:30.169785 [**] [1:10000001:0] ICMP Packet found [**] [Priority: 0] {ICMP} 192.168.175.129 -> 142.250.187.110 12/12-12:13:30.201470 [**] [1:10000001:0] ICMP Packet found [**] [Priority: 0] {ICMP} 142.250.187.110 -> 192.168.175.129 12/12-12:13:31.172101 [**] [1:10000001:0] ICMP Packet found [**] [Priority: 0] {ICMP} 192.168.175.129 -> 142.250.187.110 ^C*** Caught Int-Signal
IPS mode and dropping packets
Snort IPS mode activated with -Q — daq afpacket parameters. You can also activate this mode by editing snort.conf file. However, you don’t need to edit snort.conf file in the scope of this room. Review the bonus task or snort manual for further information on daq and advanced configuration settings: -Q --daq afpacket
Activate the Data Acquisition (DAQ) modules and use the afpacket module to use snort as an IPS: -i eth0:eth1
Identifying interfaces note that Snort IPS require at least two interfaces to work. Now run the traffic-generator script as sudo and start ICMP/HTTP traffic.
running IPS mode
user@ubuntu$ sudo snort -c /etc/snort/snort.conf -q -Q --daq afpacket -i eth0:eth1 -A console Running in IPS mode 12/18-07:40:01.527100 [Drop] [**] [1:1000001:0] ICMP Packet found [**] [Priority: 0] {ICMP} 192.168.175.131 -> 192.168.175.2 12/18-07:40:01.552811 [Drop] [**] [1:1000001:0] ICMP Packet found [**] [Priority: 0] {ICMP} 172.217.169.142 -> 192.168.1.18 12/18-07:40:01.566232 [Drop] [**] [1:1000001:0] ICMP Packet found [**] [Priority: 0] {ICMP} 192.168.175.131 -> 192.168.175.2 12/18-07:40:02.517903 [Drop] [**] [1:1000001:0] ICMP Packet found [**] [Priority: 0] {ICMP} 192.168.1.18 -> 172.217.169.142 12/18-07:40:02.550844 [Drop] [**] [1:1000001:0] ICMP Packet found [**] [Priority: 0] {ICMP} 172.217.169.142 -> 192.168.1.18 ^C*** Caught Int-Signal
As you can see in the picture above, Snort blocked the packets this time. We used the same rule with a different action (drop/reject). Remember, for the scope of this task; our point is the operating mode, not the rule.
Answer the questions below
Investigate the traffic with the default configuration file.
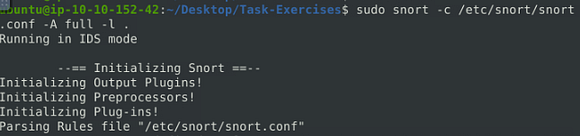
sudo snort -c /etc/snort/snort.conf -A full -l .
In the terminal you are using for snort, type out the command but don’t press enter to run it just yet.

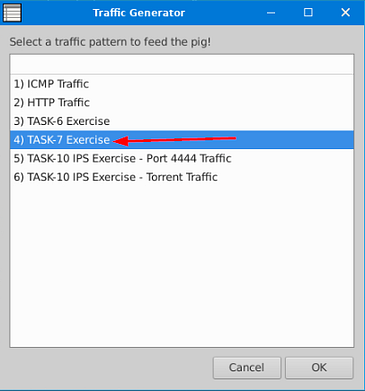
Execute the traffic generator script and choose “TASK-7 Exercise”. Wait until the traffic stops, then stop the Snort instance. Now analyse the output summary and answer the question.
sudo ./traffic-generator.sh
n another terminal that you’ve been running the traffic-generator, type out the command above and press enter to run it.

A window will pop-up, you want to click on the TASK-7 Exercise.
Go back to your, and press enter to run Snort.
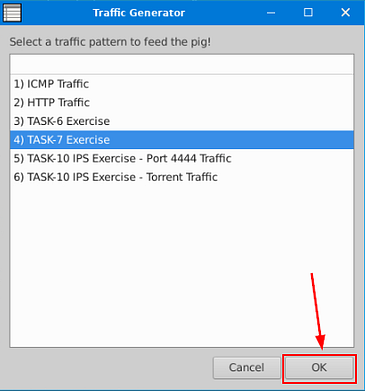
Now that Snort is running, go back to the Traffic Generator and click the OK button in the bottom right to start the Traffic Generator.
What is the number of the detected HTTP GET methods?
Head back to the terminal that your running Snort in. After the scan is complete, scroll up till you get to the HTTP Inspect section. Once you are at this section, which is close to the bottom, look for the GET methods, the answer can be found in this row. Once you find it, type the answer into the TryHackMe Answer field, then click submit.
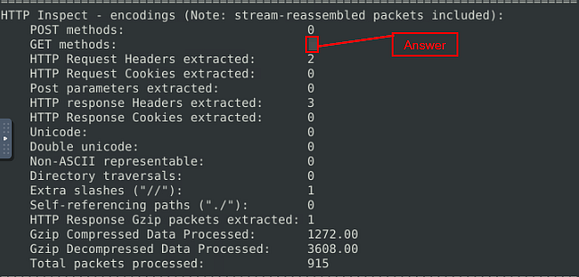
Answer: 2
Task 8 Operation Mode 4: PCAP Investigation

Let’s investigate PCAPs with Snort
Capabilities of Snort are not limited to sniffing, logging and detecting/preventing the threats. PCAP read/investigate mode helps you work with pcap files. Once you have a pcap file and process it with Snort, you will receive default traffic statistics with alerts depending on your ruleset.
Reading a pcap without using any additional parameters we discussed before will only overview the packets and provide statistics about the file. In most cases, this is not very handy. We are investigating the pcap with Snort to benefit from the rules and speed up our investigation process by using the known patterns of threats.
Note that we are pretty close to starting to create rules. Therefore, you need to grasp the working mechanism of the Snort, learn the discussed parameters and begin combining the parameters for different purposes.
PCAP mode parameters are explained in the table below;
ParameterDescription-r / — pcap-single=Read a single pcap — pcap-list=””Read pcaps provided in command (space separated). — pcap-showShow pcap name on console during processing.
Investigating single PCAP with parameter “-r”
For test purposes, you can still test the default reading option with pcap by using the following command snort -r icmp-test.pcap
Let’s investigate the pcap with our configuration file and see what will happen. sudo snort -c /etc/snort/snort.conf -q -r icmp-test.pcap -A console -n 10
If you don’t remember the purpose of the parameters in the given command, please revisit previous tasks and come back again!
investigating single pcap file
user@ubuntu$ sudo snort -c /etc/snort/snort.conf -q -r icmp-test.pcap -A console -n 10 12/12-12:13:29.167955 [**] [1:10000001:0] ICMP Packet found [**] [Priority: 0] {ICMP} 192.168.175.129 -> 142.250.187.110 12/12-12:13:29.200543 [**] [1:10000001:0] ICMP Packet found [**] [Priority: 0] {ICMP} 142.250.187.110 -> 192.168.175.129 12/12-12:13:30.169785 [**] [1:10000001:0] ICMP Packet found [**] [Priority: 0] {ICMP} 192.168.175.129 -> 142.250.187.110 12/12-12:13:30.201470 [**] [1:10000001:0] ICMP Packet found [**] [Priority: 0] {ICMP} 142.250.187.110 -> 192.168.175.129 12/12-12:13:31.172101 [**] [1:10000001:0] ICMP Packet found [**] [Priority: 0] {ICMP} 192.168.175.129 -> 142.250.187.110 12/12-12:13:31.204104 [**] [1:10000001:0] ICMP Packet found [**] [Priority: 0] {ICMP} 142.250.187.110 -> 192.168.175.129 12/12-12:13:32.174106 [**] [1:10000001:0] ICMP Packet found [**] [Priority: 0] {ICMP} 192.168.175.129 -> 142.250.187.110 12/12-12:13:32.208683 [**] [1:10000001:0] ICMP Packet found [**] [Priority: 0] {ICMP} 142.250.187.110 -> 192.168.175.129 12/12-12:13:33.176920 [**] [1:10000001:0] ICMP Packet found [**] [Priority: 0] {ICMP} 192.168.175.129 -> 142.250.187.110 12/12-12:13:33.208359 [**] [1:10000001:0] ICMP Packet found [**] [Priority: 0] {ICMP} 142.250.187.110 -> 192.168.175.129``
Our ICMP rule got a hit! As you can see in the given output, snort identified the traffic and prompted the alerts according to our ruleset.
Investigating multiple PCAPs with parameter “ — pcap-list”
Let’s investigate multiple pcaps with our configuration file and see what will happen. sudo snort -c /etc/snort/snort.conf -q --pcap-list="icmp-test.pcap http2.pcap" -A console -n 10
investigating multiple pcap files
user@ubuntu$ sudo snort -c /etc/snort/snort.conf -q --pcap-list="icmp-test.pcap http2.pcap" -A console 12/12-12:13:29.167955 [**] [1:10000001:0] ICMP Packet found [**] [Priority: 0] {ICMP} 192.168.175.129 -> 142.250.187.110 12/12-12:13:29.200543 [**] [1:10000001:0] ICMP Packet found [**] [Priority: 0] {ICMP} 142.250.187.110 -> 192.168.175.129 12/12-12:13:30.169785 [**] [1:10000001:0] ICMP Packet found [**] [Priority: 0] {ICMP} 192.168.175.129 -> 142.250.187.110 12/12-12:13:30.201470 [**] [1:10000001:0] ICMP Packet found [**] [Priority: 0] {ICMP} 142.250.187.110 -> 192.168.175.129 12/12-12:13:31.172101 [**] [1:10000001:0] ICMP Packet found [**] [Priority: 0] {ICMP} 192.168.175.129 -> 142.250.187.110 ... 12/12-12:13:31.204104 [**] [1:10000001:0] ICMP Packet found [**] [Priority: 0] {ICMP} 142.250.187.110 -> 192.168.175.129 12/12-12:13:32.174106 [**] [1:10000001:0] ICMP Packet found [**] [Priority: 0] {ICMP} 192.168.175.129 -> 142.250.187.110
12/12-12:13:32.208683 [**] [1:10000001:0] ICMP Packet found [**] [Priority: 0] {ICMP} 142.250.187.110 -> 192.168.175.129 12/12-12:13:33.176920 [**] [1:10000001:0] ICMP Packet found [**] [Priority: 0] {ICMP} 192.168.175.129 -> 142.250.187.110 12/12-12:13:33.208359 [**] [1:10000001:0] ICMP Packet found [**] [Priority: 0] {ICMP} 142.250.187.110 -> 192.168.175.129
Our ICMP rule got a hit! As you can see in the given output, snort identified the traffic and prompted the alerts according to our ruleset.
Here is one point to notice: we’ve processed two pcaps, and there are lots of alerts, so it is impossible to match the alerts with provided pcaps without snort’s help. We need to separate the pcap process to identify the source of the alerts.
Investigating multiple PCAPs with parameter “ — pcap-show”
Let’s investigate multiple pcaps, distinguish each one, and see what will happen. sudo snort -c /etc/snort/snort.conf -q --pcap-list="icmp-test.pcap http2.pcap" -A console --pcap-show
investigating multiple pcap files wth pcap info
user@ubuntu$ sudo snort -c /etc/snort/snort.conf -q --pcap-list="icmp-test.pcap http2.pcap" -A console --pcap-show Reading network traffic from "icmp-test.pcap" with snaplen = 1514
12/12-12:13:29.167955 [**] [1:10000001:0] ICMP Packet found [**] [Priority: 0] {ICMP} 192.168.175.129 -> 142.250.187.110 12/12-12:13:29.200543 [**] [1:10000001:0] ICMP Packet found [**] [Priority: 0] {ICMP} 142.250.187.110 -> 192.168.175.129 12/12-12:13:30.169785 [**] [1:10000001:0] ICMP Packet found [**] [Priority: 0] {ICMP} 192.168.175.129 -> 142.250.187.110
...Reading network traffic from "http2.pcap" with snaplen = 1514
12/12-12:13:35.213176 [**] [1:10000001:0] ICMP Packet found [**] [Priority: 0] {ICMP} 142.250.187.110 -> 192.168.175.129 12/12-12:13:36.182950 [**] [1:10000001:0] ICMP Packet found [**] [Priority: 0] {ICMP} 192.168.175.129 -> 142.250.187.110 12/12-12:13:38.223470 [**] [1:10000001:0] ICMP Packet found [**] [Priority: 0] {ICMP} 142.250.187.110 -> 192.168.175.129 …
Our ICMP rule got a hit! As you can see in the given output, snort identified the traffic, distinguished each pcap file and prompted the alerts according to our ruleset.
Now, use the attached VM and navigate to the Task-Exercises/Exercise-Files/TASK-8 folder to answer the questions!
Answer the questions below
You should already be in the Task exercise directory, move into the TASK-8 dirctory with the following command cd Exercise-Files/TASK-8 , then press enter to run the command

Investigate the mx-1.pcap file with the default configuration file.
sudo snort -c /etc/snort/snort.conf -A full -l . -r mx-1.pcap
Type into the terminal the command above, then press enter to run it.

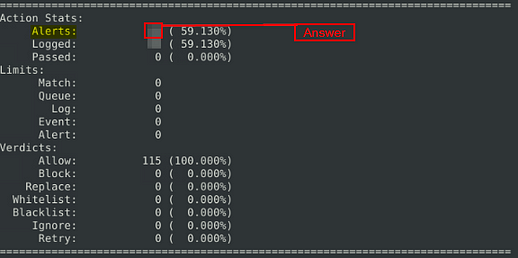
What is the number of the generated alerts?
Once Snort is done running we need to find how many alerts were generated. Scroll up till you see a section with Action Stats, this is the section with the number of Alerts. Look to the number on the right, in the Alerts column, this is the answer. Once you find it, type the answer into the TryHackMe Answer field, then click submit.

Answer: 170
Keep reading the output. How many TCP Segments are Queued?
Scroll two sections down, you will see Stream Statistics. In this section you will find the TCP Segments Queued, look to the number to the right and you will find the answer. Once you find it, type the answer into the TryHackMe Answer field, then click submit.
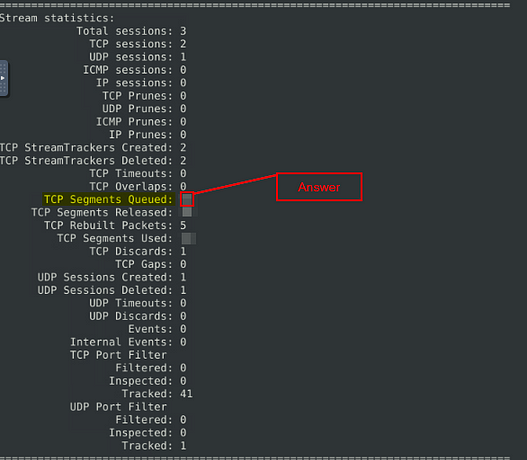
Answer: 18
Scroll down to the next section under the Stream Statistics, which will be the HTTP Inspect. In this section you will find the HTTP response Headers extracted, look to the number to the right and you will find the answer. Once you find it, type the answer into the TryHackMe Answer field, then click submit.
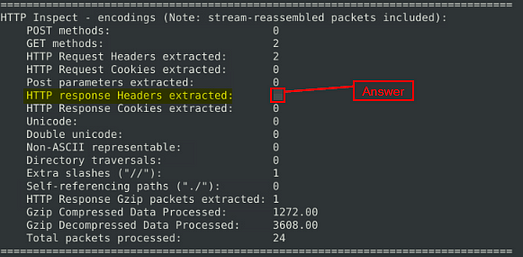
Answer: 3
Investigate the mx-1.pcap file with the second configuration file.
sudo snort -c /etc/snort/snortv2.conf -A full -l . -r mx-1.pcap
Type into the terminal the command above, then press enter to run it.

What is the number of the generated alerts?
Like before scroll up to the Action Stats section, once you are there look for Alerts. When you find it, look to the number on the right this is the answer. Once you find it, type the answer into the TryHackMe Answer field, then click submit.
Answer: 68
Investigate the mx-2.pcap file with the default configuration file.
sudo snort -c /etc/snort/snort.conf -A full -l . -r mx-2.pcap
Type into the terminal the command above, then press enter to run it.

What is the number of the generated alerts?
Like before scroll up to the Action Stats section, once you are there look for Alerts. When you find it, look to the number on the right this is the answer. Once you find it, type the answer into the TryHackMe Answer field, then click submit.
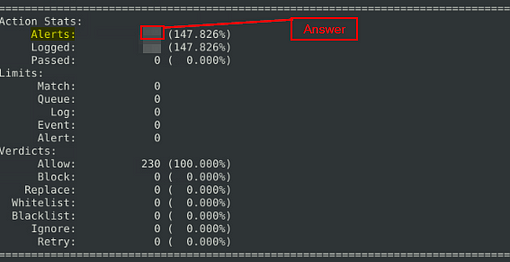
Answer: 340
Keep reading the output. What is the number of the detected TCP packets?
Scroll up to the next section, Breakdown by Protocol. Look for TCP, then look for the number on the right, this is the answer. Once you find it, type the answer into the TryHackMe Answer field, then click submit.
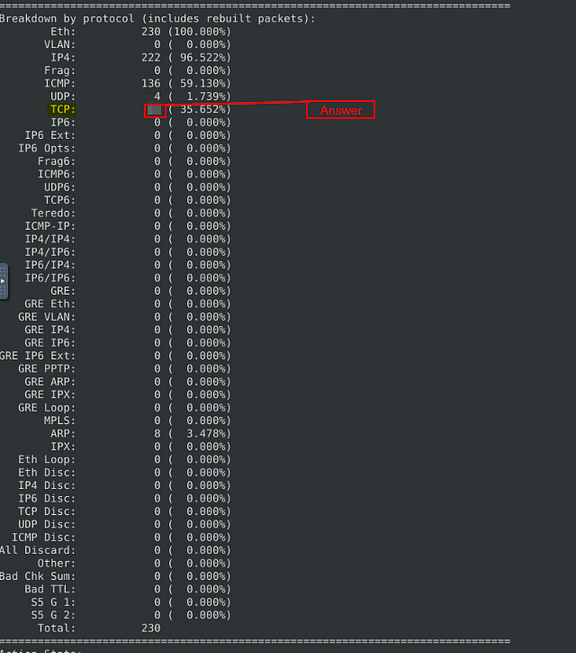
Answer: 82
Investigate the mx-2.pcap and mx-3.pcap files with the default configuration file.
sudo snort -c /etc/snort/snort.conf -A full -l . --pcap-list="mx-2.pcap mx-3.pcap"
Type into the terminal the command above, then press enter to run it.

What is the number of the generated alerts?
For the last time, scroll up to the Action Stats section, once you are there look for Alerts. When you find it, look to the number on the right this is the answer. Once you find it, type the answer into the TryHackMe Answer field, then click submit.
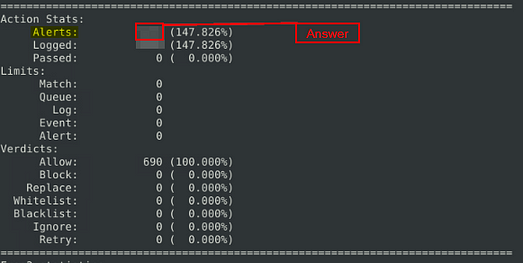
Answer: 1020
You have finished these tasks, and can now move onto Task 9 Snort Rule Structure, Task 10 Snort2 Operation Logic: Points to Remember, & Task 11 Conclusion.