If you haven’t done task 7 & 8 yet, here is the link to my write-up it: Task 7 Operation Mode 3: IDS/IPS & Task 8 Operation Mode 4: PCAP Investigation.
Getting the VM Started
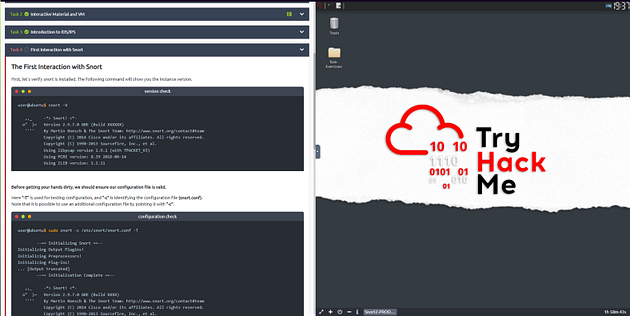
If you don’t have the VM started or running, head back to task 2. Once there click on the green button labeled Start Machine, in the top right of the task.
The screen should spit in half, if not scroll to the top of the page. You will see a blue button labeled Show Split View. Click this button to split the screen in half, with the TryHackMe room being on the Left and the Linux VM on the right
Getting the Terminal
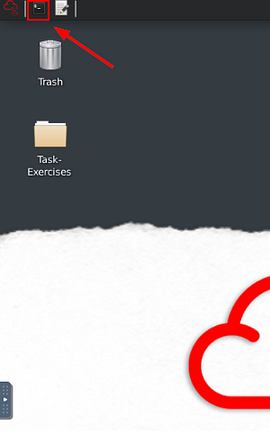
Now before we can start, we need a terminal. On our Linux VM, you can find the terminal icon in the top left. Click the icon to open a terminal window.
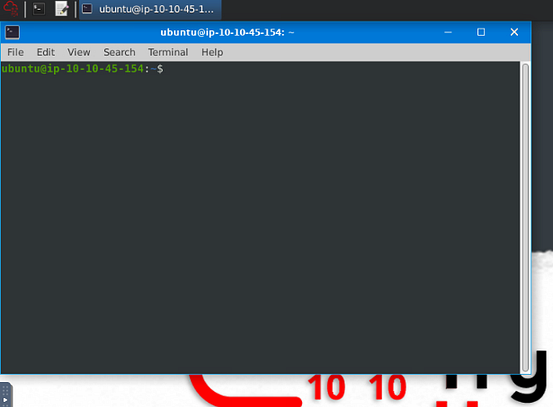
The terminal window will appear on the Linux VM screen.
Now you are ready to start the tasks ahead of you!!!!
Task 9 Snort Rule Structure
Let’s Learn Snort Rules!
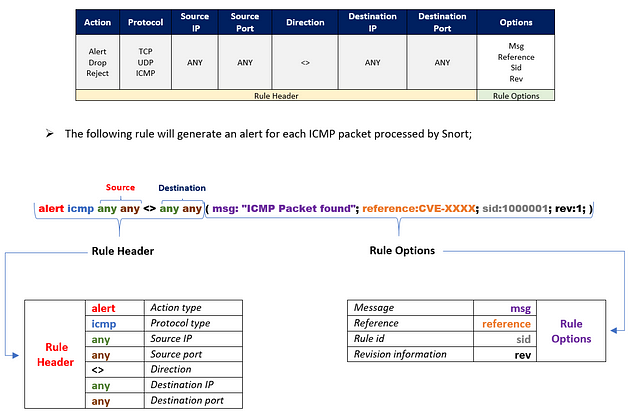
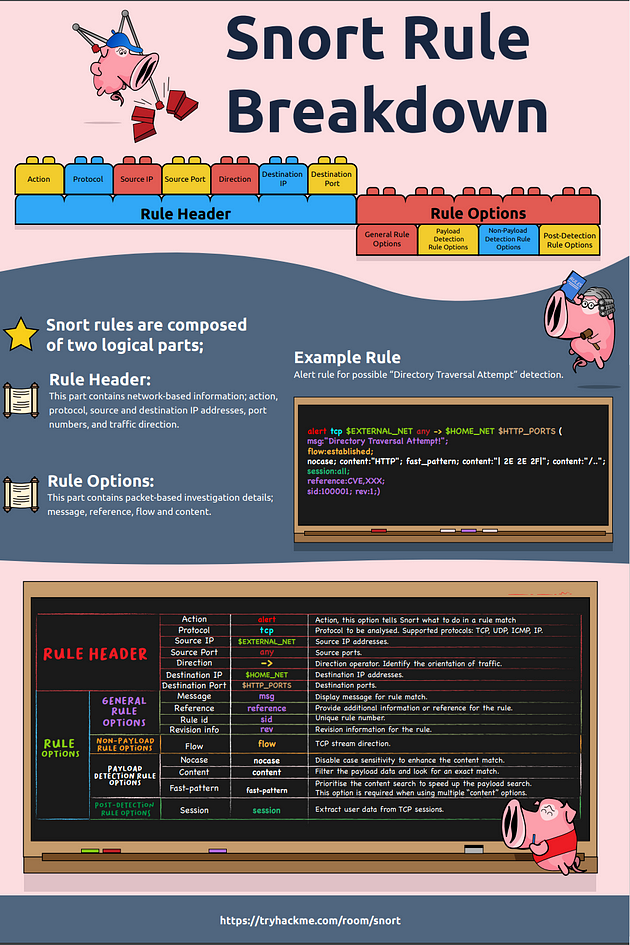
Understanding the Snort rule format is essential for any blue and purple teamer. The primary structure of the snort rule is shown below;
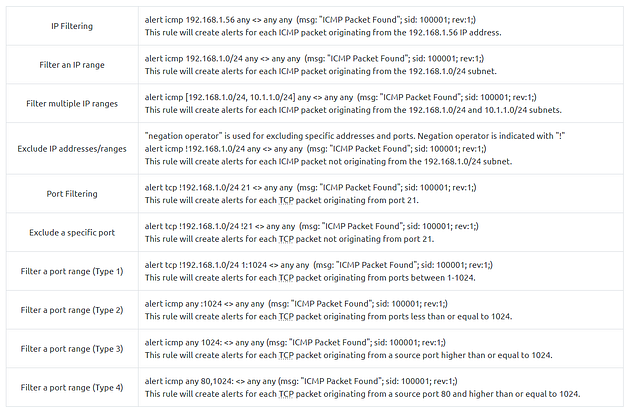
Each rule should have a type of action, protocol, source and destination IP, source and destination port and an option. Remember, Snort is in passive mode by default. So most of the time, you will use Snort as an IDS. You will need to start “inline mode” to turn on IPS mode. But before you start playing with inline mode, you should be familiar with Snort features and rules.
The Snort rule structure is easy to understand but difficult to produce. You should be familiar with rule options and related details to create efficient rules. It is recommended to practice Snort rules and option details for different use cases.
We will cover the basic rule structure in this room and help you take a step into snort rules. You can always advance your rule creation skills with different rule options by practising different use cases and studying rule option details in depth. We will focus on two actions; “alert” for IDS mode and “reject” for IPS mode.
Rules cannot be processed without a header. Rule options are “optional” parts. However, it is almost impossible to detect sophisticated attacks without using the rule options.
IP and Port Numbers
These parameters identify the source and destination IP addresses and associated port numbers filtered for the rule.
The direction operator indicates the traffic flow to be filtered by Snort. The left side of the rule shows the source, and the right side shows the destination.
- -> Source to destination flow.
- <> Bidirectional flow
Note that there is no “<-” operator in Snort.
There are three main rule options in Snort;
- General Rule Options — Fundamental rule options for Snort.
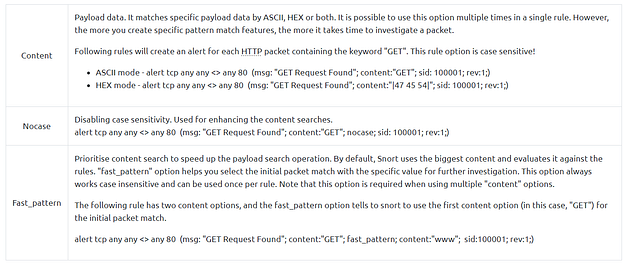
- Payload Rule Options — Rule options that help to investigate the payload data. These options are helpful to detect specific payload patterns.
- Non-Payload Rule Options — Rule options that focus on non-payload data. These options will help create specific patterns and identify network issues.
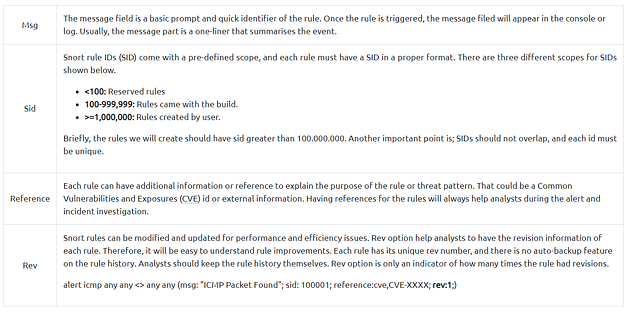
General Rule Options
Payload Detection Rule Options
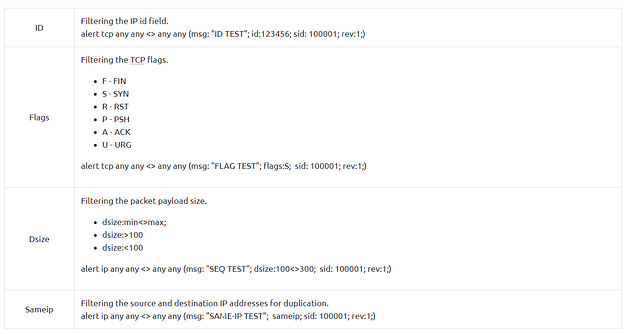
Non-Payload Detection Rule Options
There are rule options that focus on non-payload data. These options will help create specific patterns and identify network issues.
Remember, once you create a rule, it is a local rule and should be in your “local.rules” file. This file is located under “/etc/snort/rules/local.rules”. A quick reminder on how to edit your local rules is shown below.
modifying the local rules
user@ubuntu$ sudo gedit /etc/snort/rules/local.rules
That is your “local.rules” file.
Note that there are some default rules activated with snort instance. These rules are deactivated to manage your rules and improve your exercise experience. For further information, please refer to the TASK-10 or Snort manual.
By this point, we covered the primary structure of the Snort rules. Understanding and practicing the fundamentals is suggested before creating advanced rules and using additional options.
Wow! We have covered the fundamentals of the Snort rules! Now, use the attached VM and navigate to the Task-Exercises/Exercise-Files/TASK-9 folder to answer the questions! Note that you can use the following command to create the logs in the current directory: **-l .**
Answer the questions below
Use “task9.pcap”.
Write a rule to filter IP ID “35369” and run it against the given pcap file. What is the request name of the detected packet?
snort -c local.rules -A full -l . -r task9.pcap
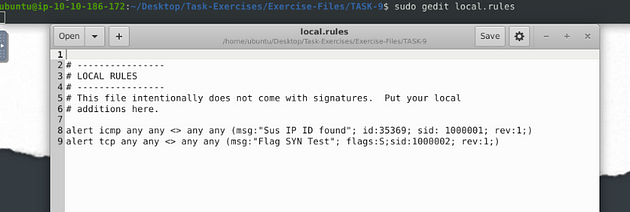
While in the TASK-9 directory, use the command sudo gedit local.rules and press enter to open a text editor, so we can start writing our Snort rules.
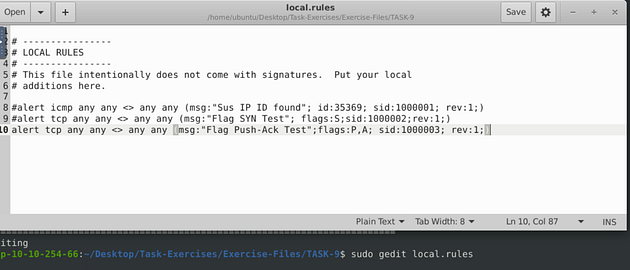
Now that we have our text editor open, we have to write our first rule. Let’s start it off with alert icmp any any <> any any, we start it off this way because we don’t have an IP address to check, so we use the any on both sides of the directional arrows. The protocol we aren’t sure on yet either, so we can start with icmp. Next we want to do the Rule options, so this is what I did (msg:"Sus IP ID found"; id:35369; sid:1000001; rev:1;), the message can be whatever you want it to be but it should be descriptive, then I added the id given to me by TryHackMe. Then to finish it up since it it the first rule the sid is 1000001, and the first revision as well.
Use the keyboard shortcut to save the rule ctrl + s . Then you can click the X in the top right of the window, after you do this you will be back at the terminal and should see this below.
Now run the command given above to use you newly written rule against the pcap file in this directory. The command is sudo snort -c local.rules -A full -l . -r task9.pcap. Press enter to run the command.
After Snort is done running, we can run lsto see what all is in the directory, and we see the Snort log file.
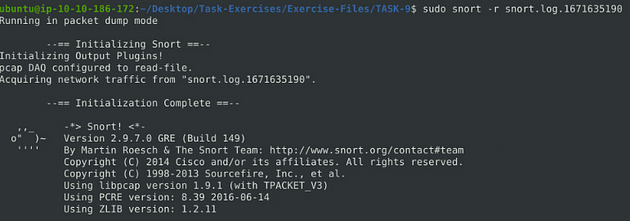
So as we learned back in task 6 we can read the log file with the command sudo snort -r snort.log.1671635190, your log file may be named different but you get the gist.
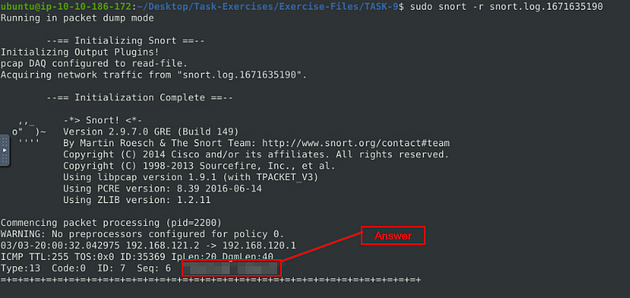
When it is done, scroll back up towards the top till you reach the one packet that is in the log. In this packet is the answer to the question, look to the last line any it is the final two words. Once you find it, type the answer into the TryHackMe answer field, then click submit.
Answer: TIMESTAMP REQUEST
Create a rule to filter packets with Syn flag and run it against the given pcap file. What is the number of detected packets?
Once again use the command sudo gedit local.rules, then press enter to open the text editor
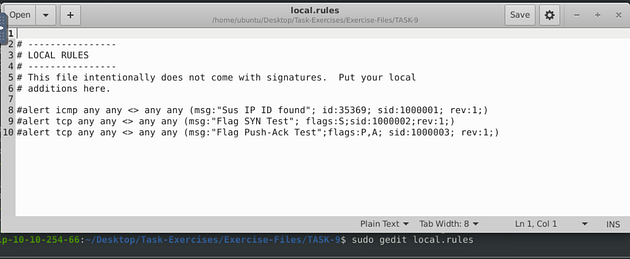
Time for the second rule, this time it is much like the first. The command go as such alert tcp any any <> any any (msg:"Flag SYN Test"; flags:S;sid:1000002;rev:1;). We just indicate that we are searching for anything with a SYN flag.
So as before, save (ctrl + s) and X out of the text editor window, and your back in the terminal.
Now run the command given above to use you newly written rule against the pcap file in this directory. The command is sudo snort -c local.rules -A full -l . -r task9.pcap. Press enter to run the command.
After Snort is done running, we can run lsto see what all is in the directory, and we see a new Snort log file.
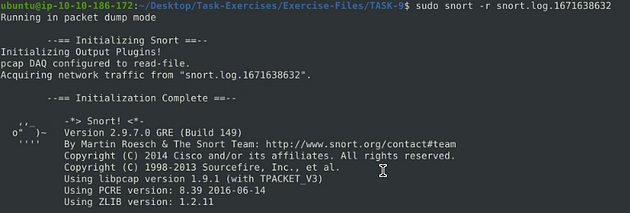
So as we learned back in task 6 we can read the log file with the command sudo snort -r snort.log.1671635190, your log file may be named different but you get the gist.
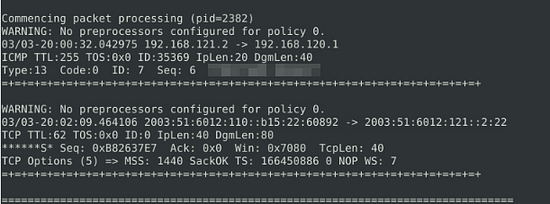
Scroll back up to the packets sections, looks like we have two. But if you remember, that first packet is being detected by our first rule so we can’t count that one. So how many do we really have? Once you have it figured out, type the answer into the TryHackMe answer field, then click submit.
Answer: 1
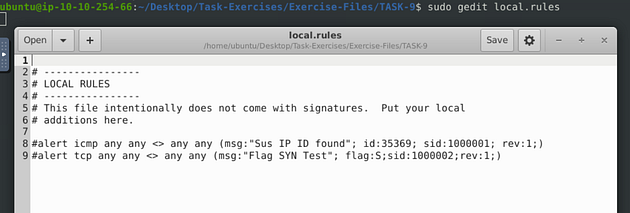
Clear the previous log and alarm files and deactivate/comment out the old rule.
Opening up the text editor again with sudo gedit local.rules.
To comment out the rules, put a # in from of the rule, then snort will not run it, and think it is just text like above.
So as before, save (ctrl + s) and X out of the text editor window, and your back in the terminal.
Now to remove the Alerts and the logs. To do this we can use the rm command. So start with the ls command to view what is in the directory. From there you want to then use the command sudo rm snort.log.167635190 snort.log.1671638632, we use sudo because you have to have admin rights to remove the files the the rm command to remove, then the file names. Do not remove the alert file you could break the Snort scanning, not sure why but it does.
You are ready to move onto the next question.
Write a rule to filter packets with Push-Ack flags and run it against the given pcap file. What is the number of detected packets?
Opening up the text editor again with sudo gedit local.rules.
The rule is going to be made up just like rule two, but we are going to Which will make the command, alert tcp any any <> any any (msg:"Flag Push-Ack Test"; flags:P,A; sid:1000003; rev:1;).
So as before, save (ctrl + s) and X out of the text editor window, and your back in the terminal.
Now run the command given by TryHackMe above to use you newly written rule against the pcap file in this directory. The command is sudo snort -c local.rules -A full -l . -r task9.pcap. Press enter to run the command.
After Snort is done running, we can run lsto see what all is in the directory, and we see a new Snort log file.
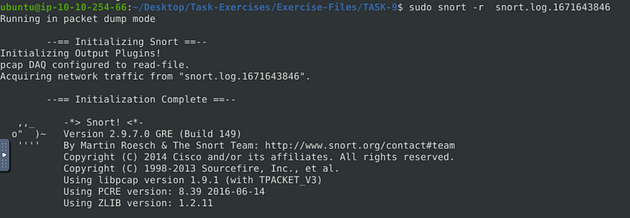
So as we learned back in task 6 we can read the log file with the command sudo snort -r snort.log.1671643846, your log file may be named different but you get the gist.
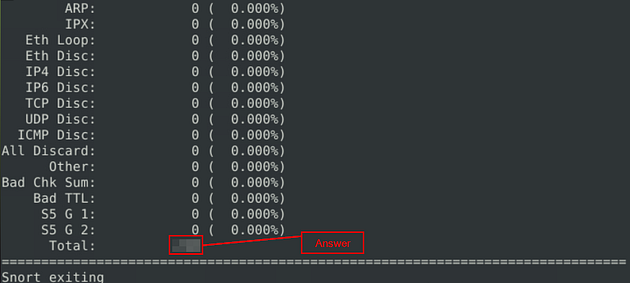
When Snort is done outputing the file, you will see Total at the bottom. The number to the right of this is the answer to the question. Once you find it, type the answer into the TryHackMe Answer field, then click submit.
Answer: 216
Clear the previous log and alarm files and deactivate/comment out the old rule.
Opening up the text editor again with sudo gedit local.rules.
To comment out the rules, put a # in from of the rule, then snort will not run it, and think it is just text like above.
So as before, save (ctrl + s) and X out of the text editor window, and your back in the terminal.
Now to remove log file. To do this we can use the rm command. So start with the ls command to view what is in the directory. From there you want to then use the command sudo rm snort.log.1671643846, we use sudo because you have to have admin rights to remove the files the the rm command to remove, then the file names.
You are ready to move onto the next question.
Create a rule to filter packets with the same source and destination IP and run it against the given pcap file. What is the number of detected packets?
Opening up the text editor again with sudo gedit local.rules.
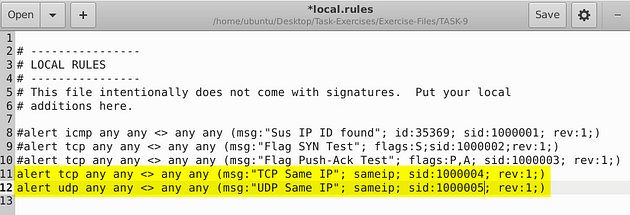
We learned about this in the above section Non-Payload Detection Rule Options, it is at the bottom of the table. After taking a look at it, we have our rule layed out for us nicely. The rule then is alert ip any any <> any any (msg:"Same IP"; sameip; sid:1000004; rev:1;). But we need to filter out both tcp and udp, unfortunately you can’t do both protocols in one rule so you must do two rules. In the front after alert the first one I have tcp and the second I have udp. But the rest is pretty much the same.
So as before, save (ctrl + s) and X out of the text editor window, and your back in the terminal.
Now run the command given by TryHackMe above to use you newly written rule against the pcap file in this directory. The command is sudo snort -c local.rules -A full -l . -r task9.pcap. Press enter to run the command.
After Snort is done running, we can run lsto see what all is in the directory, and we see a new Snort log file.
So as we learned back in task 6 we can read the log file with the command sudo snort -r snort.log.1671651153, your log file may be named different but you get the gist.
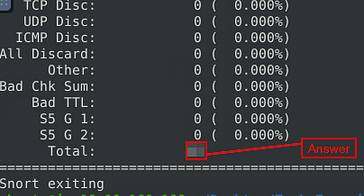
Like after running the previous rule through snort, the answer is going to be found at the bottom. Look at the Total row and move to the right, the number is the answer. Once you find it, type the answer into the TryHackMe Answer field, then click submit.
Answer: 10
Edit: I had someone inform me that the answer to this question is different at this point. After running through the same process above they got 7. So it could be the case that something changed and the new answer is 7. Thank you, for letting me know and keeping these blogs accurate.
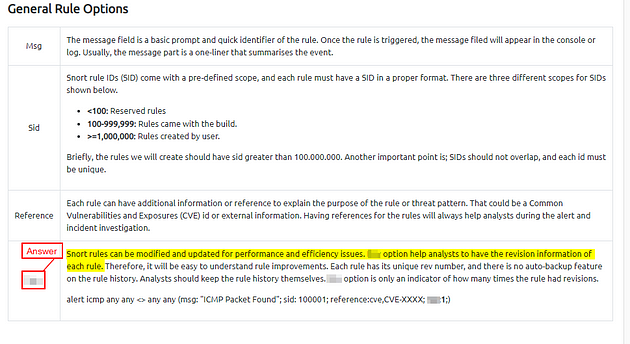
Case Example — An analyst modified an existing rule successfully. Which rule option must the analyst change after the implementation?
Since you can find the answer above I won’t be sharing it here, but follow along to help discover it if you need help. Scroll up to the General Rule Options, at the bottom of this table is where you can find the answer. Once you find it, type the answer into the TryHackMe Answer field, then click submit.
Task 10 Snort2 Operation Logic: Points to Remember
Points to Remember
Main Components of Snort
- Packet Decoder — Packet collector component of Snort. It collects and prepares the packets for pre-processing.
- Pre-processors — A component that arranges and modifies the packets for the detection engine.
- Detection Engine — The primary component that process, dissect and analyse the packets by applying the rules.
- Logging and Alerting — Log and alert generation component.
- Outputs and Plugins — Output integration modules (i.e. alerts to syslog/mysql) and additional plugin (rule management detection plugins) support is done with this component.
There are three types of rules available for snort
- Community Rules — Free ruleset under the GPLv2. Publicly accessible, no need for registration.
- Registered Rules — Free ruleset (requires registration). This ruleset contains subscriber rules with 30 days delay.
- Subscriber Rules (Paid) — Paid ruleset (requires subscription). This ruleset is the main ruleset and is updated twice a week (Tuesdays and Thursdays).
You can download and read more on the rules here.
Note: Once you install Snort2, it automatically creates the required directories and files. However, if you want to use the community or the paid rules, you need to indicate each rule in the snort.conf file.
Since it is a long, all-in-one configuration file, editing it without causing misconfiguration is troublesome for some users. That is why Snort has several rule updating modules and integration tools. To sum up, never replace your configured Snort configuration files; you must edit your configuration files manually or update your rules with additional tools and modules to not face any fail/crash or lack of feature.
- snort.conf: Main configuration file.
- local.rules: User-generated rules file.
Let’s start with overviewing the main configuration file (snort.conf) sudo gedit /etc/snort/snort.conf
Navigate to the “Step #1: Set the network variables.” section.
This section manages the scope of the detection and rule paths.
Navigate to the “Step #2: Configure the decoder.” section.
In this section, you manage the IPS mode of snort. The single-node installation model IPS model works best with “afpacket” mode. You can enable this mode and run Snort in IPS.
Data Acquisition Modules (DAQ) are specific libraries used for packet I/O, bringing flexibility to process packets. It is possible to select DAQ type and mode for different purposes.
There are six DAQ modules available in Snort;
- Pcap: Default mode, known as Sniffer mode.
- Afpacket: Inline mode, known as IPS mode.
- Ipq: Inline mode on Linux by using Netfilter. It replaces the snort_inline patch.
- Nfq: Inline mode on Linux.
- Ipfw: Inline on OpenBSD and FreeBSD by using divert sockets, with the pf and ipfw firewalls.
- Dump: Testing mode of inline and normalisation.
The most popular modes are the default (pcap) and inline/IPS (Afpacket).
Navigate to the “Step #6: Configure output plugins” section.
This section manages the outputs of the IDS/IPS actions, such as logging and alerting format details. The default action prompts everything in the console application, so configuring this part will help you use the Snort more efficiently.
Navigate to the “Step #7: Customise your ruleset” section.
Note that “#” is commenting operator. You should uncomment a line to activate it.
Task 11 Conclusion
In this room, we covered Snort, what it is, how it operates, and how to create and use the rules to investigate threats.
- Understanding and practising the fundamentals is crucial before creating advanced rules and using additional options.
- Do not create complex rules at once; try to add options step by step to notice possible syntax errors or any other problem easily.
- Do not reinvent the wheel; use it or modify/enhance it if there is a smooth rule.
- Take a backup of the configuration files before making any change.
- Never delete a rule that works properly. Comment it if you don’t need it.
- Test newly created rules before migrating them to production.
Now, we invite you to complete the snort challenge room: Snort Challenge — Live Attacks
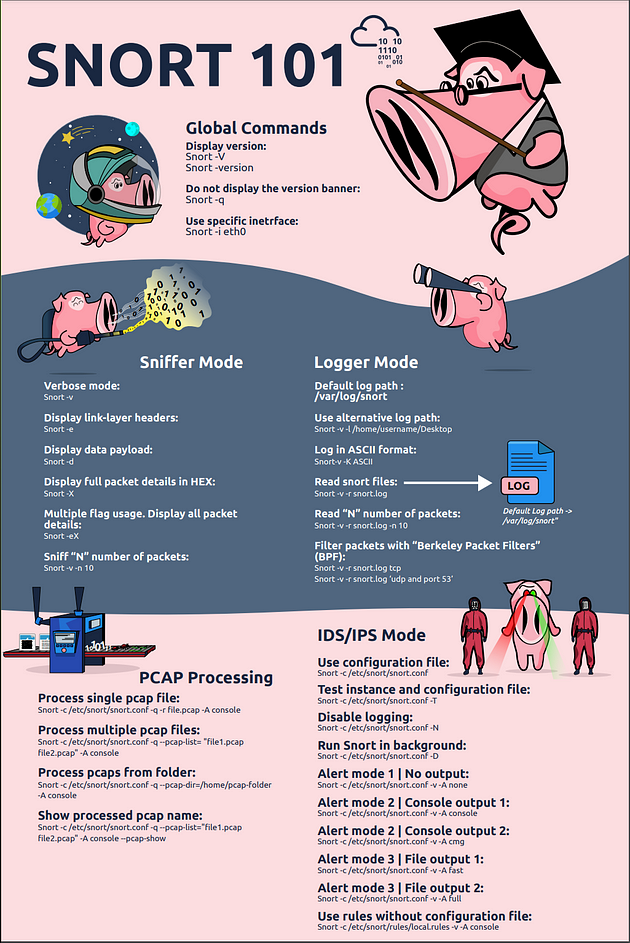
A great way to quickly recall snort rules and commands is to download and refer to the TryHackMe snort cheatsheet.


