This is a free room on TryHackMe. It was created by TryHackMe and
ar33zy. Here it the link to said room, TryHackMe Room — Threat Intelligence for SOC.
Learn how to utilise Threat Intelligence to improve the Security Operations pipeline.

Task 1 Introduction
Is your organisation prepared to handle emerging threats like new malware IOCs or zero days? And in any case, can you determine unknown adversaries or apply known indicators from reliable sources in your Security Operations pipeline?
Such questions arise when you think of the ever-going cat-and-mouse game of threat actors and security analysts on a typical day. As a group working to secure an organisation, the security team is expected to be prepared to handle the never-ending evolution of threats and anticipate unknown possibilities of potential compromises. Doing all these might be challenging, but you are not alone in this battle.
Learning Objectives
In this room, we will highlight the impact of Threat Intelligence in the Security Operations pipeline; how important information shared across different groups can be utilised by your organisation. In addition, we will tackle topics such as the following throughout the room:
- Threat Intelligence Consumers and Producers
- Types of Threat Intelligence
- Utilising Threat Intelligence to Prevent and Detect malicious activities
Room Prerequisites
It is highly suggested to clear the following rooms first before proceeding with this room:
- Threat Intelligence Tools
- Introduction to Detection Engineering
- Tactical Detection
- Investigating with ELK 101
Let’s put our intelligence to work and stay ahead of potential threats with Threat Intelligence.
Task 2 Threat Intelligence Feeds
Threat Intelligence Recap
For a quick review, let’s reiterate the definition of Threat Intelligence discussed in the Intro to Cyber Threat Intel room.
Threat Intelligence is the analysis of data and information using tools and techniques to generate meaningful patterns to mitigate against potential risks associated with existing or emerging threats targeting organisations, industries, sectors or governments.
There are different classifications of Threat Intelligence, and the primary types of it are:
- Strategic Intel: High-level intel that looks into the organisation’s threat landscape and maps out the risk areas based on trends, patterns and emerging threats that may impact business decisions.
- Technical Intel: Examines evidence and artefacts of attacks an adversary uses. Incident Response teams can use this intel to create a baseline attack surface to analyse and develop defence mechanisms.
- Tactical Intel: Assesses adversaries’ tactics, techniques, and procedures (TTPs). This intel can strengthen security controls and address vulnerabilities through real-time investigations.
- Operational Intel: Assesses an adversary’s specific motives and intent to perform an attack. Security teams may use this intel to understand the critical assets available in the organisation (people, processes, and technologies) that threat actors may target.
These classifications may give you an idea of how you operate with the data. But our only focus in this room is on Technical Intel, utilising artefacts generated by adversaries to improve the Security Operations pipeline. This type is the most common of the four classes and is mainly known as IOC-based Threat Intelligence.
Before applying Threat Intelligence to Security Operations, let’s first deal with your understanding of how organisations differ in roles regarding Threat Intelligence.
Consumers and Producers
Do you build the knowledge base, or do you consume the knowledge of others?
The common notion of Threat Intelligence is the dataset of known bad IOCs collated by different entities. It may be malicious URLs hosting malware or IP addresses of suspicious connections. But would you know how this information is gathered for the disposal of security analysts? Let’s first differentiate the concept of Producers and Consumers of Threat Intelligence.
Producers

Threat Intelligence Producers gather, analyse and disseminate threat intelligence data for others and themselves. These Producers create reports, advisories, and resources that are shared within the broader cybersecurity community. This group includes cybersecurity vendors, research labs and organisations specialising in collecting and interpreting data on emerging cyber threats.
Now, the Producers typically collect data using various methods and techniques. Standard methods include network monitoring, which involves monitoring an organisation’s network traffic to identify abnormal behaviour from the inside or a honeypot server exposed externally.
Another example could be a collection of IOCs based on internal incidents handled by an organisation. These organisations expect a more significant number of incidents compared to small organisations with fewer assets to be compromised or user activity to be monitored. The results of these collections are then further analysed, attributed to potential threat actors, and published eventually to help other organisations.
These examples summarise that not every organisation can be a Producer. It requires a vast set of collected data, the capacity to determine expected normal behaviour, and the capability to analyse and pinpoint unknown potential threats.
Consumers
On the other hand, Threat Intelligence Consumers are organisations or individuals who consume Threat Intelligence created by Producers. The information gathered from different sources is utilised to improve the organisation’s security posture.

How does this group typically leverage the intelligence data shared with them?
- Identifying vulnerabilities — Consumers can use published vulnerabilities discovered due to zero days launched by threat actors to identify vulnerabilities in an organisation’s infrastructure. Advisories such as CVE publications are commonly utilised to determine if an organisation is impacted by it and apply mitigations if needed.
- Prevention and Detection — Consumers can use IOCs to prevent intrusions by blocking these artefacts or detect them by applying them to threat detection rules.
- Incident Response — Consumers can use intelligence data to respond more effectively to incidents as the data may confirm the likelihood of the attack and the potentially attributed tactics and techniques.
- Collaborating with others — Information sharing is not only for Producers but also for Consumers. Data analysis of IOCs may still require human assessment, so it is helpful to share information that is validated to be beneficial for Security Operations.
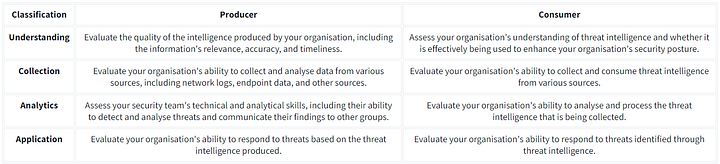
Are you a Consumer or a Producer?
Assessing whether your organisation is a Threat Intelligence Consumer or Producer depends on the roles and responsibilities of your security team and the overall cybersecurity strategy of your organisation.

Once you have defined your role, you may also consider assessing your current practices based on the following:
Consuming Threat Intelligence
To conclude this task, we will hunt and consume IOCs provided by Threat Intelligence Producers.
Click on the Start Machine button at the top right corner of this task. Make sure you are on the TryHackMe VPN to be able to access form you home machine.The machine provides access to the following:
- SSH access via port 22 with the following credentials:

Username : user
Password : tryhackme
IP Address : MACHINE_IP
- Kibana Instance via http://MACHINE_IP with the following credentials:
elastic:elastic
Note: The Kibana instance takes 3–5 minutes to initialise.
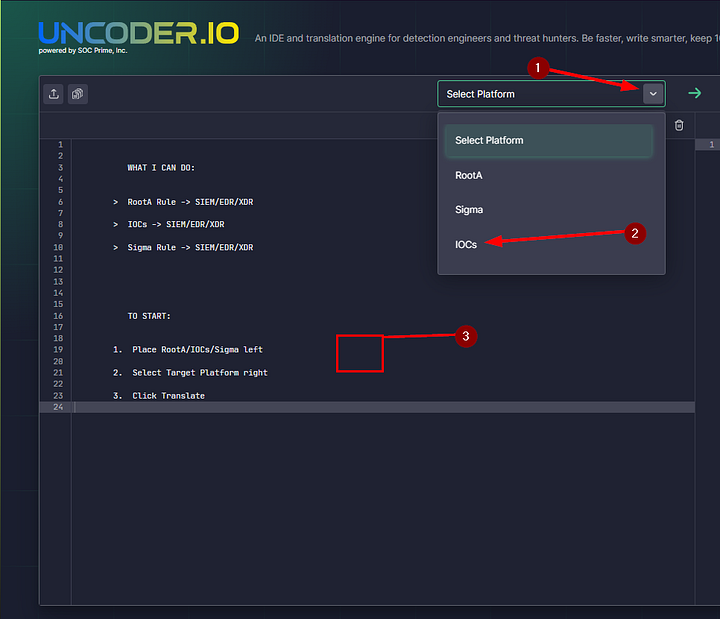
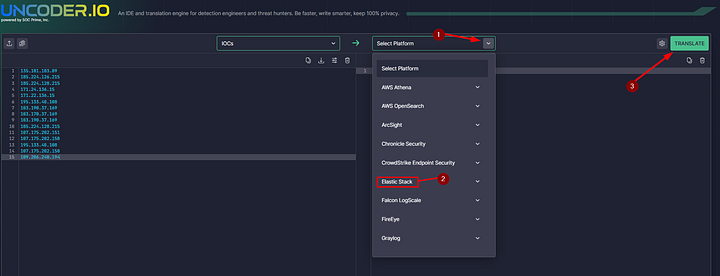
Uncoder.io
Uncoder.io is an online tool that transforms Sigma rules, IOC lists, and other platform query syntaxes into custom hunting queries prepared for execution in SIEM and XDR. It is an easy-to-use tool that could assist us in hunting the following IOCs up for investigation. For IOCs, the tool accepts six different types of IOCs, namely:
- IPs
- Domains
- URLs
- Hashes
- Emails
- Files
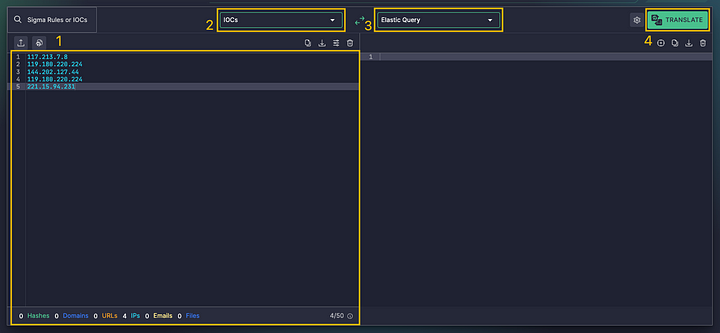
Let’s use the following set of IPs and feed them into Uncoder. Do take note that with recent updates, this requires setting up a free account on the uncoder.io website.
1
2
3
4
5
117[.]213[.]7[.]8
119[.]180[.]220[.]224
144[.]202[.]127[.]44
119[.]180[.]220[.]224
221[.]15[.]94[.]231
Follow along with the steps and the image below:
- Paste the list of IOCs. Note that defanged IPs will be cleaned, and redundancies will be removed, so only four IPs are detected, as shown below.
- Configure the source platform and set it to IOCs.
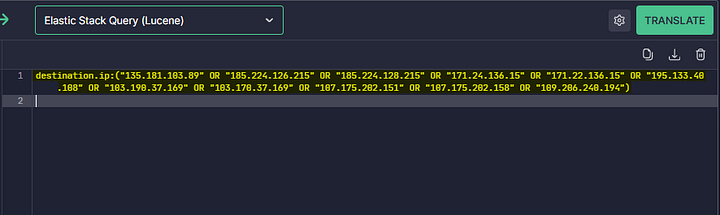
- Set the target platform to Elastic Stack Query (Lucene) since the provided SIEM is built on that.
- Click translate and view the produced query syntax.
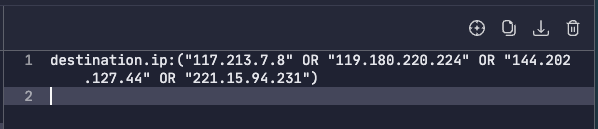
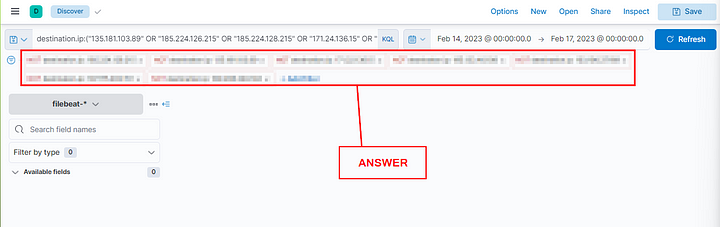
The result of using the tool can be utilised in our Kibana Instance via the Discover feature. Ensure that the query is under the filebeat-* index and searches between 02/14/2023 and 02/17/2023.

To complete the task, answer the following questions using the set of IOCs below. You must use the same index and timeframe mentioned above.
1
2
3
4
5
6
7
8
9
10
11
12
13
14
15
135[.]181[.]103[.]89
185[.]224[.]126[.]215
185[.]224[.]128[.]215
171[.]24[.]136[.]15
171[.]22[.]136[.]15
195[.]133[.]40[.]108
103[.]190[.]37[.]169
103[.]170[.]37[.]169
103[.]190[.]37[.]169
185[.]224[.]128[.]215
107[.]175[.]202[.]151
107[.]175[.]202[.]158
195[.]133[.]40[.]108
107[.]175[.]202[.]158
109[.]206[.]240[.]194
Answer the questions below
How many unique IP addresses were provided in the IOC list?
We need to start off by copying the list of IP addresses in the code block above. Once that is done, head over to Uncoder.io. Starting on the left side, click the down caret in the Select Platform box, then click on IOCs. Finally, click in the input box.
At the bottom of the input box is an indication section. Look for the blue IPs string. The integar to the left of IPs is the answer, as it will automatically remove any duplicate IP addresses. Once you see it, type the answer into the THM answer field. Then click Submit.
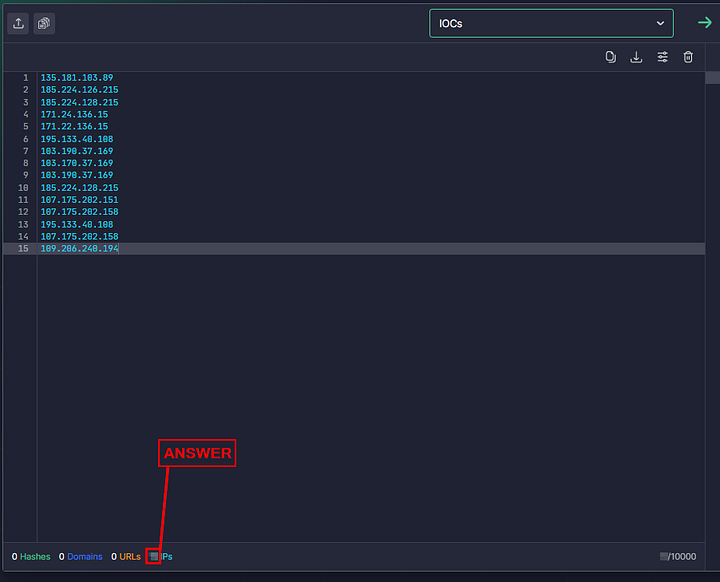
ANSWER: 11
Based on the set of IOCs, how many IOC hits were discovered in the logs?
Going back over to Uncoder.io, we need to create the query for the IP addresses from the first question. In the Select Platform box on the right, click the down caret. Then click on Elastic Stack, and finally the teal TRANSLATE button.
Highlight and copy the query. Now it’s time to head over to the Elastic Discover Dashboard.
Now paste the query into the Elastic search field at the top of the Discover dashboard. Press enter to search it.

You should see the results to below the indicator graph. At the top left of the indicator graph you will see the word Hits. To the left of this word is the number of times the query found results. Type this number into the THM answer field. Then click Submit.

ANSWER: 48
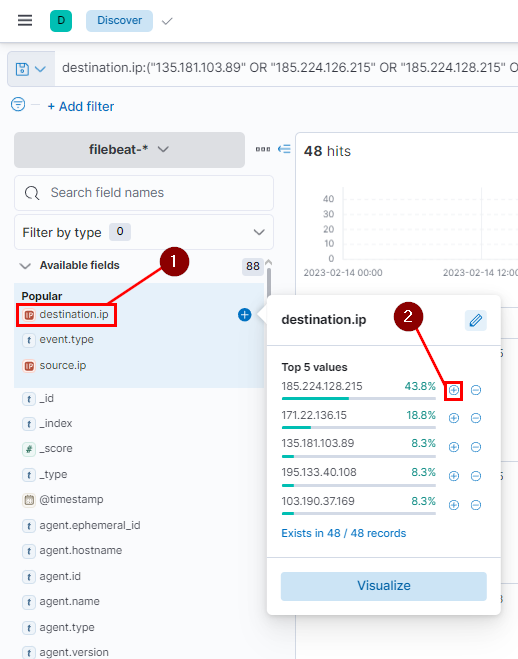
Out of the total number of IOCs, how many unique IP addresses were discovered in the logs?
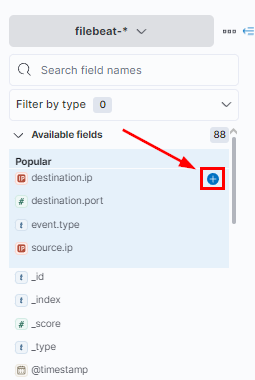
On the left side of the Elastic Discover Dashboard, under Available fields. Look for destination.ip, and click on it. A small window will appear, in this window you will see several IP addresses. These are the ones that have matached to our query. Click on the minus ( — ) icon on the right side of the each IP address.

We can now count the number of unique IP address matches that appear under the query field. Once you have counted these, type them into the THM answer field. Then click Submit.
ANSWER: 7
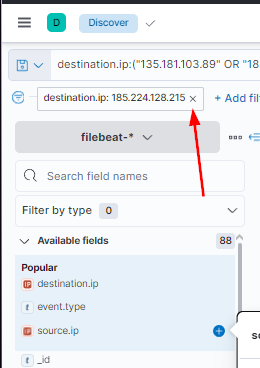
How many connections were made to 185[.]224[.]128[.]215?
We first need to remove the filters we put in place in the previous question. To do this click on the X on the right side of the IP Filter Box.
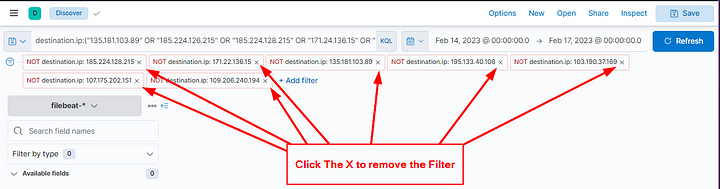
Let’s click on destination.ip again, on the left side panel. To bring up the smaller window, with the IP addresses. The look for the IP address 185[.]224[.]128[.]215 and click the plus ( + ) icon to the right. This will filter only for this IP address.
Looking at hits again, above the results graph. We can see the number of times this IP address was found. Once you see it, type the answer into the THM answer field. Then click Submit.

ANSWER: 21
What is the IP address of the compromised host?
We need to go back to the Available field section in the left side panel. This time click on source.ip. In the small window, only one IP address appears. This is the IP of the compromised host, copy and paste or type the answer into the THM answer field. The click Submit.
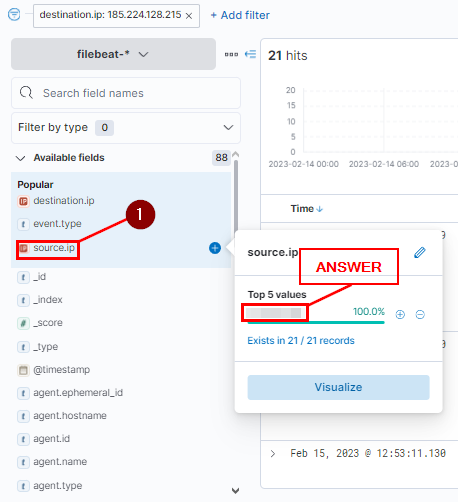
ANSWER: 10.10.196.49
What is the destination port of connections made to 107[.]175[.]202[.]151?
First we need to remove the filter we used in a previous question. We can do so by clicking the X icon on the right side.
Back again into the Available fields panel. This time, hover your cursor over destination.ip. A plus ( + ) icon will appear, click on it. This will show the only the destination IP in the results on the right.
We want to add the destination port in results as well. To do this, click on the Search field names, then type port. The top result below is destination.port. Click on the plus ( + ) icon to add it to the results as well.
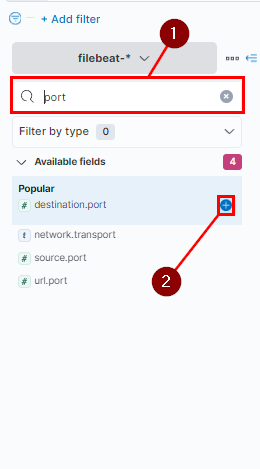
Turn your attention to the results on the right. We can now see the Destination IPs and ports. Parse down through the IP addresses till you see 107[.]175[.]202[.]151, once you find it look to the column to the right. You will see the port assocaited with the Destination IP. Now type the answer into the THM answer field, and click Submit.
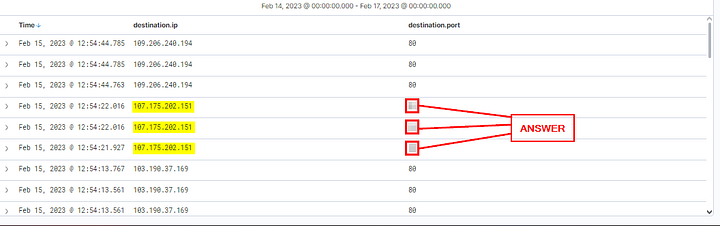
ANSWER: 80
Task 3 Intelligence-driven Prevention
Your organisation has determined that you are a consumer of Threat Intelligence from reliable sources; your task is to apply the concepts of being a consumer by deploying controls to prevent threats in your infrastructure.
Using our current knowledge of Threat Intelligence, we will utilise the IOCs from reliable sources to deploy security controls that will prevent malicious activity in our infrastructure.
To start with, we can first simplify the types of IOCs that are commonly distinguished in Threat Intelligence feeds:
- Domains — Typically attributed to URLs used to host malicious files, C2 callbacks or email domains used for spam.
- IP Addresses — Commonly attributed to addresses known to execute attacks seen from external assets or outbound callbacks from malware.
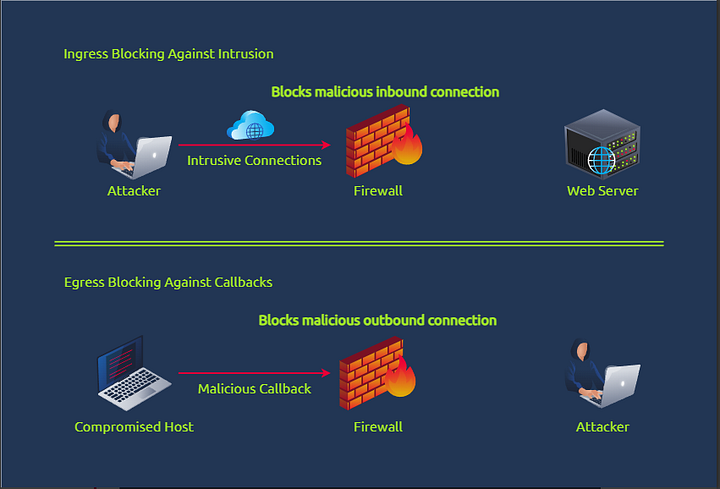
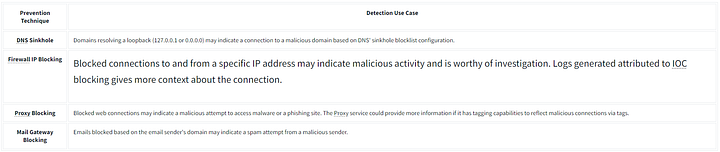
IP Blocking via Firewall
IP blocking is a well-known security measure that involves blocking ingress or egressing network traffic based on the device’s IP address attempting to initiate a network connection. It is typically done using a Firewall, a security system that controls the traffic based on predetermined rules.
Configuring firewall rules could be overwhelming, but having a direction to deny connections from a known malicious IP address is a good start in preventing malicious connections, such as:
- Prevent intrusive connections against external applications that may affect service uptime or compromise via a known vulnerability.
- Prevent connection attempts to the threat actor’s infrastructure after successful malware execution.
Domain Blocking through Email Gateways
Similar to IP blocking, we can configure Email Gateways to prevent known malicious domains from forwarding incoming email messages based on the sender’s domain. Email Gateways also depend on a ruleset, which should contain the block list of domains known to send spam or phishing emails. Once the block list is populated, the Email Gateway prevents threat actors from reaching the inbox of the target users in the organisation.
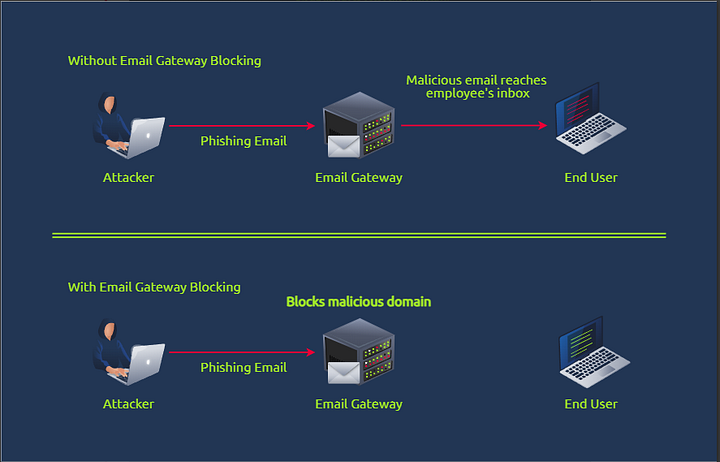
Preventing spam emails from reaching employees’ inboxes reduces the potential attack surfaces of a threat actor in compromising the organisation. Most of the time, an organisation takeover starts with the execution of a malicious attachment or submitting credentials to a phishing website. An additional prevention layer slightly reduces the burden on the users’ phishing awareness capabilities.
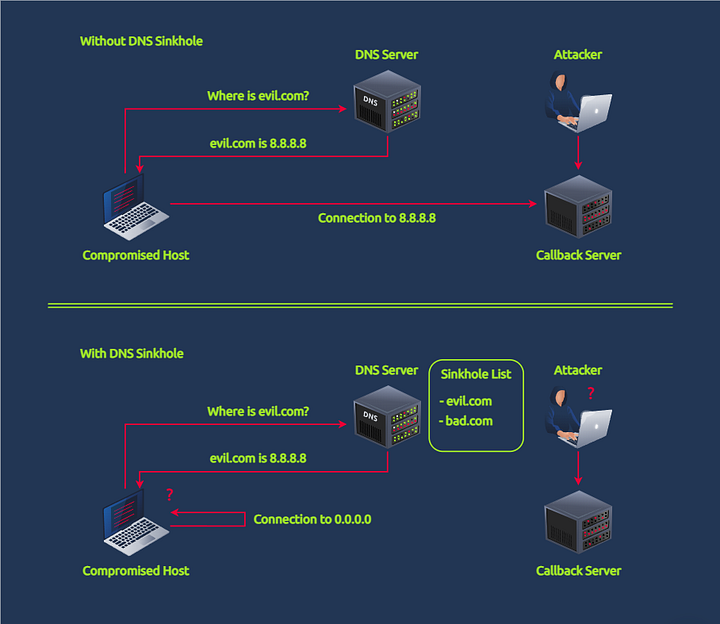
Domain Blocking through DNS Sinkhole
DNS Sinkhole is a security measure that mitigates connections to a malicious domain. This is typically done by redirecting all DNS requests from a known malicious domain to a sinkhole, preventing the resolution to their counterpart IP addresses.
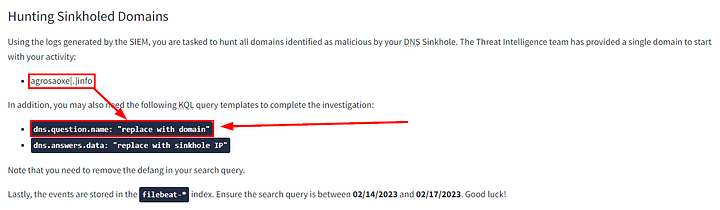
Hunting Sinkholed Domains
Using the logs generated by the SIEM, you are tasked to hunt all domains identified as malicious by your DNS Sinkhole. The Threat Intelligence team has provided a single domain to start with your activity:
- agrosaoxe[.]info
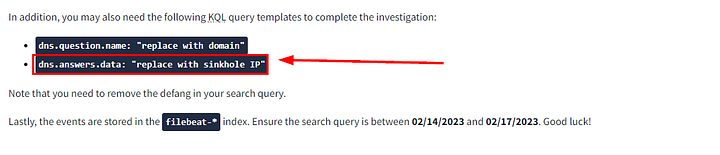
In addition, you may also need the following KQL query templates to complete the investigation:
dns.question.name: "replace with domain"dns.answers.data: "replace with sinkhole IP"
Note that you need to remove the defang in your search query.
Lastly, the events are stored in the filebeat-* index. Ensure the search query is between 02/14/2023 and 02/17/2023. Good luck!
Answer the questions below
How many DNS queries to agrosaoxe[.]info have been created?
THM has given us a great start with the following query: dns.question.name: "replace with domain". Let’s take this and query it through Elastic.
In the Elastic KQL query bar, type out dns.question.name: "agrosaoxe.info". Then press enter to search.

Again, look at hits, as the integar to the left is the number of results and thus the answer. Type it into the THM answer field, and click Submit.
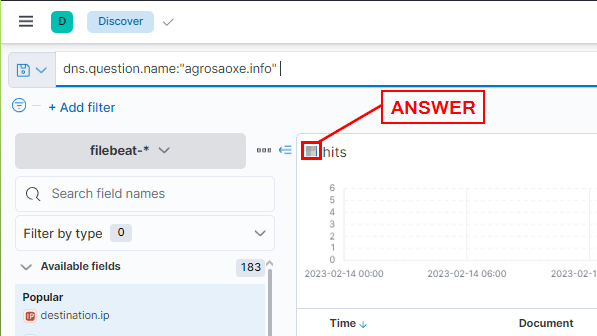
ANSWER: 11
Before deploying the sinkhole configuration, what IPv4 addresses are resolved by agrosaoxe[.]info? (format: IPs in ascending order)
To start you will need to click on the Search field name bar above the left side panel. Then type ip, one of the results is dns.resolved_ip. Which is what we are looking for, so click on the name. A small window will appear with IP addresses in it. The top one is an internal IP address and thus not what we are looking for (keep an eye on it though wink). But the next two are external IP addresses and what we are looking for. Copy and paste or type the answer into the THM answer field. There is a comma with no spaces between the IP address. Then click Submit.
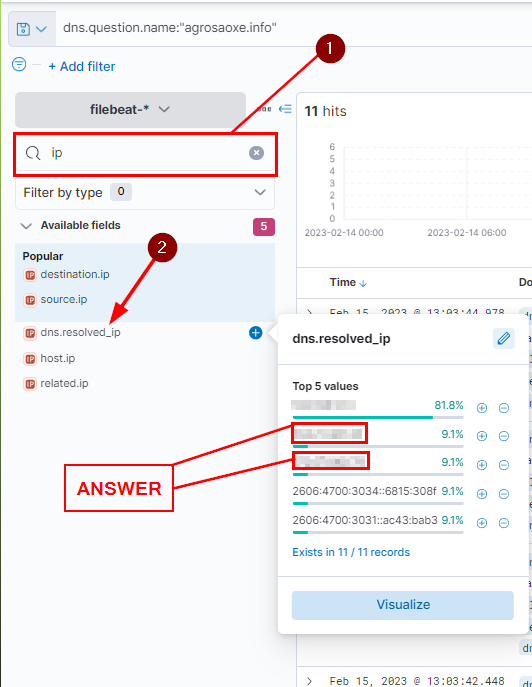
ANSWER: 104.21.48.143,172.67.186.179
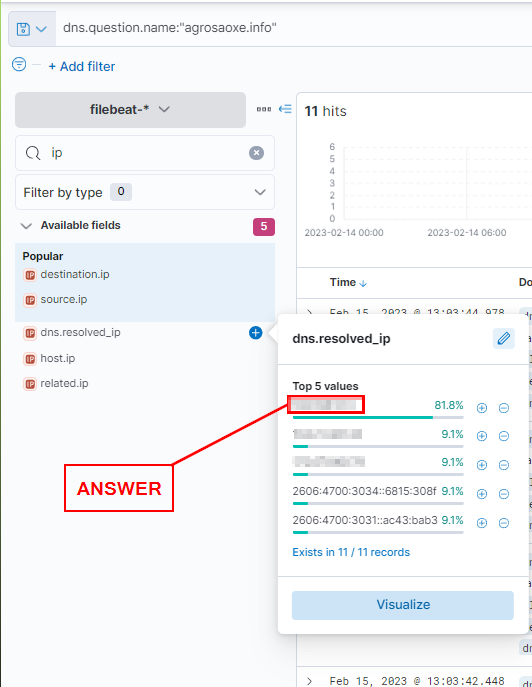
What is the IP address used for DNS Sinkhole?
All our hardwork from answering the previous question, gave us the answer to this question. The internal IP address at the top of the small window, is the IP address of the DNS Sinkhole. Copy and paste or type the answer into the THM answer field. Then click Submit.
ANSWER: 192.168.5.13
How many hits were caused by connections to sinkholed domains?
THM gave us a wonderful query for this as well. Copy the first part: dns.answers.data:, and head back over to Elastic.
Now add the DNS sinkhole IP address between double quoutes ( “ ): "192.168.5.13”, then press enter to run the query.
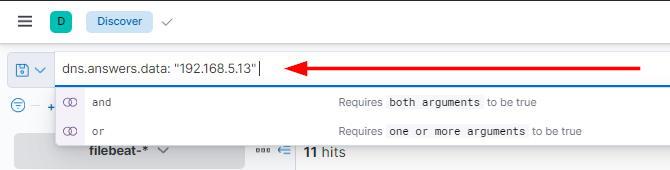
Again, look at hits, as the integar to the left is the number of results and thus the answer. Type it into the THM answer field, and click Submit.
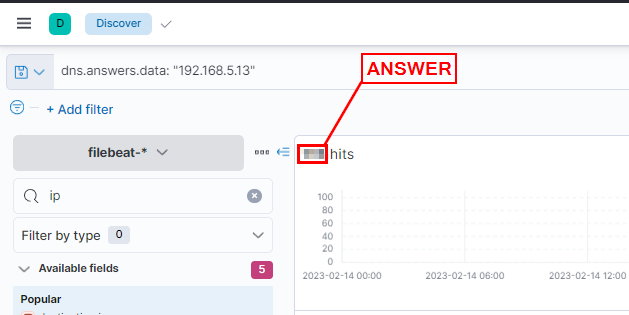
ANSWER: 115
How many unique domains have been sinkholed?
Looking in the Available fields panel, under Popular. We can see zeek.dns.query, click on it. In the small window, there is a light blue button labeled Visualize. Click on it.
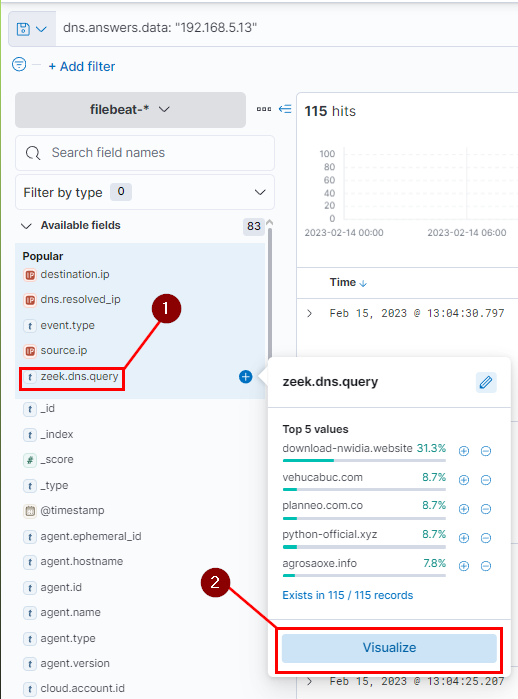
On the right side of the Visualization page, you will see Top values of zeek.dns.query. Click on it.
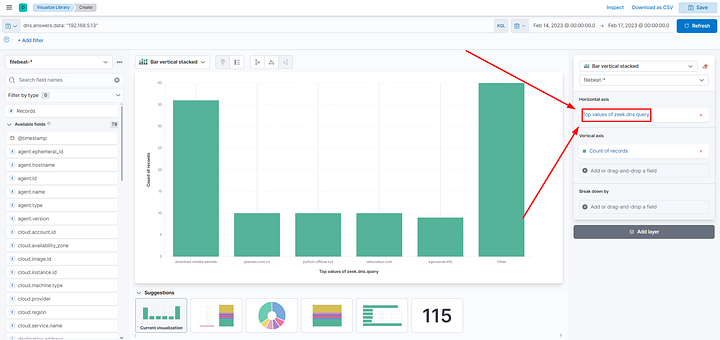
A new display will appear. We can see a field labeled Number of values. Since we know how many results we have, and it is displayed at the bottom of the page. We want to add this number into the Number of values field.
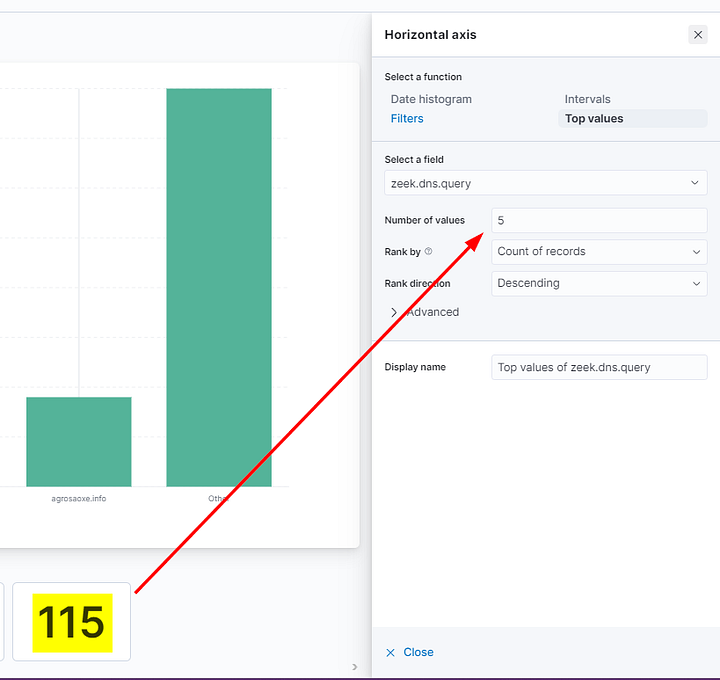
Count the results on the bar chart, the number of bars is the answer. Type it into the THM answer field, then click Submit.
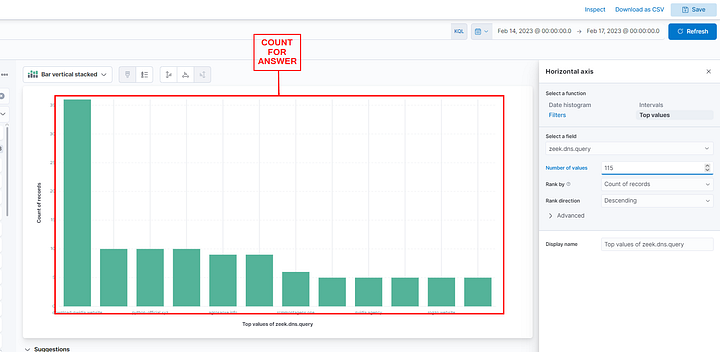
ANSWER: 12
Task 4 Intelligence-driven Detection
You have successfully deployed preventive mechanisms to mitigate known IOCs in your infrastructure. To maximise the capabilities of your detection and response, you are now tasked to improve the detection capabilities of your tooling.
We have started utilising Threat Intelligence from the previous task to prevent potential compromises from malicious actors. Now, we will leverage Threat Intelligence IOCs to know if something suspicious is happening in our infrastructure effectively.
Optimising Detection Capabilities
Implementing detection based on IOCs may be pretty straightforward, as one may think we can deploy a blocklist rule for known malicious IOCs. An example set of detection use cases is listed below for each common Threat Intel IOC.
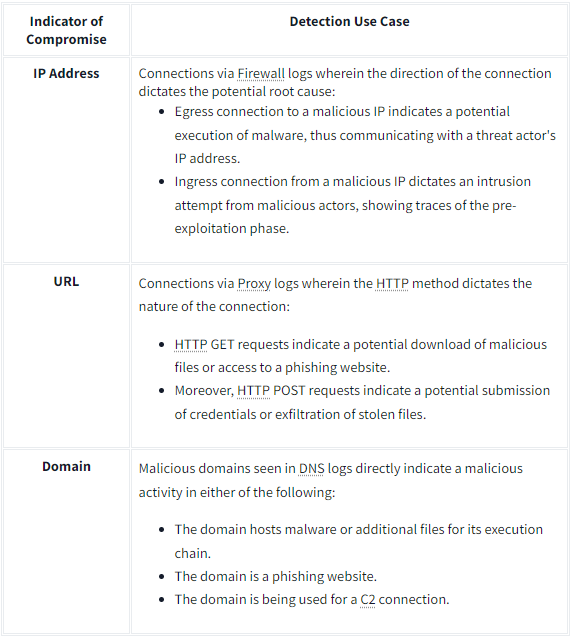
The scenarios above depict the usage of publicly available IOCs to hit any suspicious connections across different data sources such as Firewalls, DNS and Proxy servers. However, this kind of setup may require continuous fine-tuning of rules to accommodate the growth of IOCs.
We can combine some prevention techniques discussed in Task 3 to detect suspicious traffic.
By doing so, the fine-tuning detection rules only rely on blocklist updates from prevention tactics. Hence, this way introduces an optimal way to prevent and detect malicious activity based on Threat Intelligence IOCs.
Sigma Rules Revisited
As discussed throughout the Detection Engineering Module, Sigma is an open-source generic signature language to describe log events in a structured format. This allows for quick sharing of detection methods by security analysts.
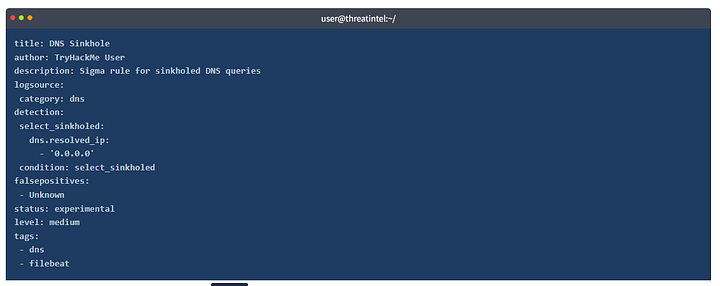
In this task, we will use the following Sigma rule to hunt for sinkholed domains.
1
2
3
4
5
6
7
8
9
10
11
12
13
14
15
16
17
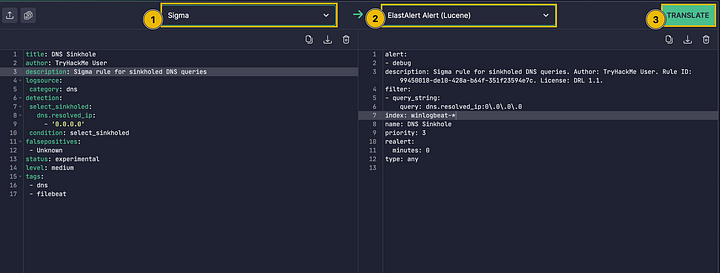
title: DNS Sinkhole
author: TryHackMe User
description: Sigma rule for sinkholed DNS queries
logsource:
category: dns
detection:
select_sinkholed:
dns.resolved_ip:
- '0.0.0.0'
condition: select_sinkholed
falsepositives:
- Unknown
status: experimental
level: medium
tags:
- dns
- filebeat
The Sigma rule above hunts for DNS queries resolving 0.0.0.0. As discussed previously, such cases may indicate a connection to a known suspicious domain based on DNS Sinkhole configuration.
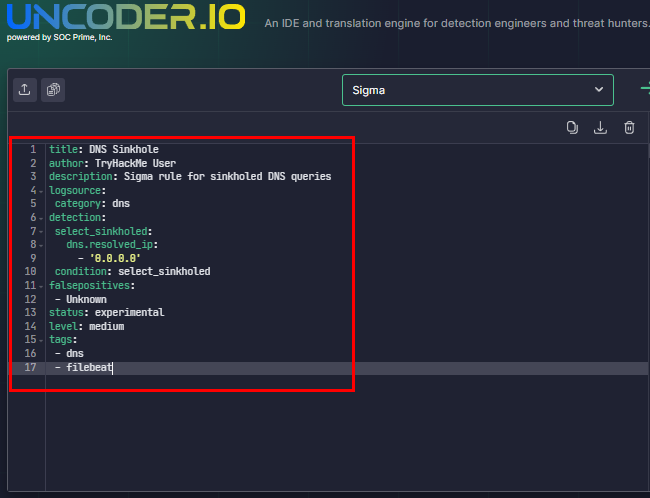
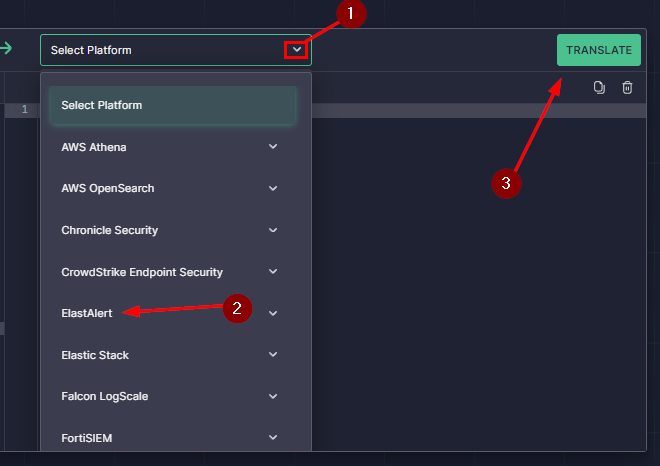
Playing with ElastAlert and Uncoder.io
To emulate sample detection, we will use Uncoder.io to translate the previously mentioned Sigma rule into ElastAlert. Ensure that the conversion is set from Sigma to ElastAlert before clicking Translate.
Before we use the generated rule, let’s have a quick run-through about ElastAlert.
ElastAlert is an open-source framework for alerting on anomalies, spikes, or other patterns of interest found in data stored in Elasticsearch. It integrates with Elasticsearch, Kibana, and other tools in the Elasticsearch ecosystem and can be configured to send alerts to various external services such as Email, Slack, PagerDuty, and more.
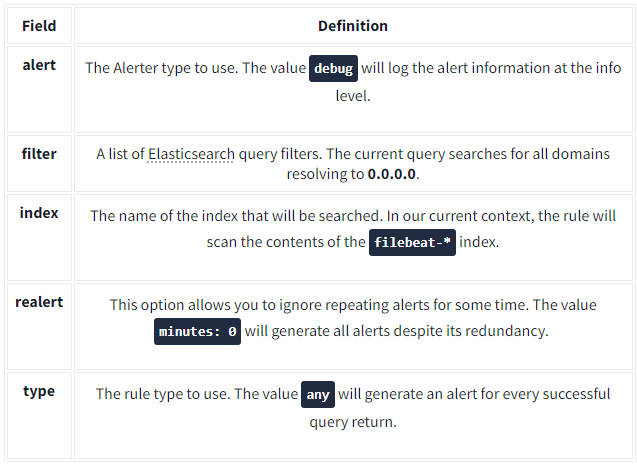
The resulting ElastAlert rule from Uncoder.io contains the following information:
Now that we have introduced ElastAlert, access the machine via SSH using the provided credentials in Task 2 (user:tryhackme) and navigate to the ~/elastalert directory. You may see that the directory contains a config file and a subdirectory.
1
2
3
4
user@threatintel:~/elastalert$ ls
config.yaml  rules
user@threatintel:~/elastalert$ ls rules/
sinkhole.yaml
The config.yaml file contains all the configurations needed to connect and query to our Elasticsearch instance, while the ~/elastalert/rules directory contains a placeholder rule. You may populate this rule with the translated Sigma to ElastAlert rule from Uncoder.io.
Note: After copying the Elastalert rule generated by Uncoder.io, execute the following to clean the syntax and point ElastAlert to the right index.
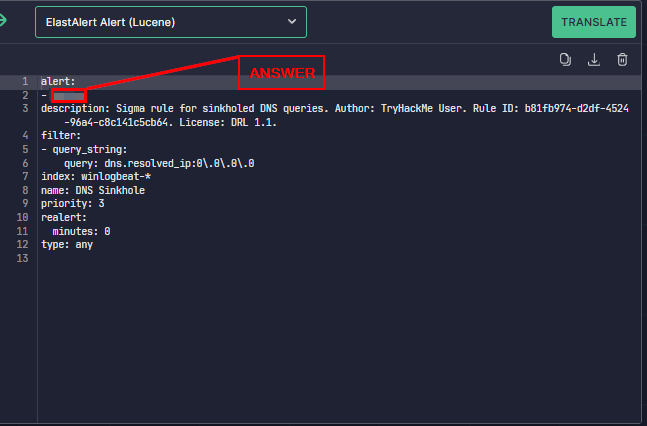
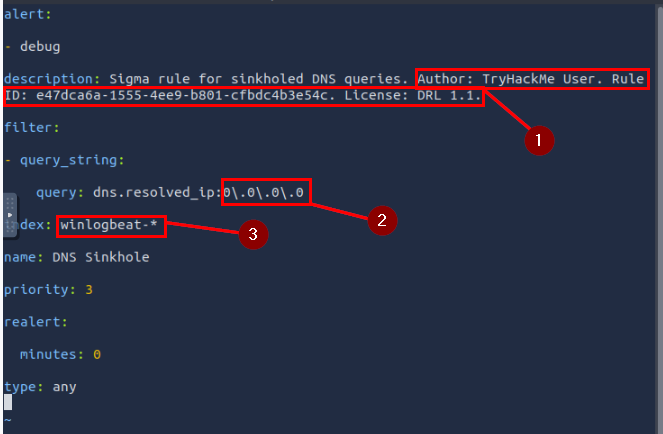
- In the description field, remove the string starting from
Author:until the end of the line. This is being removed to make the syntax of the ElastAlert rule valid. - In the index field, replace
winlogbeat-*withfilebeat-*.
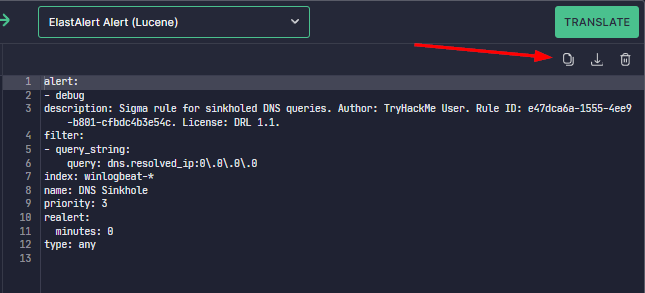
The ElastAlert rule should be similar to the one below after executing the steps mentioned above.
1
2
3
4
5
6
7
8
9
10
11
12
13
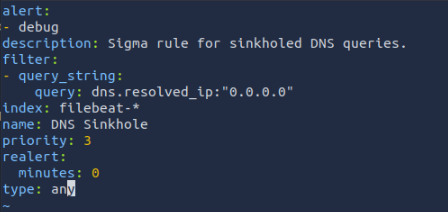
user@threatintel:~/elastalert/rules$ cat sinkhole.yaml
alert:
- debug
description: Sigma rule for sinkholed DNS queries.
filter:
- query_string:
query: dns.resolved_ip:"0.0.0.0"
index: filebeat-*
name: dns_sinkhole
priority: 3
realert:
minutes: 0
type: any
After configuring the sinkhole.yaml rule, navigate back to the elastalert directory and start executing ElastAlert.
user@threatintel:~/elastalert/rules$ cd ~/elastalert
user@threatintel:~/elastalert$ elastalert –start 2023-02-16T00:00:00 –verbose 2>&1 | tee output.txt
The elastalert command above can be broken down as:
- ElastAlert executes the rule we configured starting from 02/16/2023 until the present.
- It also provides verbose output.
- Lastly, the snippet uses
2>&1 | tee output.txtto write the results into output.txt. Note that file descriptors were used since the output is being written at the INFO level.
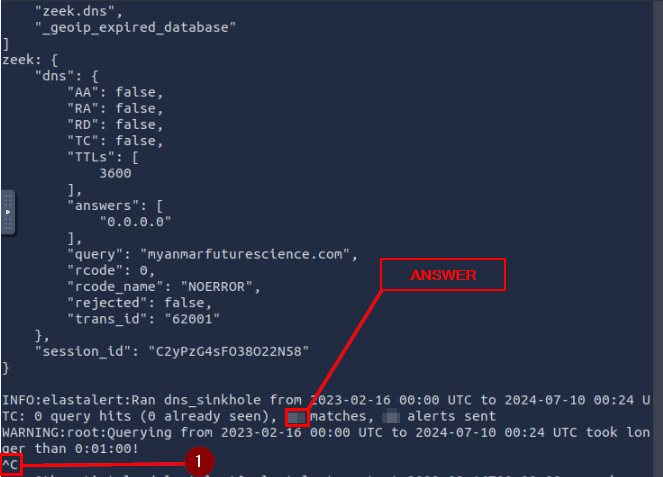
Once the command is executed, you may need to wait a few seconds to finish the initial run. The following string indicates that the execution is finished: X query hits (X already seen), X matches, X alerts sent
After seeing the string above, you can now stop the execution of the elastalert command with CTRL + C.
To complete the task, review the results written in ~/elastalert/output.txt to answer the questions below.
Answer the questions below
What is the value of the alert field in the converted ElastAlert rule?
We need to first copy the sigma rule from above. Once you have it copied, let’s head over to Uncoder.io.
Once on Uncoder.io, paste the Sigma rule into the input section on the left. It will automatically change the platform to Sigma.
Now on the right side, click the down caret on the Select Platform. Then in the drop down menu, click on ElastAlert. Finally, click on the teal TRANSLATE button in the upper right.
Looking at the results we can see that alert is the first category. Under which is the type of alert and thus the answer to the question. Type the answer into the THM answer field. Then click Submit.
ANSWER: debug
How many alerts were generated by the rule?
We need to first access the machine via SSH. I am using an attackbox to SSH into the machine. To SSH you can start by using ssh user@{InsertMachineIP}, then press enter to attempt to connect. You will be asked to add the servers fingerprint to the list of known hosts, type yes and press enter. Finally, you will be prompted to enter the password. Type tryhackme and press enter again. You should be logged into the server at this point.

Change the directory with the command cd elastalert.

Head back to Uncoder.io. On the output/right side click the copy icon under the teal TRANSLATE. This will copy the rule to your clipboard. Now head back to the server we SSH’d into.
Time to edit the rule file. Use your favorite text editor, I am using vim. Open the sinkhole.yaml file.

Remove the old content from inside of the yaml. In vim this can be done by typing :%d then pressing enter. Now that the file is clear, press i to enter INSERT mode. Then paste the rule into the yaml with ctrl shift V.
Finally we need to edit the contents we just pasted. As shared by THM above, in the description section remove everything starting from Author till the end of the line. Moving down to query, we need to change the IP address to "0.0.0.0". Next in the index section, change winlogbeat-* to filebeat-*. The last edit is all the whitespace between each line. You can easily remove these using dd on each whitespace line.
The final configuration for the yaml should look like it does below. Now save the file using :wq and pressing enter.
Using a modified version of command given to use by THM above. So the command we want to use is elastalert --start 2023–02–16T00:00:00 --verbose 2>&1 | tee output.txt. The command will run the elastalert program, checking our rule we just configured on the information starting on Feb 16, 2023 through to today. The output is then configured to be verbose and said output will be place in the file output.txt. If the file output.txt doesn’t exist, it will be created. Now press enter to run the command.

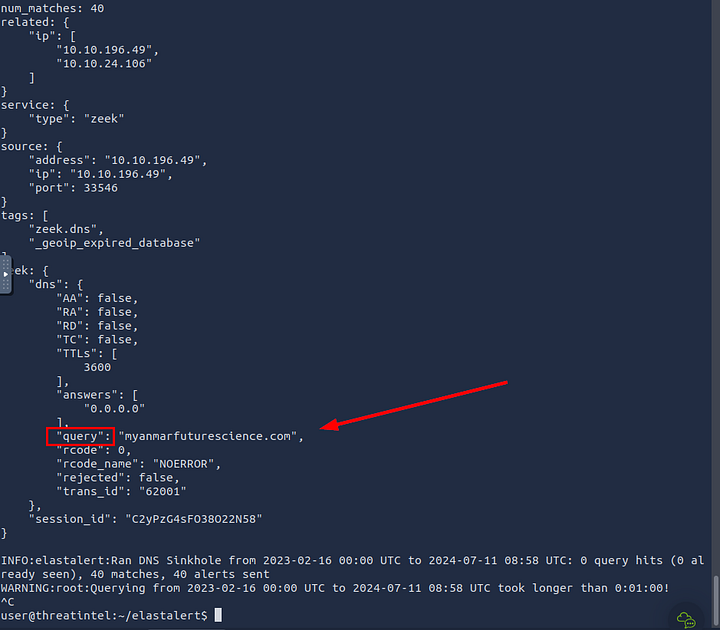
This will take a minute or two, to complete. Once you see X query hits (X already seen), X matches, X alerts sent, press CTRL C to end the program. This will stop the program from running. Looking at the line I first mentioned, look for matches. The interger to the left of matches is the answer. Type it into the THM answer field, then press Submit.
ANSWER: 40
How many unique domains were sinkholed via 0.0.0.0?
We first need to see how the domains are displayed in the results. Looking towards the end of the output, we can see that "query": has a domain after it. So let’s grep out the "query":, and see what we get.
To grep out "query":, we can place it inbetwen single quotes. This will allow us to have the double qoutes ( “ )in the search perimeters, along with the colon ( : ). So our command should be: grep '"query":' output.txt. Press enter to run, and we can see that we only get back the domains. Time to clean this up and narrow down the list.
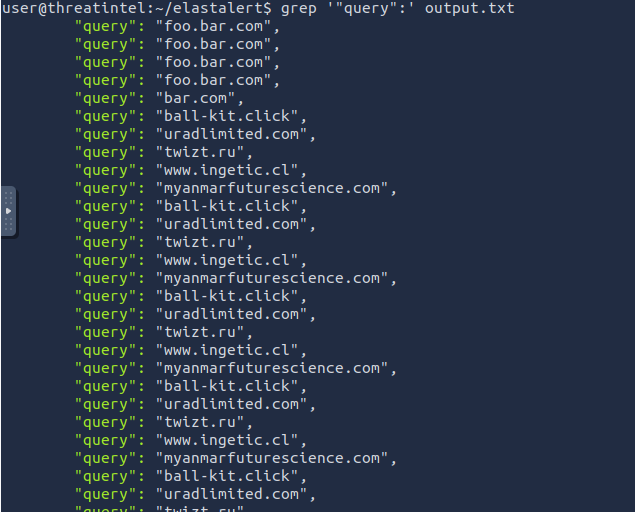
To do this we will use some commandline kunfu. First we will repeat the last command grep '"query":' output.txt. But then we will add a pipe | , followed by sort to alphabetize the output so far. Next, another pipe | . Then we will use uniq, it will only show one instance for each occurrence. One last pipe | and wc -l, wc stands for word count. But using the -l, will out put the number of lines. So for our cases, it will show the number of unique domains. Press enter to run the command. Once it is displayed, type the answer into the THM answer field. Then click Submit.

ANSWER: 7
What is the sinkholed domain that has .ru TLD?
You can either parse through the output from when we ran the orginarl query. Or you can use some more commandline kung-fu to only display the Top Level Domain (TLD). I choose kung-fu!! Keeping our orginal query of grep '"query":' output.txt. We will add a pipe | and then another grep, this time looking for '.ru'. Lastly, one more pipe |, and using uniq to only display one identical instance of each match. Press enter to run the command. Once it is displayed, type the answer into the THM answer field. Then click Submit.

ANSWER: twizt.ru
Task 5 Conclusion
Congratulations! You have completed learning and improving the Security Operation’s capabilities using Threat Intelligence.
In the previous tasks, we have learned the following:
- The difference between Threat Intelligence Producers and Consumers.
- Knowing your current needs and capabilities is vital to maximising the usage of Threat Intelligence.
- Implementation of Intelligence-driven prevention and detection.
- Revisiting Sigma, Uncoder and Elastalert for the example tooling of intelligence-driven detection.
To conclude, this room focused on leveraging Threat Intelligence to improve the overall capabilities of a Security Operations Center, ranging from detection capabilities to preventive mechanisms that mitigate entirely known threats.
In this world of ever-evolving threats, we need to utilise every ounce of knowledge to protect our organisation, including all the intelligence provided by organisations that serve as Producers and bits of meaningful feedback from Consumers. Through collaboration, we can protect and improve the security posture of every organisation.
If you enjoyed this room, continue learning detection engineering concepts by proceeding to Rule Tuning (coming soon!) and Alert Enrichment (coming soon!).