If you haven’t done tasks 1 and 2 yet, here is the link to my write-up of them: Task 1 Introduction & Task 2 Nmap Scans
Getting the VM Started
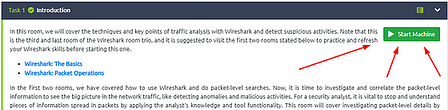
Starting at Task 1, you will see the green Start Machine button. Click this button to get the VM Started.
Scroll to the top where the banner is. On the right side of the page, you will see the blue Show Split view. Click this blue button.
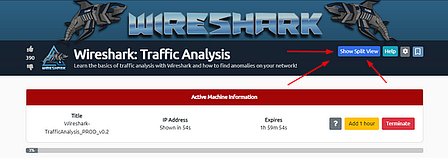
The page will split, now just wait till the VM loads.
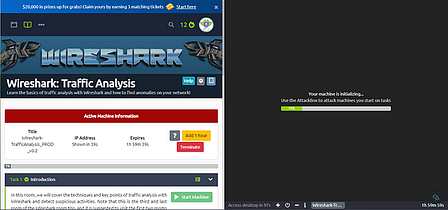
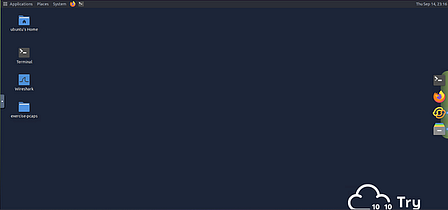
Once the VM loads, click the View in Full Screen icon in the bottom left of the VM.
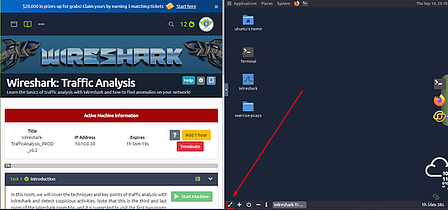
A new browser tab should open with the VM in it.
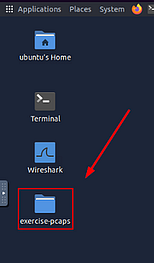
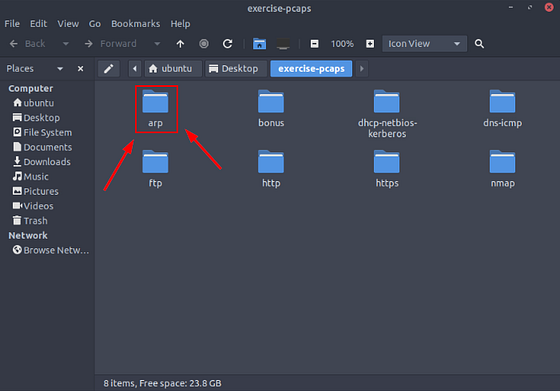
Double-Click on the e_xercise-pcap_ folder to open it.
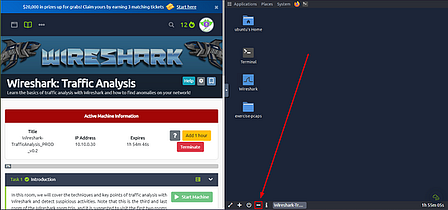
While folder opens, head back to the THM Task Tab. At the bottom of the VM you will see a minus ( — ), this represents Exit Split View. Click the — to allow the THM task to incapsilate the entire window. This won’t close out of your VM instance, it will just be on the other tab.
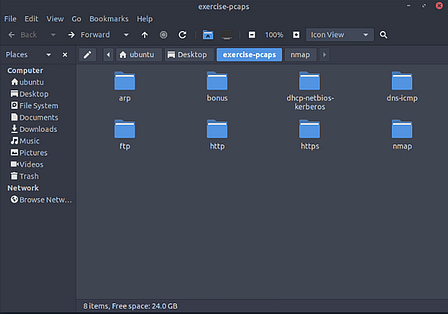
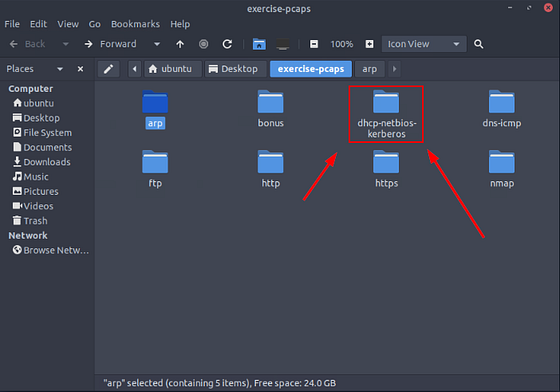
Heading back to the browser tab that the VM is in. The folder should be open. Inside this folder will be other folders containing the files needed for the tasks ahead. The folders are named accordingly to the task they are associated with.
Task 3 ARP Poisoning & Man In The Middle!
ARP Poisoning/Spoofing (A.K.A. Man In The Middle Attack)
ARP protocol, or Address Resolution Protocol (ARP), is the technology responsible for allowing devices to identify themselves on a network. Address Resolution Protocol Poisoning (also known as ARP Spoofing or Man In The Middle (MITM) attack) is a type of attack that involves network jamming/manipulating by sending malicious ARP packets to the default gateway. The ultimate aim is to manipulate the “IP to MAC address table” and sniff the traffic of the target host.
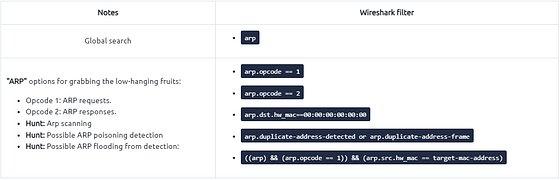
There are a variety of tools available to conduct ARP attacks. However, the mindset of the attack is static, so it is easy to detect such an attack by knowing the ARP protocol workflow and Wireshark skills.
ARP analysis in a nutshell:
- Works on the local network
- Enables the communication between MAC addresses
- Not a secure protocol
- Not a routable protocol
- It doesn’t have an authentication function
- Common patterns are request & response, announcement and gratuitous packets.
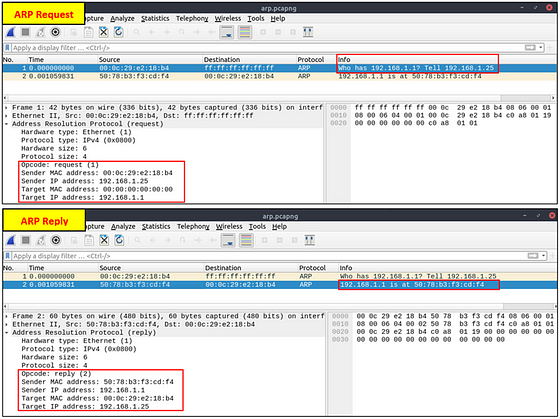
Before investigating the traffic, let’s review some legitimate and suspicious ARP packets. The legitimate requests are similar to the shown picture: a broadcast request that asks if any of the available hosts use an IP address and a reply from the host that uses the particular IP address.
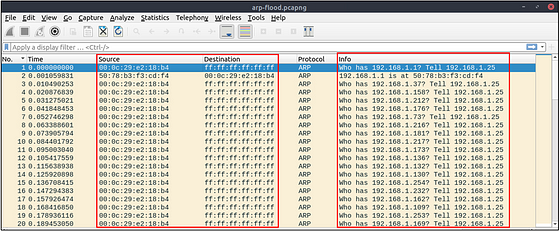
A suspicious situation means having two different ARP responses (conflict) for a particular IP address. In that case, Wireshark’s expert info tab warns the analyst. However, it only shows the second occurrence of the duplicate value to highlight the conflict. Therefore, identifying the malicious packet from the legitimate one is the analyst’s challenge. A possible IP spoofing case is shown in the picture below.
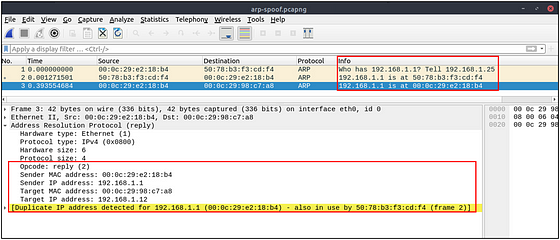
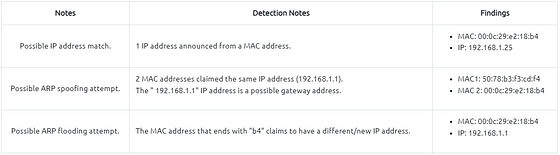
Here, knowing the network architecture and inspecting the traffic for a specific time frame can help detect the anomaly. As an analyst, you should take notes of your findings before going further. This will help you be organised and make it easier to correlate the further findings. Look at the given picture; there is a conflict; the MAC address that ends with “b4” crafted an ARP request with the “192.168.1.25” IP address, then claimed to have the “192.168.1.1” IP address.
Let’s keep inspecting the traffic to spot any other anomalies. Note that the case is split into multiple capture files to make the investigation easier.
At this point, it is evident that there is an anomaly. A security analyst cannot ignore a flood of ARP requests. This could be malicious activity, scan or network problems. There is a new anomaly; the MAC address that ends with “b4” crafted multiple ARP requests with the “192.168.1.25” IP address. Let’s focus on the source of this anomaly and extend the taken notes.
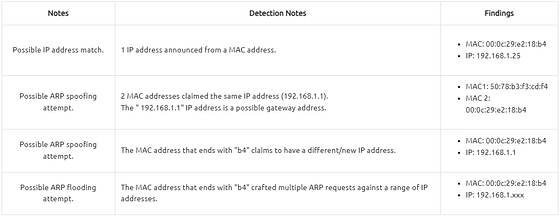
Up to this point, it is evident that the MAC address that ends with “b4” owns the “192.168.1.25” IP address and crafted suspicious ARP requests against a range of IP addresses. It also claimed to have the possible gateway address as well. Let’s focus on other protocols and spot the reflection of this anomaly in the following sections of the time frame.

There is HTTP traffic, and everything looks normal at the IP level, so there is no linked information with our previous findings. Let’s add the MAC addresses as columns in the packet list pane to reveal the communication behind the IP addresses.
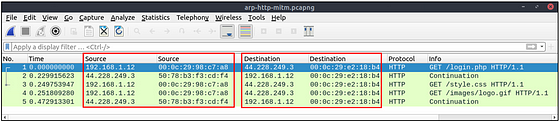
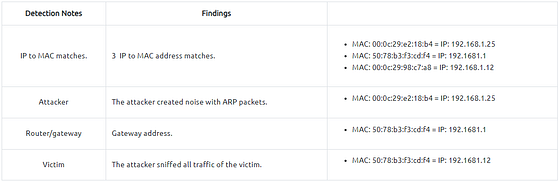
One more anomaly! The MAC address that ends with “b4” is the destination of all HTTP packets! It is evident that there is a MITM attack, and the attacker is the host with the MAC address that ends with “b4”. All traffic linked to “192.168.1.12” IP addresses is forwarded to the malicious host. Let’s summarise the findings before concluding the investigation.
Detecting these bits and pieces of information in a big capture file is challenging. However, in real-life cases, you will not have “tailored data” ready for investigation. Therefore you need to have the analyst mindset, knowledge and tool skills to filter and detect the anomalies.
Note: In traffic analysis, there are always alternative solutions available. The solution type and the approach depend on the analyst’s knowledge and skill level and the available data sources.
Detecting suspicious activities in chunked files is easy and a great way to learn how to focus on the details. Now use the exercise files to put your skills into practice against a single capture file and answer the questions below!
Answer the questions below
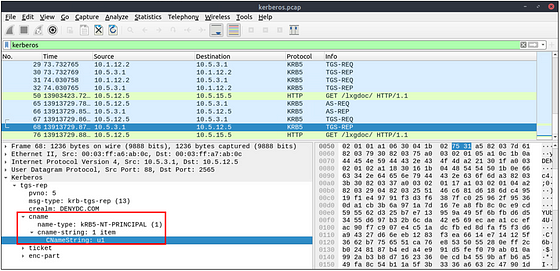
Use the “Desktop/exercise-pcaps/arp/Exercise.pcapng” file.
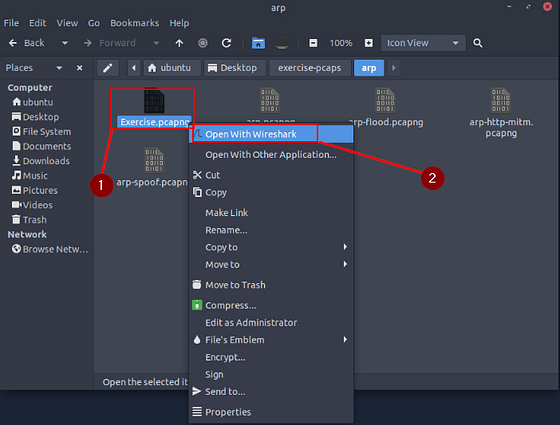
Inside the exercise-pcaps folder, double-click on the arp folder.
Inside the arp folder you will see the Exercise.pcap file. Right-click on it, then choose Open With Wireshark from the drop-down menu.
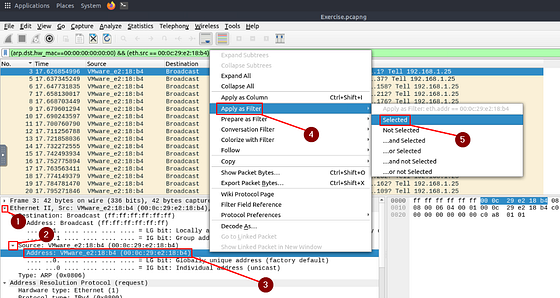
What is the number of ARP requests crafted by the attacker?
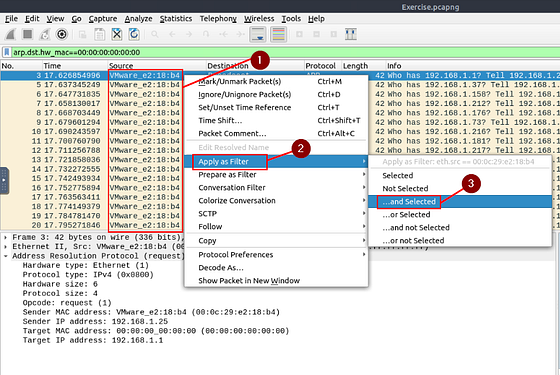
First, we need to figure out what the attacker’s IP or MAC address is. Taking into account from the question, we are looking for ARP requests. So to me it seems like the attacker is scanning the system. With all of this knowledge, we can start to figure out the filter we need to craft to be able to find the answer. Scrolling up to the table that THM provided at the beginning of this task, we can find a filter for possible ARP scanning. That being arp.dst.hw_mac==00:00:00:00:00:00. Copy (ctrl+C) & Paste(crtl+P) or type the filter into the mint green filter bar in Wireshark, then press enter.

From the results we can see that the Source MAC address seems to be scanning the system. This could be our attacker, so to investgate this possibility, right-click on the Source MAC address. Hover you cursor over the Apply as Filter. Another drop-down menu will appear. Move your cursor over to the …and Selected and click on it.
Looking at the results it seems like we may have our answer. But since the question did say Requests, then we want to confirm this. We can easily do this by adding onto our filter.
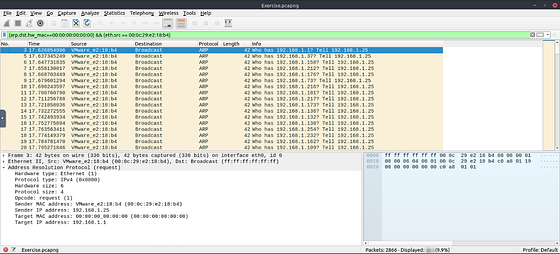
Following the syntax already established by the search parameters, along what THM shared at the start of this task. We can add the following to the end of our filter: && (arp.opcode==1). Adding this to the end of the filter will show only Arp Request from the suspected Malcious actor. Once you have typed it into the mint green search bar, press enter to search.

The answer will be located in the bottom right of the Wireshark window. The number next to Displayed is the answer to the question. Once you have found it, type it into the THM answer field. The click submit.

Answer: 284
What is the number of HTTP packets received by the attacker?
Since we know what the MAC address is for the attacker, we can use that to search for the HTTP packets. To do this you will need to follow a couple of steps. The first being in the Detail section of Wireshark. You want to click on the drop-down carot for Layer 2. You will then see Destination and Source, click on the drop-down carot for Source. We can now see the attacker’s MAC address, time to apply it as a filter. To do this, right-click on Address: VMware_e2:18:b4 (00:0c:29:e2:18:b4). A drop-down menu will appear, move your cursor over top of Apply as Filter. The final drop-down menu will appear, move your cursor over to Selected and click on it.
The filter will appear in the mint green Filter bar. Now before we press enter and use it, we need to add to the filter. Since the question is asking for HTTP we can add to the end of the filter && http. This will search for any HTTP packets from our attackers MAC address. Now press enter to use the filter.

You should now have all the HTTP packets attributed to the attackers MAC address. The answer will be located in the bottom right of the Wireshark window. The number next to Displayed is the answer to the question. Once you have found it, type it into the THM answer field. The click submit.
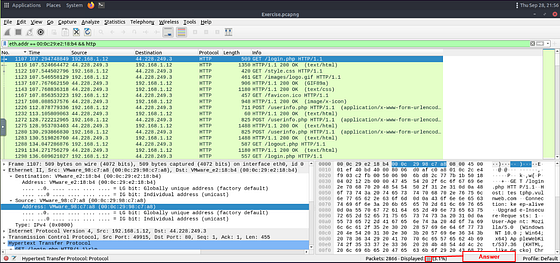
Answer: 90
What is the number of sniffed username&password entries?
Heading back to Wireshark, we can stick with the filter we currently have to start investigating. Looking at the Info section of the packet area, we can see an interesting frame. Inside this frame we see POST and /userinfo.php
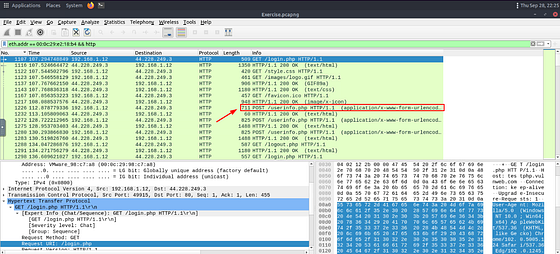
Inspecting the Details section, we can see that we are correct. We see the username and password. Time to filter down so that we only see these types of packets.
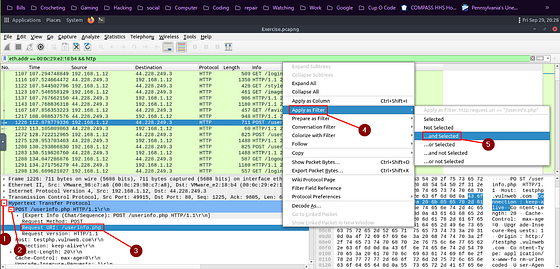
To do this we first need to dig down a bit. Do this by clicking on the drop-down carot on Hypertext Transfer Protocol. Again click on the drop-down carot next to POST /userinfo.php. You should now see Request URI: /userinfo.php. Right-click on Request URI: /userinfo.php, from the drop-down menu hover your cursor over Apply as Filter. When the new drop-down menu appears, move your cursor over to …and Selected. Then click on it.
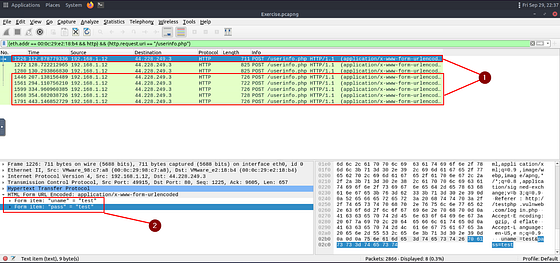
As we can see we have 8 results left. Two of which seem to be a bit larger than the others. Let’s check them out to see they contain usernames and passwords.
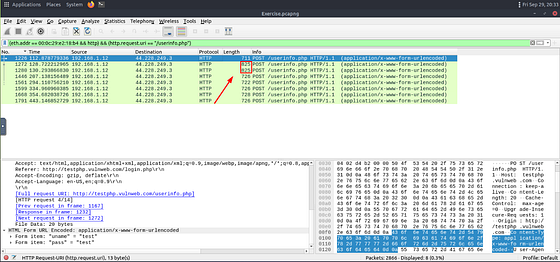
Taking a look we can see a username, but no password. So it seems safe to believe that the two packets that are larger, do not contain passwords (feel free to take a look since there is only one other packet).
So it looks like we need to count the other packets we have left. Once you have done this, type the number into the THM answer field, and click submit.

Answer: 6
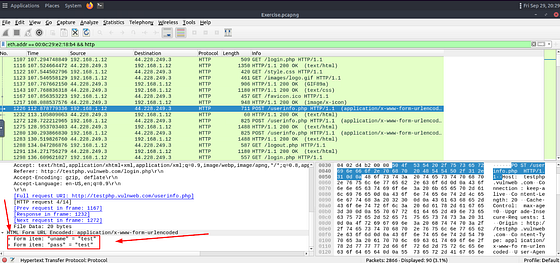
What is the password of the “Client986”?
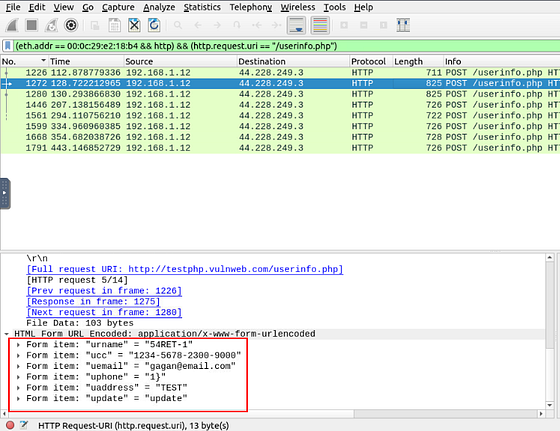
Time to do some inspecting. We need to click on each of the packets. Then check out the detail section of each. At the bottom of the Detail section is HTML Form URL Encoded: application/x-www-for-urlencoded. Under this drop down is uname and pass. You need to look at each till you find the uname Client986.
Once you find it, type the answer into the THM answer field. Then click submit.
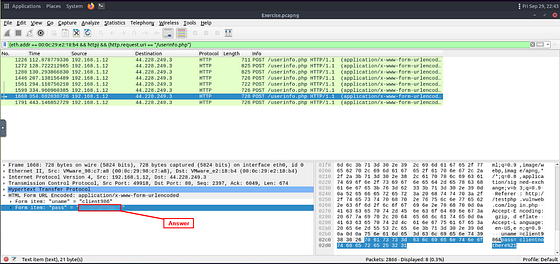
Answer: clientnothere!
What is the comment provided by the “Client354”?
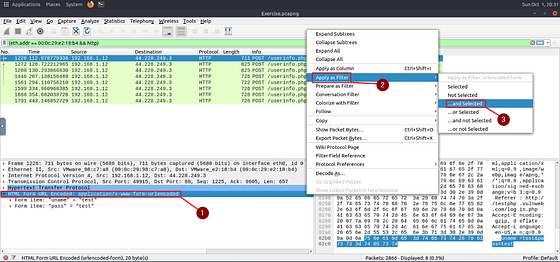
To be honest this took me a while to figure out as I was over looking and narrowed my scope to much. I took a step back and removed the filter that showed only HTTP URI of /userinfo.php. To do this delete that filter from the filter field, but don’t press enter to resubmit.

Now right-click on HTML Form URL Encoded: application/x-www-for-urlencoded. On the drop-down menu, hover your cursor over Apply as Filter. Then an new drop-down will appear, click on …and Selected.
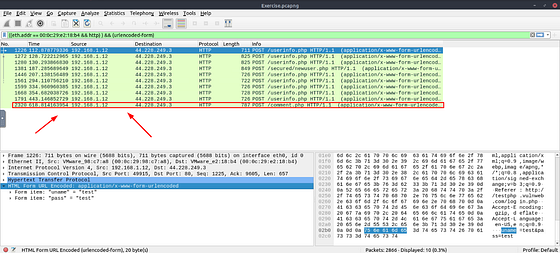
Looks like we have two new packets, newuser.php and comment.php. Since we want to see what comment was made by client354. It is safe to say we want to check the packet containing comment.php, so click on it.
This was the right call, because as we can see we have client354 and comment. So if we look at comment we can find the answer. Once you see it, type it into the THM answer field. Then click submit.
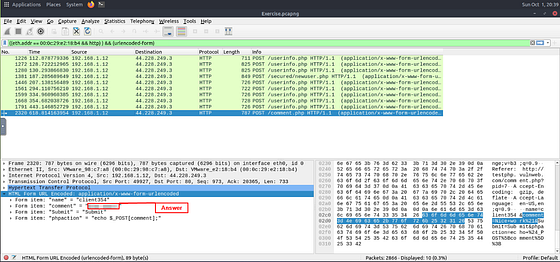
Answer: Nice Work!
Task 4 Identifying Hosts: DHCP, NetBIOS and Kerberos
Identifying Hosts
When investigating a compromise or malware infection activity, a security analyst should know how to identify the hosts on the network apart from IP to MAC address match. One of the best methods is identifying the hosts and users on the network to decide the investigation’s starting point and list the hosts and users associated with the malicious traffic/activity.
Usually, enterprise networks use a predefined pattern to name users and hosts. While this makes knowing and following the inventory easier, it has good and bad sides. The good side is that it will be easy to identify a user or host by looking at the name. The bad side is that it will be easy to clone that pattern and live in the enterprise network for adversaries. There are multiple solutions to avoid these kinds of activities, but for a security analyst, it is still essential to have host and user identification skills.
Protocols that can be used in Host and User identification:
- Dynamic Host Configuration Protocol (DHCP) traffic
- NetBIOS (NBNS) traffic
- Kerberos traffic
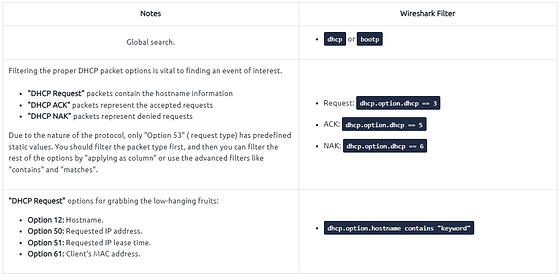
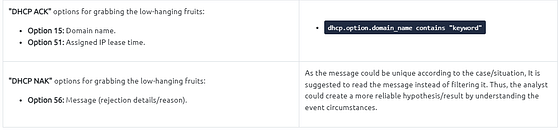
DHCP Analysis
DHCP protocol, or Dynamic Host Configuration Protocol (DHCP), is the technology responsible for managing automatic IP address and required communication parameters assignment.
DHCP investigation in a nutshell:
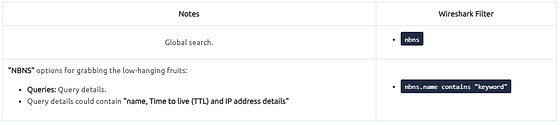
NetBIOS (NBNS) Analysis
NetBIOS or Network Basic Input/Output System is the technology responsible for allowing applications on different hosts to communicate with each other.
NBNS investigation in a nutshell:
Kerberos Analysis
Kerberos is the default authentication service for Microsoft Windows domains. It is responsible for authenticating service requests between two or more computers over the untrusted network. The ultimate aim is to prove identity securely.
Kerberos investigation in a nutshell:
Detecting suspicious activities in chunked files is easy and a great way to learn how to focus on the details. Now use the exercise files to put your skills into practice against a single capture file and answer the questions below!
Answer the questions below
Use the “Desktop/exercise-pcaps/dhcp-netbios-kerberos/dhcp-netbios.pcap” file.
Going back to the folder where the pcapng file is located. Click on the Back button in the upper left of the arp folder’s window.
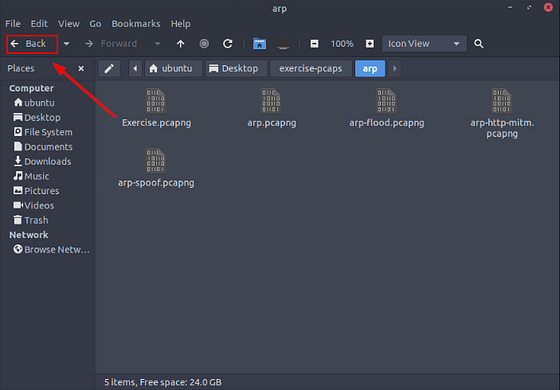
Now being in the exercise-pcaps folder, double-click on dchp-netbios-kerberos folder to open it.
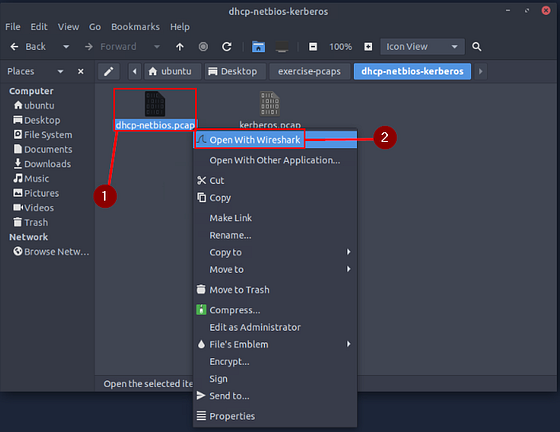
Now being inside the dhcp-netbios-pcaps folder, right-click on the dchp-netbios.pcap file. From the drop-down menu, click on Open With Wireshark.
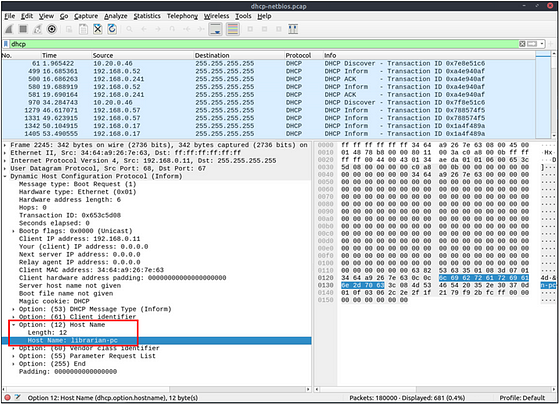
What is the MAC address of the host “Galaxy A30”?
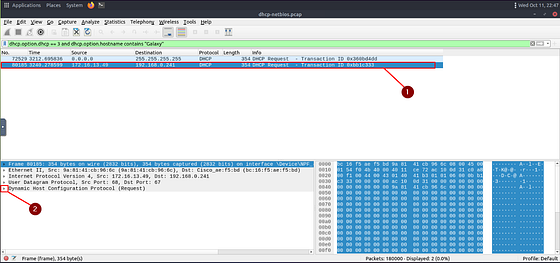
A way we can find this is using DHCP (Dynamic Host Configuration Protocol). Since DHCP will will assign an IP address to everything attached to the network. From the reading above, we know that the option for a DHCP request is 3. Along with that we are looking for a device the Galaxy in the Hostname. So let’s build our filter with our knowledge, we can start with dhcp.option.dhcp == 3 which will look for DHCP request. Then and, followed by dhcp.option.hostname contains "Galaxy". Which will look for any host names that have Galaxy in the name. All together the filter looks like this: dhcp.option.dhcp == 3 and dhcp.option.hostname contains “Galaxy” . After you typed it into the mint green filter bar, press enter to filter for you query.

Looks like we are left with two results. Taking a look at the Source IP, we can see the first one is coming from inside the system. While the second one looks to be outside the system getting an interior IP address. Let’s take a look at this one, click on the result. In the Packet Detail section let’s inspect the details by clicking the carot to drop the DHCP section.
Looks like we have a lot of info, so scroll down till you see the different Options.

Once you reach the Options section. You should see one labeled Option: (12) Host Name. Click on the carot to drop down the details of this section. Taking a look at it we can see that is the Galaxy A30 we are looking for. Time to scroll up just a bit to see the MAC Address.
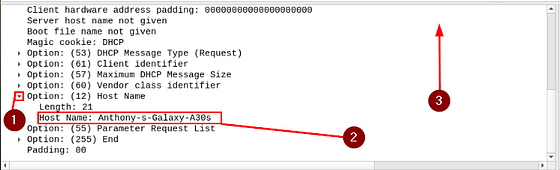
Once you see the Client MAC address: you have found the answer. You can type it into the answer field. Or you can right-click on the Client MAC address. Then from the drop-down menu, hover you mouse over Copy. A new drop-down will appear, move your mouse over to Value and click on it. Now you can paste the answer into the THM answer field, and click submit.
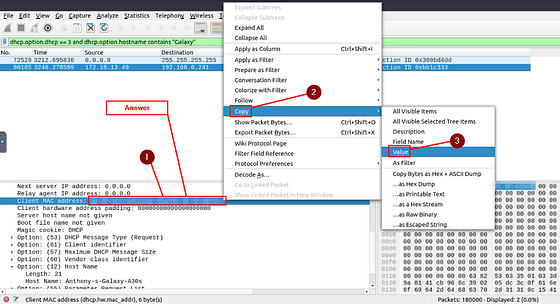
Answer: 9a:81:41:cb:96:6c
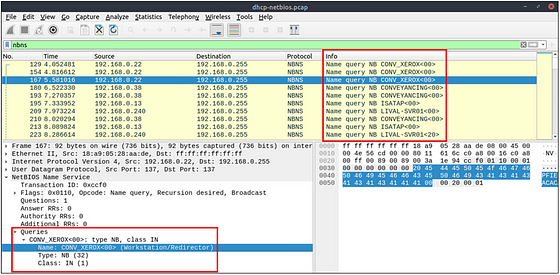
How many NetBIOS registration requests does the “LIVALJM” workstation have?
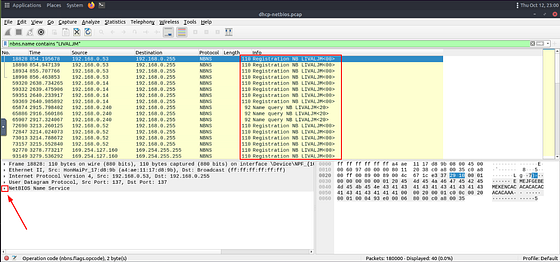
After reading the section above, the start of this should be pretty start forward. We are looking for a the NetBIOS name. So to start crafting this filter we will use nbns.name contains "LIVALJM". Since THM gave us the name we added it into the section after contains. Once this is typed into the mint green filter bar, press enter to filter for your query.

We are now left with the results that match the netBIOS name. But we can see that there is more than just Registration requests. So if you want to you could use some counting to find the answer. But I want to filter these so that only the Registration requests are the only thing that appears. To do this we can click on the carot of the NetBIOS Name Service to reveal the details to help us filter this down further.
The first thing that catches my eye is that in the section is Registration. Since we are looking for registration requests, it seems like a great way to narrow this down. Click the carot to drop-down the Flags section, to show more details. Inside this section we can see that O_pcode: _Registration is 5. I think we have enough to expand our filter.
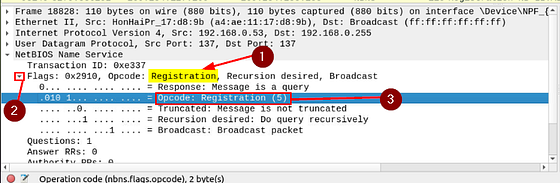
Going back to the mint green filter bar. Start by typing and to include our next bit in the filter. The next part we are looking for any packets that have the Ocode of 5 under the flags section. To do this we use the following nbns.flgs.opcode == 5. Once we have this typed into your filter field, press enter to filter.

Looking at the top section, all we see is Registration Request now. Look at the bottom right of the Wireshark window. You are looking for the word Displayed:. The numbers to the right of Displayed, is the answer. Type the answer in the THM answer field, and then click submit.
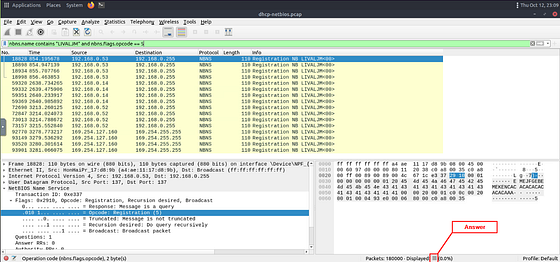
Answer: 16
Which host requested the IP address “172.16.13.85”?
Since the question is asking which host requested, it is safe to assume we could be jumping back to DHCP type filters. With this knowledge, taking a look up at some of the examples given to us by THM. One stands out, and that being the Option 50: Requested IP Address.
Let’s build the filter. On the mint green filter bar, we want to create the filter similar to the other DHCP filter from before. Start with dchp.option, as you type this you will see in the drop down suggestion menu will be requested_ip_address. Either finish typing or click on the suggestion to added it onto the filter bar. Now it’s time to add the IP address we are looking for. We can do this with == 172.16.13.85. So the final filter should be built on the filter bar. Only thing left to do is using it, so press enter to filter for our query.

As we can see there is only one result left. To find the name of the host we have to look in the Dynamic Host Configuration Protocol section. Click the carot to drop down more details. Then it’s time to scroll down till you see Option: (12) Host Name.
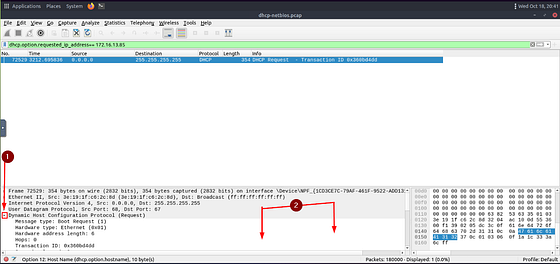
Once you find Option: (12) Host Name, click the carot to drop-down more details about the Host Name. You will see a row with Host Name as the label. The answer can be found to the right of this Label. Once you see it, type the answer into the THM answer field, then click submit.

Answer: Galaxy-A12
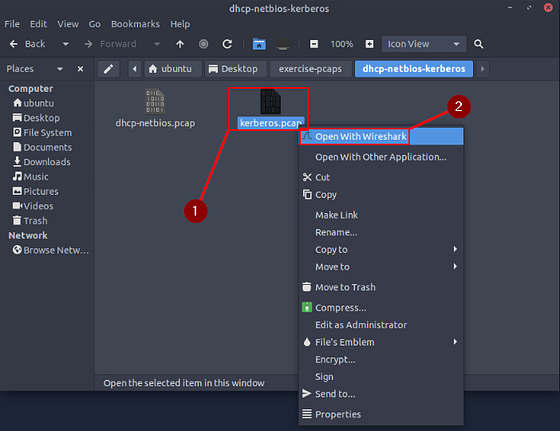
Use the “Desktop/exercise-pcaps/dhcp-netbios-kerberos/kerberos.pcap” file.
Going back to the dhcp-netbios-kerberos folder, right-click on the kerberos.pcap file. From the drop-down menu, click on Open With Wireshark.
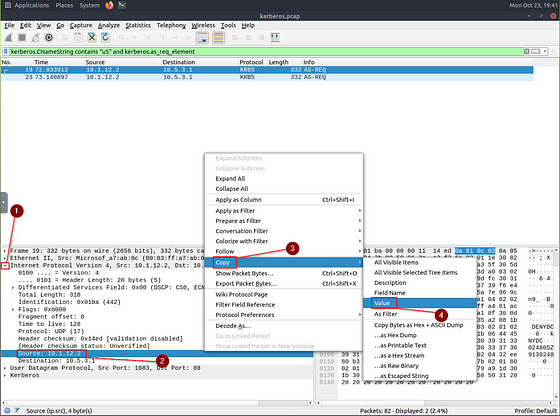
What is the IP address of the user “u5”? (Enter the address in defanged format.)
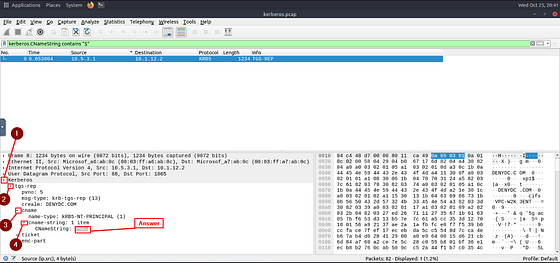
After reading through the Kerberos section above, we learn if we want to search for a username we use the filter kerberos.CNameString contains "keyword". So to look the the user we are looking for we would change keyword to u5 . So the filter will look like kerberos.CNameString contains “u5”. Once this is typed into the mint green filter field, press enter to filter.

As we can see from the results we have a couple of options. We can see the initial request come in for authentication. What I want to do is narrow down the small field to only show the request. To do this we want to add to the filter and to show that we want to include the next filter statement. That filter being kerberos.as_req_element, which is looking for the request being made to the Kerberos server. So the filter should now look like kerberos.CNameString contains “u5” and kerberos.as_req_element. After you type it into the mint green filter press enter to use it.

As we can see, we now only have 2 results. The question is asking for what the IP addres of said user is. But they want it defanged for the answer. So let’s copy the Source IP address. To do this first click on the Internet Protocol Version carot in the details section. Looking at the Details that have now dropped down you will see Source, right click on it. From the drop-down menu, hover you cursor over Copy. A new drop-down will appear, on this one you will see Value. Click on it to copy the IP Address.
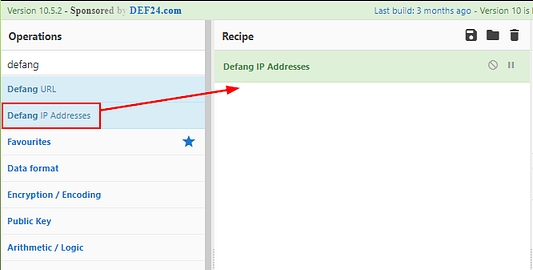
Time to Defang this IP, in a new browser head over to cyberchef.org. Once there you will see on the left side of the screen is a search bar under Operations. Type defang, into this search bar. You will see Defang IP Addresses. Click and drag this into the center Recipe column.
On the right side of the screen you will see the Input box. Paste (ctrl+v) the IP Address into this section. Then in the Output section will be the Defanged IP Address. Copy (ctrl+c) and Paste (ctrl+v) the newly defanged IP into the THM answer field, then click submit
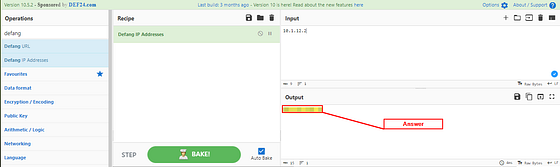
Answer: 10[.]1[.]12[.]2
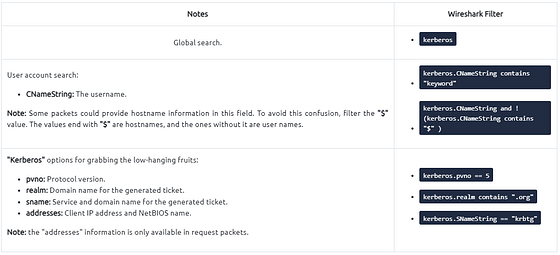
What is the hostname of the available host in the Kerberos packets?
This one took me a bit to figure out. But as I tell myself re-read and go back. After re-reading, THM gives a great filter above. Look at the section regarding CNameString.

We don’t need the full filter, instead we only need kerberos.CNameString contains "$". Once we have this typed into the mint green Filter Bar. Press enter to filter for any CNameString that would have the Hostname in it.

You should be left with only one result. Time to get that Hostname, let’s start by following the path down by clicking the carots of Kerberos > tgs-rep > cname > cname-string: 1 item. Once you reach the final section, you will see CNameString:. The answer can be found to the right of this. Type the answer you find in the THM answer field, then click submit.
Answer: xp1$