Learn the applications and language that is Yara for everything threat intelligence, forensics, and threat hunting!

Task 1 Introduction
Introduction
This room will expect you to understand basic Linux familiarity, such as installing software and commands for general navigation of the system. Moreso, this room isn’t designed to test your knowledge or for point-scoring. It is here to encourage you to follow along and experiment with what you have learned here.
As always, I hope you take a few things away from this room, namely, the wonder that Yara (Yet Another Ridiculous Acronym) is and its importance in infosec today. Yara was developed by Victor M. Alvarez (@plusvic) and @VirusTotal. Check the GitHub repo here.
Task 2 What is Yara?
All about Yara
“The pattern matching swiss knife for malware researchers (and everyone else)” (Virustotal., 2020)
With such a fitting quote, Yara can identify information based on both binary and textual patterns, such as hexadecimal and strings contained within a file.
Rules are used to label these patterns. For example, Yara rules are frequently written to determine if a file is malicious or not, based upon the features — or patterns — it presents. Strings are a fundamental component of programming languages. Applications use strings to store data such as text.
For example, the code snippet below prints “Hello World” in Python. The text “Hello World” would be stored as a string.
print(“Hello World!”)
We could write a Yara rule to search for “hello world” in every program on our operating system if we would like.
Why does Malware use Strings?
Malware, just like our “Hello World” application, uses strings to store textual data. Here are a few examples of the data that various malware types store within strings:

Caveat: Malware Analysis
Explaining the functionality of malware is vastly out of scope for this room due to the sheer size of the topic. I have covered strings in much more detail in “Task 12 — Strings” of my MAL: Introductory room. In fact, I am creating a whole Learning Path for it. If you’d like to get a taster whilst learning the fundamentals, I’d recommend my room.
Answer the questions below
The answers can be found above, follow along to help you locate them if you are having trouble.
What is the name of the base-16 numbering system that Yara can detect?
The question is asking for the abbreviated version of hexadecimal. Once you figure it out, type the answer into the answer field on TryHackMe and click submit.

Would the text “Enter your Name” be a string in an application? (Yay/Nay)
Looking at the snippet from above should give you the answer to this question. Once you figure it out, type the answer into the answer field on TryHackMe and click submit.

Task 3 Deploy
This room deploys an Instance with the tools being showcased already installed for you. Press the “Start Machine” button and wait for an IP address to be displayed and connect in one of two ways:
In-Browser (No VPN required)
Deploy your own instance by pressing the green “Start Machine” button and scroll up to the top of the room and await the timer. The machine will start in a split-screen view. In case the VM is not visible, use the blue “Show Split View” button at the top-right of the page.
Using SSH (TryHackMe VPN required).
You must be connected to the TryHackMe VPN if you wish to connect your deployed Instance from your own device. If you are unfamiliar with this process, please visit the TryHackMe OpenVPN room to get started. If you have any issues, please read our support articles.
IP Address: MACHINE_IP
Username: cmnatic
Password: yararules!
SSH Port: 22
Task 4 Introduction to Yara Rules
Your First Yara Rule
The proprietary language that Yara uses for rules is fairly trivial to pick up, but hard to master. This is because your rule is only as effective as your understanding of the patterns you want to search for.
Using a Yara rule is simple. Every yara command requires two arguments to be valid, these are:
1) The rule file we create
2) Name of file, directory, or process ID to use the rule for.
Every rule must have a name and condition.
For example, if we wanted to use “myrule.yar” on directory “some directory”, we would use the following command:
yara myrule.yar somedirectory
Note that .yar is the standard file extension for all Yara rules. We’ll make one of the most basic rules you can make below.
- Make a file named “somefile” via
touch somefile - Create a new file and name it “myfirstrule.yar” like below:
Creating a file named somefile
cmnatic@thm:~$ touch somefile
Creating a file named myfirstrule.yar
cmnatic@thm touch myfirstrule.yar
- Open the “myfirstrule.yar” using a text editor such as
nanoand input the snippet below and save the file:
rule examplerule {
condition: true
}
Inputting our first snippet into “myfirstrule.yar” using nano
cmnatic@thm nano myfirstrule.yar
GNU nano 4.8 myfirstrule.yar Modified
rule examplerule {
condition: true
}
The name of the rule in this snippet is examplerule, where we have one condition - in this case, the condition is condition. As previously discussed, every rule requires both a name and a condition to be valid. This rule has satisfied those two requirements.
Simply, the rule we have made checks to see if the file/directory/PID that we specify exists via condition: true. If the file does exist, we are given the output of examplerule
Let’s give this a try on the file “somefile” that we made in step one:
yara myfirstrule.yar somefile
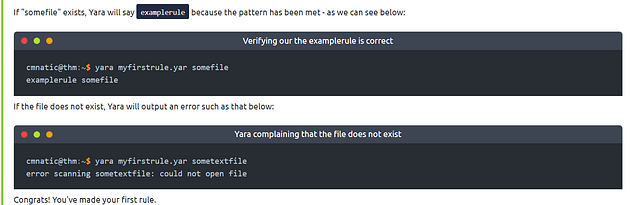
If “somefile” exists, Yara will say examplerule because the pattern has been met - as we can see below:
Verifying our the examplerule is correct
cmnatic@thm:~$ yara myfirstrule.yar somefile
examplerule somefile
If the file does not exist, Yara will output an error such as that below:
Yara complaining that the file does not exist
cmnatic@thm:~$ yara myfirstrule.yar sometextfile
error scanning sometextfile: could not open file
Congrats! You’ve made your first rule.
Task 5 Expanding on Yara Rules
Yara Conditions Continued…
Checking whether or not a file exists isn’t all that helpful. After all, we can figure that out for ourselves…Using much better tools for the job.
Yara has a few conditions, which I encourage you to read here at your own leisure. However, I’ll detail a few below and explain their purpose.
**Keyword
**Desc
Meta
Strings
Conditions
Weight
Meta
This section of a Yara rule is reserved for descriptive information by the author of the rule. For example, you can use desc, short for description, to summarise what your rule checks for. Anything within this section does not influence the rule itself. Similar to commenting code, it is useful to summarise your rule.
Strings
Remember our discussion about strings in Task 2? Well, here we go. You can use strings to search for specific text or hexadecimal in files or programs. For example, say we wanted to search a directory for all files containing “Hello World!”, we would create a rule such as below:
rule helloworld_checker{
strings:
$hello_world = “Hello World!”
}
We define the keyword Strings where the string that we want to search, i.e., “Hello World!” is stored within the variable $hello_world
Of course, we need a condition here to make the rule valid. In this example, to make this string the condition, we need to use the variable’s name. In this case, $hello_world:
rule helloworld_checker{
strings:
$hello_world = “Hello World!”
1
condition:    $hello_world   }
Essentially, if any file has the string “Hello World!” then the rule will match. However, this is literally saying that it will only match if “Hello World!” is found and will not match if “hello world” or “HELLO WORLD.”
To solve this, the condition any of them allows multiple strings to be searched for, like below:
rule helloworld_checker{
strings:
$hello_world = “Hello World!”
$hello_world_lowercase = “hello world”
$hello_world_uppercase = “HELLO WORLD”
1
2
condition:
	any of them   }
Now, any file with the strings of:
Hello World!
hello world
HELLO WORLD
Will now trigger the rule.
Conditions
We have already used the true and any of them condition. Much like regular programming, you can use operators such as:
<= less than or equal to
>= more than or equal to
!= not equal to
For example, the rule below would do the following:
rule helloworld_checker{
strings:
$hello_world = “Hello World!”
1
2
condition:
    #hello_world <= 10   }
The rule will now:
- Look for the “Hello World!” string
- Only say the rule matches if there are less than or equal to ten occurrences of the “Hello World!” string
Combining keywords
Moreover, you can use keywords such as:
and
not
or
To combine multiple conditions. Say if you wanted to check if a file has a string and is of a certain size (in this example, the sample file we are checking is less than <10 kb and has “Hello World!” you can use a rule like below:
rule helloworld_checker{
strings:
$hello_world = “Hello World!”
1
2
    condition:
        $hello_world and filesize < 10KB    }
The rule will only match if both conditions are true. To illustrate: below, the rule we created, in this case, did not match because although the file has “Hello World!”, it has a file size larger than 10KB:
Yara failing to match the file mytextfile because it is larger than 10kb
cmnatic@thm:~$
However, the rule matched this time because the file has both “Hello World!” and a file size of less than 10KB.
Yara successfully matching the file mytextfile because it has “Hello World” and a file size of less than 10KB
cmnatic@thm:~$ yara myfirstrule.yar mytextfile.txt
helloworld_textfile_checker mytextfile.txt
Remembering that the text within the red box is the name of our rule, and the text within the green is the matched file.
Anatomy of a Yara Rule
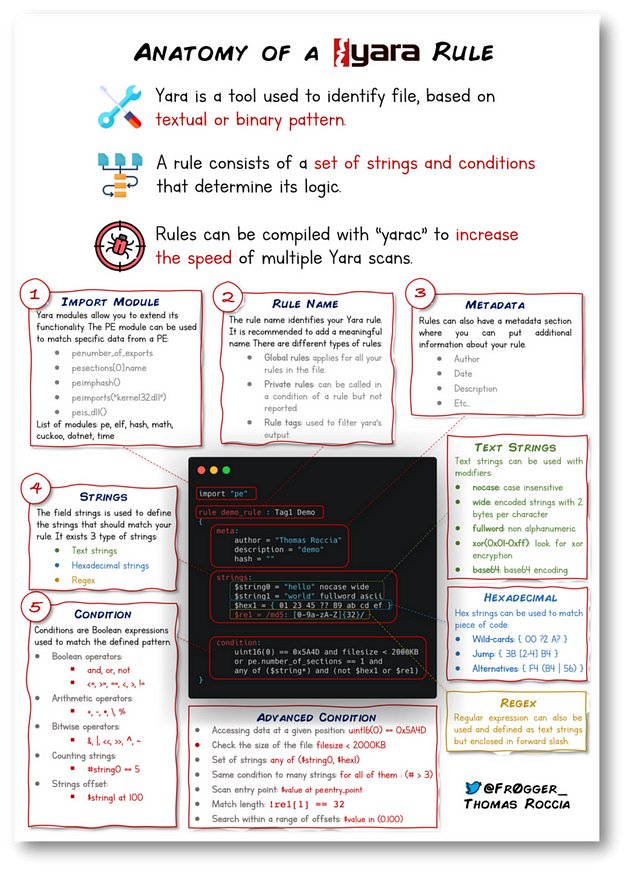
Information security researcher “fr0gger_” has recently created a handy cheatsheet that breaks down and visualises the elements of a YARA rule (shown above, all image credits go to him). It’s a great reference point for getting started!
Task 6 Yara Modules
Integrating With Other Libraries
Frameworks such as the Cuckoo Sandbox or Python’s PE Module allow you to improve the technicality of your Yara rules ten-fold.
Cuckoo
Cuckoo Sandbox is an automated malware analysis environment. This module allows you to generate Yara rules based upon the behaviours discovered from Cuckoo Sandbox. As this environment executes malware, you can create rules on specific behaviours such as runtime strings and the like.
Python PE
Python’s PE module allows you to create Yara rules from the various sections and elements of the Windows Portable Executable (PE) structure.
Explaining this structure is out of scope as it is covered in my malware introductory room. However, this structure is the standard formatting of all executables and DLL files on windows. Including the programming libraries that are used.
Examining a PE file’s contents is an essential technique in malware analysis; this is because behaviours such as cryptography or worming can be largely identified without reverse engineering or execution of the sample.
Task 7 Other tools and Yara
Yara Tools
Knowing how to create custom Yara rules is useful, but luckily you don’t have to create many rules from scratch to begin using Yara to search for evil. There are plenty of GitHub resources and open-source tools (along with commercial products) that can be utilized to leverage Yara in hunt operations and/or incident response engagements.
LOKI (What, not who, is Loki?)
LOKI is a free open-source IOC (Indicator of Compromise) scanner created/written by Florian Roth.
Based on the GitHub page, detection is based on 4 methods:
- File Name IOC Check
- Yara Rule Check (we are here)
- Hash Check
- C2 Back Connect Check
There are additional checks that LOKI can be used for. For a full rundown, please reference the GitHub readme.
LOKI can be used on both Windows and Linux systems and can be downloaded here.
Please note that you are not expected to use this tool in this room.
Displaying Loki’s help menu
cmnatic@thm:~/Loki$ python3 loki.py -h
usage: loki.py [-h] [-p path] [-s kilobyte] [-l log-file] [-r remote-loghost]
[-t remote-syslog-port] [-a alert-level] [-w warning-level]
[-n notice-level] [–allhds] [–alldrives] [–printall]
[–allreasons] [–noprocscan] [–nofilescan] [–vulnchecks]
[–nolevcheck] [–scriptanalysis] [–rootkit] [–noindicator]
[–dontwait] [–intense] [–csv] [–onlyrelevant] [–nolog]
[–update] [–debug] [–maxworkingset MAXWORKINGSET]
[–syslogtcp] [–logfolder log-folder] [–nopesieve]
[–pesieveshellc] [–python PYTHON] [–nolisten]
[–excludeprocess EXCLUDEPROCESS] [–force]
Loki - Simple IOC Scanner
optional arguments:
-h, –help show this help message and exit
THOR (superhero named programs for a superhero blue teamer)
THOR Lite is Florian’s newest multi-platform IOC AND YARA scanner. There are precompiled versions for Windows, Linux, and macOS. A nice feature with THOR Lite is its scan throttling to limit exhausting CPU resources. For more information and/or to download the binary, start here. You need to subscribe to their mailing list to obtain a copy of the binary. Note that THOR is geared towards corporate customers. THOR Lite is the free version.
Please note that you are not expected to use this tool in this room.
Displaying Thor Lite’s help menu
cmnatic@thm:~$ ./thor-lite-linux-64 -h
Thor Lite
APT Scanner
Version 10.7.3 (2022-07-27 07:33:47)
cc) Nextron Systems GmbH
Lite Version
Scan Options
-t, –template string Process default scan parameters from this YAML file
-p, –path strings Scan a specific file path. Define multiple paths by specifying this option multiple times. Append ‘:NOWALK’ to the path for non-recursive scanning (default: only the system drive) (default [])
–allhds (Windows Only) Scan all local hard drives (default: only the system drive)
–max_file_size uint Max. file size to check (larger files are ignored). Increasing this limit will also increase memory usage of THOR. (default 30MB)
Scan Modes
–quick Activate a number of flags to speed up the scan at cost of some detection.
This is equivalent to: –noeventlog –nofirewall –noprofiles –nowebdirscan –nologscan –noevtx –nohotfixes –nomft –lookback 3 –lookback-modules filescan
FENRIR (naming convention still mythical themed)
This is the 3rd tool created by Neo23x0 (Florian Roth). You guessed it; the previous 2 are named above. The updated version was created to address the issue from its predecessors, where requirements must be met for them to function. Fenrir is a bash script; it will run on any system capable of running bash (nowadays even Windows).
Please note that you are not expected to use this tool in this room.
Running Fenrir
cmnatic@thm-yara:~/tools$ ./fenrir.sh
##############################################################
__ _
/ __/ _ __()__
/ // -) _ \/ _/ / __/
// _///// ///
v0.9.0-log4shell
Simple Bash IOC Checker
Florian Roth, Dec 2021
##############################################################
YAYA (Yet Another Yara Automaton)
YAYA was created by the EFF (Electronic Frontier Foundation) and released in September 2020. Based on their website, “YAYA is a new open-source tool to help researchers manage multiple YARA rule repositories. YAYA starts by importing a set of high-quality YARA rules and then lets researchers add their own rules, disable specific rulesets, and run scans of files.”
Note: Currently, YAYA will only run on Linux systems.
Running YAYA
cmnatic@thm-yara:~/tools$ yaya
YAYA - Yet Another Yara Automaton
Usage:
yaya [-h]
-h print this help screen
Commands:
update - update rulesets
edit - ban or remove rulesets
add - add a custom ruleset, located at
scan - perform a yara scan on the directory at
In the next section, we will examine LOKI further…
Task 8 Using LOKI and its Yara rule set
Make sure you follow the instructions in this task as it will put you right where you need to be to answer question one.
Using LOKI
As a security analyst, you may need to research various threat intelligence reports, blog postings, etc. and gather information on the latest tactics and techniques used in the wild, past or present. Typically in these readings, IOCs (hashes, IP addresses, domain names, etc.) will be shared so rules can be created to detect these threats in your environment, along with Yara rules. On the flip side, you might find yourself in a situation where you’ve encountered something unknown, that your security stack of tools can’t/didn’t detect. Using tools such as Loki, you will need to add your own rules based on your threat intelligence gathers or findings from an incident response engagement (forensics).
As mentioned before, Loki already has a set of Yara rules that we can benefit from and start scanning for evil on the endpoint straightaway.
Navigate to the Loki directory. Loki is located in the tools.
Listing the tools directory
cmnatic@thm-yara:~/tools$ ls
Loki yarGen
Run python loki.py -h to see what options are available.
If you are running Loki on your own system, the first command you should run is --update. This will add the signature-base directory, which Loki uses to scan for known evil. This command was already executed within the attached VM.
Listing Loki signature-base directory
cmnatic@thm-yara:~/tools/Loki/signature-base$ ls
iocs misc yara
Navigate to the yara directory. Feel free to inspect the different Yara files used by Loki to get an idea of what these rules will hunt for.
To run Loki, you can use the following command (note that I am calling Loki from within the file 1 directory)
Instructing Loki to scan the suspicious file
cmnatic@thm-yara:~/suspicious-files/file1$ python ../../tools/Loki/loki.py -p .
Scenario: You are the security analyst for a mid-size law firm. A co-worker discovered suspicious files on a web server within your organization. These files were discovered while performing updates to the corporate website. The files have been copied to your machine for analysis. The files are located in the suspicious-files directory. Use Loki to answer the questions below.
Answer the questions below
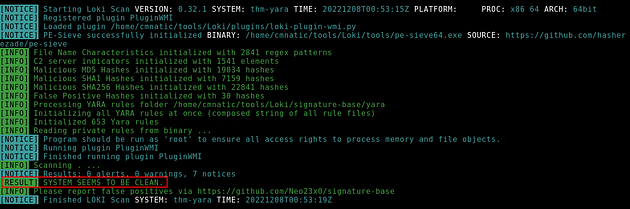
Scan file 1. Does Loki detect this file as suspicious/malicious or benign?
After you have run Loki to scan, you will have a big output with a lot of information to look at. The results can be found in the bottom section of the output. Look for the first yellow Result, the answer will be in this row. Once you find it, type your answer into the TryHackMe answer field and click submit.

Answer: Suspicious
What Yara rule did it match on?
The next answer can be found a little bit further up, look for the white text REASON 1. In this row you will find the answer right after MATCH:. There is and underscore between the words but you can’t see it on the output. Once you find it, type your answer into the TryHackMe answer field and click submit.
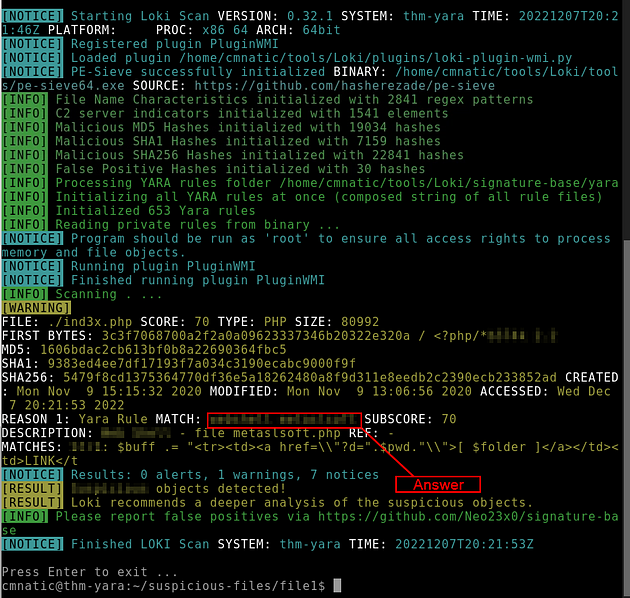
Answer: webshell_metaslsoft
What does Loki classify this file as?
This answer can be found on the row underneath where you found the previous question. It can be found right after the white text DESCRIPTION:. There is no underscore between these two words on this answer. Once you find it, type your answer into the TryHackMe answer field and click submit.
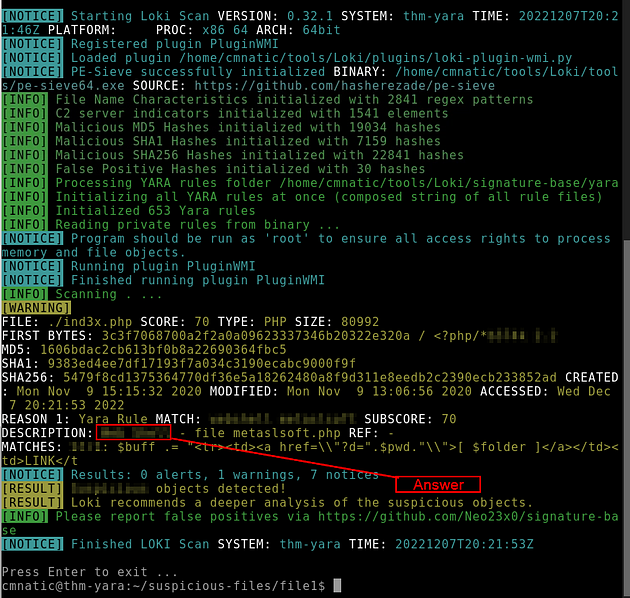
Answer: Web Shell
Based on the output, what string within the Yara rule did it match on?
This answer can be found on the row underneath where you found the previous question. It can be found right after the white text MATCHES:. Once you find it, type your answer into the TryHackMe answer field and click submit.
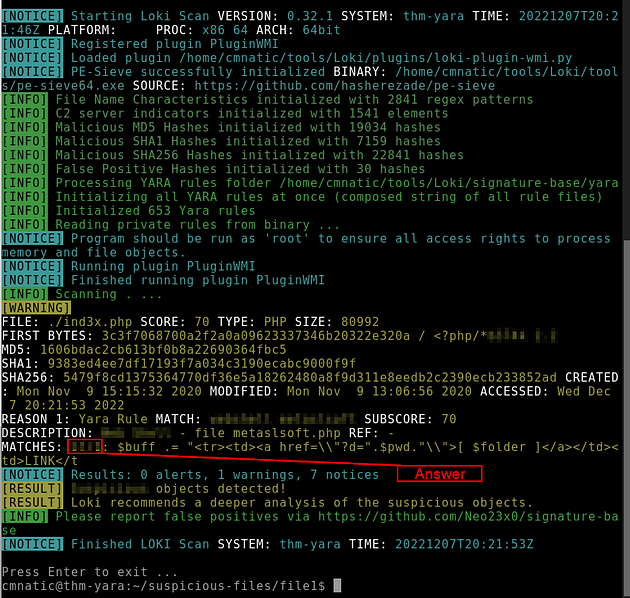
Answer: Str1
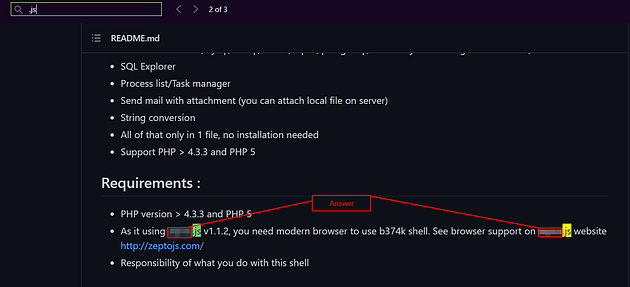
What is the name and version of this hack tool?
Move up to the white text FIRST BYTES: then move to the end where you will find the answer. Once you find it, type your answer into the TryHackMe answer field and click submit.
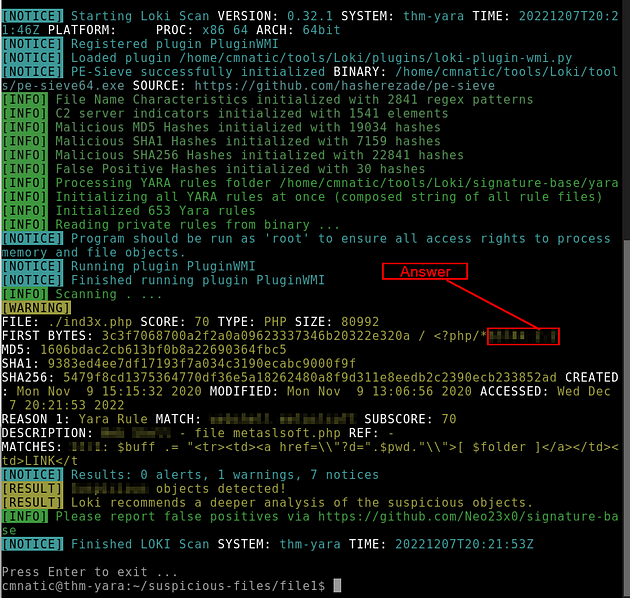
Answer:b374k 2.2
Inspect the actual Yara file that flagged file 1. Within this rule, how many strings are there to flag this file?
Now from two of the previous questions we know that the Yara rule it has to deal with is Web Shell, and the Loki out put shows us the file path that we can take to hopefully find the file.

| So we can run the command, ls /home/cmnatic/tools/Loki/signature-base/yara | grep webshell . Then press enter to run the command. |

We get five different Yara files, the only one that looks like it might be the one to look at is thor-webshells.yar. I only say this becuase Thor was mentioned in the previous task. So lets take a look at this and see what we got, use command nano /home/cmnatic/tools/Loki/signature-base/yara/thor-webshells.yar and press enter to look at it.
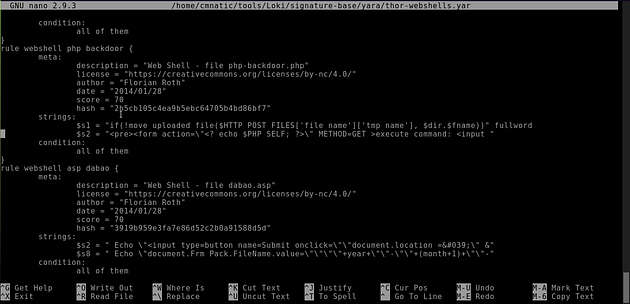
Ok, now that we have the file open in nano let’s search it. Press F6 to enable the search feature in nano and type webshell_metaslsoft, then press enter.
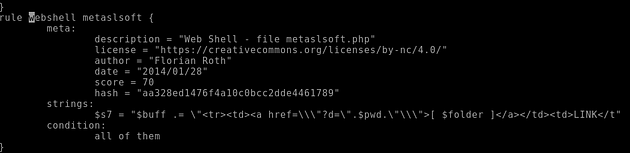
We had the right file, and were taken to the right Yara rule. So now we look for the strings portion and count how many rules are under the string category. Once you have done this, type your answer into the answer field on TryHackMe and click submit.
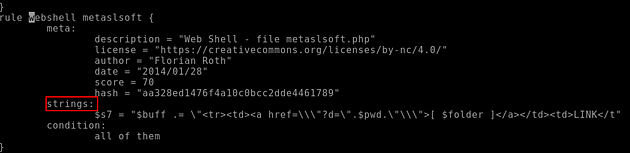
Answer: 1
Scan file 2. Does Loki detect this file as suspicious/malicious or benign?
So let’s change directories, with cd ..

Then move into the file2 directory with cd file2

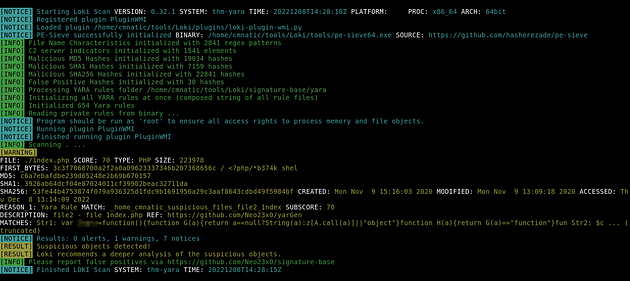
Now we can run Loki with the command python /home/cmnatic/tools/Loki/loki.py -p .

After the Loki scan runs it’s course it’s time to see what if it’s safe or not. According to the scan the file is clean.
Answer: Benign
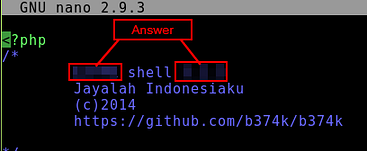
Inspect file 2. What is the name and version of this web shell?
Use ls to list out the contents of the directory.

Now use nano on the 1ndex.php file, like so, nano 1ndex.php .

This will open the file so you can view the details of it. If you look at the top left of the php file you will see the name and version, the answer does not require the word shell. So once you find it, type the answer into the TryHackMe answer field and click submit.
Task 9 Creating Yara rules with yarGen
Creating Yara rules with yarGen
From the previous section, we realized that we have a file that Loki didn’t flag on. At this point, we are unable to run Loki on other web servers because if file 2 exists in any of the webs servers, it will go undetected.
We need to create a Yara rule to detect this specific web shell in our environment. Typically this is what is done in the case of an incident, which is an event that affects/impacts the organization in a negative fashion.
We can manually open the file and attempt to sift through lines upon lines of code to find possible strings that can be used in our newly created Yara rule.
Let’s check how many lines this particular file has. You can run the following: strings <file name> | wc -l.
Using wc to count the amount of lines in the file
cmnatic@thm-yara:~/suspicious-files/file2$ strings 1ndex.php | wc -l
3580
If you try to go through each string, line by line manually, you should quickly realize that this can be a daunting task.
Catting the output of 1ndex.php
if(res==’error’){
$(‘.ulProgress’+ulType+i).html(‘( failed )’);
}
else{
$(‘.ulRes’+ulType+i).html(res);
}
loading_stop();
},
error: function(){
loading_stop();
$(‘.ulProgress’+ulType+i).html(‘( failed )’);
$(‘.ulProgress’+ulType+i).removeClass(‘ulProgress’+ulType+i);
$(‘.ulFilename’+ulType+i).removeClass(‘ulFilename’+ulType+i);
}
});
}
function ul_go(ulType){
ulFile = (ulType==’comp’)? $(‘.ulFileComp’):$(‘.ulFileUrl’);
ulResult = (ulType==’comp’)? $(‘.ulCompResult’):$(‘.ulUrlResult’);
ulResult.html(‘’);
ulFile.each(function(i){
if(((ulType==’comp’)&&this.files[0])||((ulType==’url’)&&(this.value!=’’))){
file = (ulType==’comp’)? this.files[0]: this.value;
filename = (ulType==’comp’)? file.name: file.substring(file.lastIndexOf(‘/’)+1);
ulSaveTo = (ulType==’comp’)? $(‘.ulSaveToComp’)[i].value:$(‘.ulSaveToUrl’)[i].value;
ulFilename = (ulType==’comp’)? $(‘.ulFilenameComp’)[i].value:$(‘.ulFilenameUrl’)[i].value;
–snippet cropped for brevity–
Luckily, we can use yarGen (yes, another tool created by Florian Roth) to aid us with this task.
What is yarGen? yarGen is a generator for YARA rules.
From the README — “The main principle is the creation of yara rules from strings found in malware files while removing all strings that also appear in goodware files. Therefore yarGen includes a big goodware strings and opcode database as ZIP archives that have to be extracted before the first use.”
Navigate to the yarGen directory, which is within tools. If you are running yarGen on your own system, you need to update it first by running the following command: python3 yarGen.py --update.
This will update the good-opcodes and good-strings DB’s from the online repository. This update will take a few minutes.
Once it has been updated successfully, you’ll see the following message at the end of the output.
Updating yarGen
cmnatic@thm-yara:~/tools/yarGen$ python3 yarGen.py –update
1
2
3
               _____
__ _____ _____/ ___/__ ___      / // / _ `/ __/ (_ / -_) _ \      \_, /\_,_/_/  \___/\__/_//_/     /___/  Yara Rule Generator
     Florian Roth, July 2020, Version 0.23.3     Note: Rules have to be post-processed     See this post for details: https://medium.com/@cyb3rops/121d29322282   ------------------------------------------------------------------------   Downloading good-opcodes-part1.db from https://www.bsk-consulting.de/yargen/good-opcodes-part1.db ...
To use yarGen to generate a Yara rule for file 2, you can run the following command:
python3 yarGen.py -m /home/cmnatic/suspicious-files/file2 --excludegood -o /home/cmnatic/suspicious-files/file2.yar
A brief explanation of the parameters above:
-mis the path to the files you want to generate rules for--excludegoodforce to exclude all goodware strings (these are strings found in legitimate software and can increase false positives)-olocation & name you want to output the Yara rule
If all is well, you should see the following output.
Using yarGen to generate a rule for file2
[=] Generated 1 SIMPLE rules.
[=] All rules written to /home/cmnatic/suspicious-files/file2.yar
[+] yarGen run finished
Generally, you would examine the Yara rule and remove any strings that you feel might generate false positives. For this exercise, we will leave the generated Yara rule as is and test to see if Yara will flag file 2 or no.
Note: Another tool created to assist with this is called yarAnalyzer (you guessed it — created by Florian Roth). We will not examine that tool in this room, but you should read up on it, especially if you decide to start creating your own Yara rules.
Further Reading on creating Yara rules and using yarGen:
- https://www.bsk-consulting.de/2015/02/16/write-simple-sound-yara-rules/
- https://www.bsk-consulting.de/2015/10/17/how-to-write-simple-but-sound-yara-rules-part-2/
- https://www.bsk-consulting.de/2016/04/15/how-to-write-simple-but-sound-yara-rules-part-3/
Answer the questions below
From within the root of the suspicious files directory, what command would you run to test Yara and your Yara rule against file 2?
To answer this question you have to think about how you would run the file using yara, not Loki like in the previous task. So you are creating the syntax that you are going to run the rule against the file. If we look back at Task 4 we can see what the snytax should look like.
So with this knowledge and the name and location of the new yara rule we answer this question. You will need to swap the file name and yara rule file location/name for the answer, not sure why it is like that but that is the format of the answer. Once you have it properly figured out type it out into the TryHackMe answer field and click submit.
Answer: yara 1ndex.php file2/file2.yar
Did Yara rule flag file 2? (Yay/Nay)
Before we run this let’s move over to the file with cd /home/cmnatic/suspicious-files/file2 .

Now that we are in this directory let’s change the syntax from the previous question, so that we can run this yara rule against the php file. So we can set up the syntax like this, yara /home/cmnatic/suspicious-files/file2.yar 1ndex.php

So what does this output mean, if we look back at Task 5 we can see what the output means.

So it found matched to the yararule!! Since it found a match we know our answer and can type it into the TryHackMe answer field and click submit.
Answer: Yay
Copy the Yara rule you created into the Loki signatures directory.
This question doesn’t require an answer but does require a little work. To move the yara rule over to the Loki yara directory. You can look back at the output from Loki scan, if you don’t have it here is the syntax to move the file over to the proper directory: mv /home/cmnatic/suspicious-files/file2.yar /home/cmnatic/tools/Loki/signature-base/yara/

Now that the file is moved over to the correct directory now you can move onto the next question.
Test the Yara rule with Loki, does it flag file 2? (Yay/Nay)
We will run Loki again, as we did in the previous Task. First let’s change the directory over to the file we want to scan with cd /home/cmnatic/suspicious-files/file2

Being in the correct directory we need to type the correct syntax into the terminal, python /home/cmnatic/tools/Loki/loki.py -p . , and press enter to run the program.
This time we get some results on the file, and since we see that we get results this answer this question. Type the answer into the answer field on TryHackMe, and click submit.
Answer: Yay
What is the name of the variable for the string that it matched on?
Going back to our output from the Loki scan, look for the white text that says MATCHES: after the word var is the answer. Once you find it type the answer into the TryHackMe answer field and click submit.
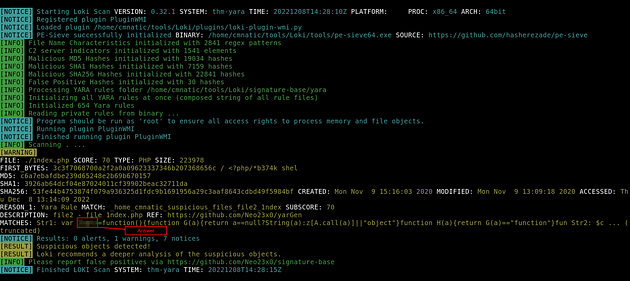
Answer: Zepto
Inspect the Yara rule, how many strings were generated?
Since we know where the file is we don’t have to change directories, we can open nano right to the file. We can do this with the syntax nano /home/cmnatic/tools/Loki/sigature-base/yara/file2.yar
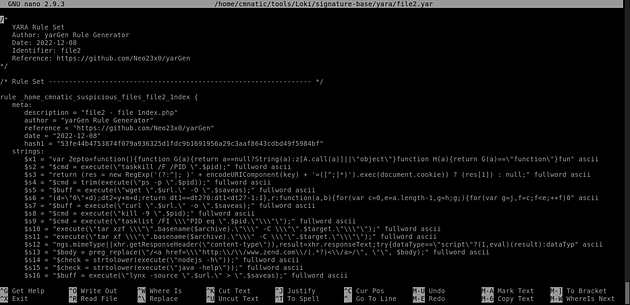
As we can see the strings we are looking start around the middle of the terminal and go beyond. All you need to do is count the number of strings and type that number into the TryHackMe answer field, then click submit.
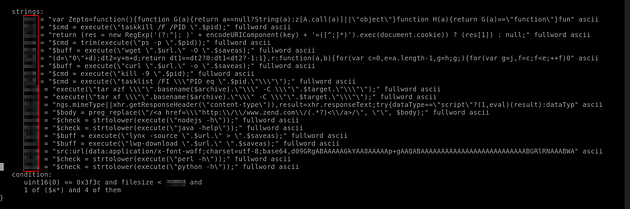
Answer: 20
One of the conditions to match on the Yara rule specifies file size. The file has to be less than what amount?
This answer can be found underneath the string section, in the conditions section. In the first row you will see filesize then to the right the file size. Once you find the answer type it into the TryHackMe answer field and click submit.
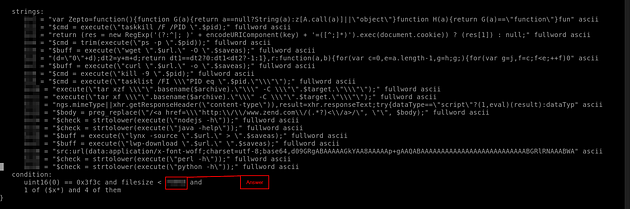
Answer: 700kb
Task 10 Valhalla
Valhalla
Valhalla is an online Yara feed created and hosted by Nextron-Systems (erm, Florian Roth). By now, you should be aware of the ridiculous amount of time and energy Florian has dedicated to creating these tools for the community. Maybe we should have just called this the Florian Roth room. (lol)
Per the website, “Valhalla boosts your detection capabilities with the power of thousands of hand-crafted high-quality YARA rules.”
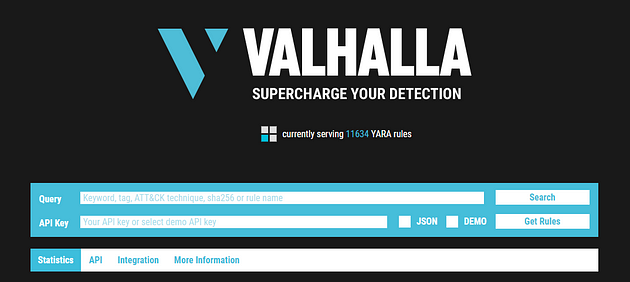
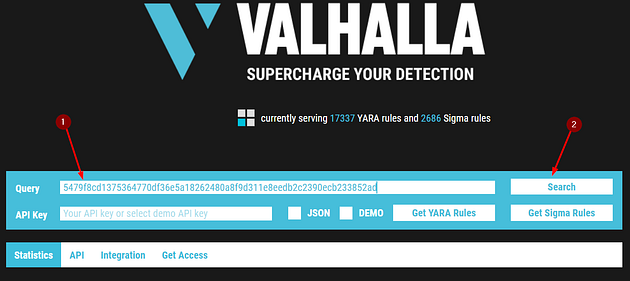
From the image above, we should denote that we can conduct searches based on a keyword, tag, ATT&CK technique, sha256, or rule name.
Note: For more information on ATT&CK, please visit the MITRE room.
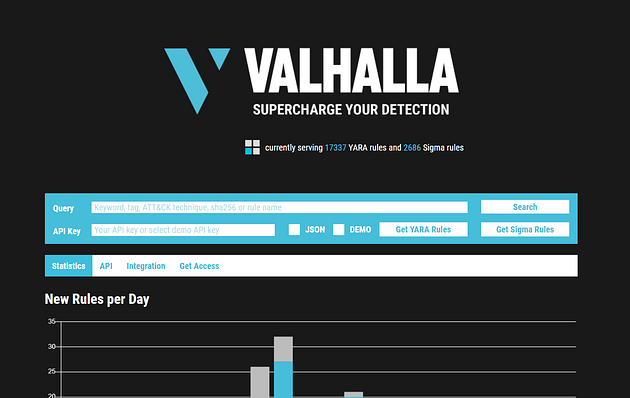
Taking a look at the data provided to us, let’s examine the rule in the screenshot below:

We are provided with the name of the rule, a brief description, a reference link for more information about the rule, along with the rule date.
Feel free to look at some rules to become familiar with the usefulness of Valhalla. The best way to learn the product is by just jumping right in.
Picking up from our scenario, at this point, you know that the 2 files are related. Even though Loki classified the files are suspicious, you know in your gut that they are malicious. Hence the reason you created a Yara rule using yarGen to detect it on other web servers. But let’s further pretend that you are not code-savvy (FYI — not all security professionals know how to code/script or read it). You need to conduct further research regarding these files to receive approval to eradicate these files from the network.
Time to use Valhalla for some threat intelligence gathering…
Answer the questions below
Before we answer let’s get to the Valhalla website, here is the link for said website https://valhalla.nextron-systems.com . Hold ctrl and click the link to have it open in a new tab.
Enter the SHA256 hash of file 1 into Valhalla. Is this file attributed to an APT group? (Yay/Nay)
If you still have the SHA256 hash for file1 from the previous task awesome if not here it is: 5479f8cd1375364770df36e5a18262480a8f9d311e8eedb2c2390ecb233852ad
You should be at the Valhalla website, you will see a Query search field. Take the SHA256 hash above copy (ctrl + c) and paste (ctrl + v) into the Query field on Valhalla. Then click the Search button on the right.
After it searches the SHA256, you can find the answer within the first result. Read the Description, once you figure out the answer type it into the TryHackMe answer field and click submit.
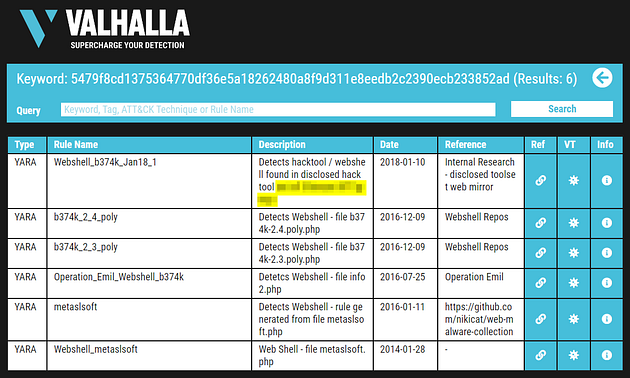
Answer: Yay
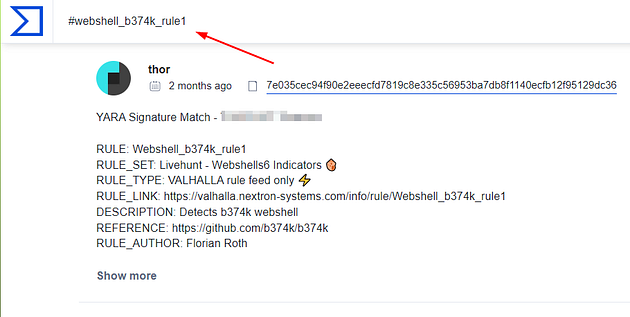
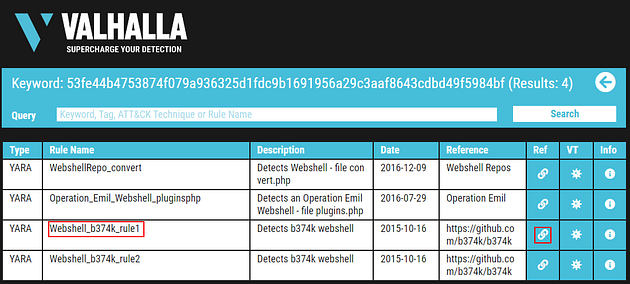
Do the same for file 2. What is the name of the first Yara rule to detect file 2?
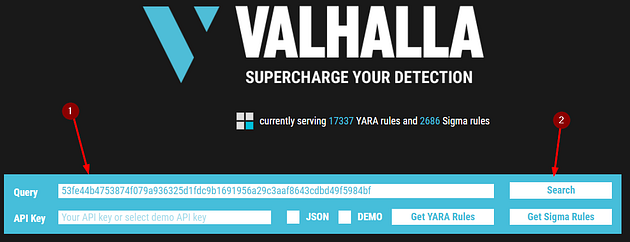
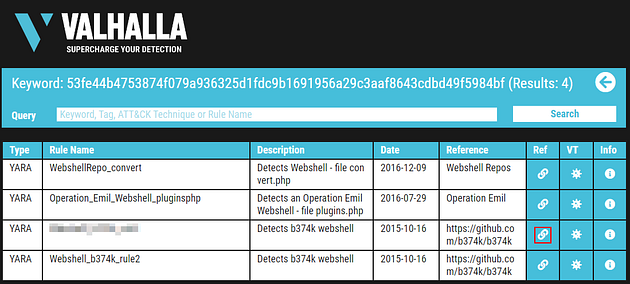
If you still have the SHA256 hash for file2 from the previous task awesome if not here it is: 53fe44b4753874f079a936325d1fdc9b1691956a29c3aaf8643cdbd49f5984bf
On your web browser press the back button to be taken back to the Valhalla home page. Before you can put the file2 SHA256 hash in though you will need to delete out the previous hash, this can easily be done by highlighting and pressing delete or clicking on the far right side of the Query search and holding backspace till it’s gone. Now take the SHA256 hash above copy (ctrl + c) and paste (ctrl + v) into the Query field on Valhalla. Then click the Search button on the right.
When the search results load, you will see four of them. Even though the question is asking for the the first rule that to detect the file, look at the date column first and go from there. Once you figure it out, highlight copy (ctrl + c) and paste (ctrl + v) or type, the answer into the TryHackMe Answer field and click submit.
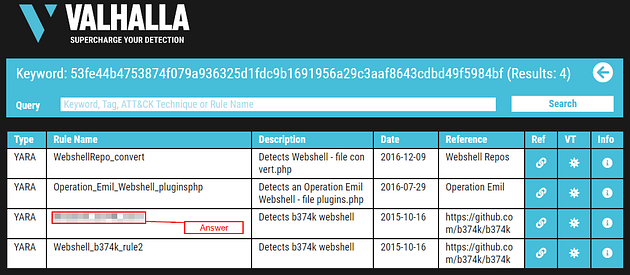
Answer: Webshell_b374k_rule1
Examine the information for file 2 from Virus Total (VT). The Yara Signature Match is from what scanner?
Going back to Valhalla, back in the row that we got the answer from the previous question from, move to the right to the blue boxes. The middle one with the little virus icon, takes you to VirusTotal, click on it.

When the page loads, the first line says YARA Signature Match -, after these is the name of the scanner and the answer to this question. Once you find it, highlight copy (ctrl + c) and paste (ctrl + v) or type, the answer into the TryHackMe Answer field and click submit.
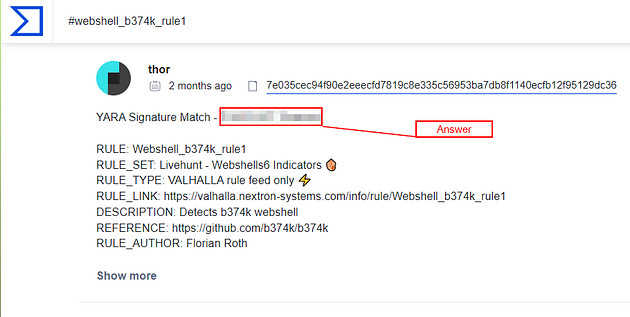
Answer: THOR APT Scanner
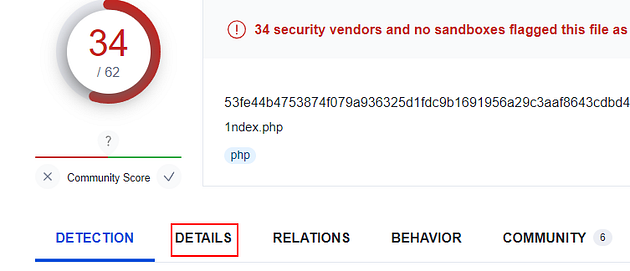
Enter the SHA256 hash of file 2 into Virus Total. Did every AV detect this as malicious? (Yay/Nay)
Going back to VirusTotal, before you can put the file2 SHA256 hash in though you will need to delete out the previous search entry, this can easily be done by highlighting and pressing delete or clicking on the far right side of the Query search and holding backspace till it’s gone.
Once that is done take the SHA256 hash above copy (ctrl + c) and paste (ctrl + v) into the VirusTotal search bar at the top of the page press enter to search it.

At quick glance it looks like it was detected by all the AV vendors, but scroll down to make sure. Once you figure it out type the answer into the TryHackMe answer field and click submit.

Answer: Nay
Besides .PHP, what other extension is recorded for this file?
Back on the VirusTotal site click on the DETAILS tab, this will open the tab where the DETECTIONS just was.
Now that the DETAILS tab is open we need to scroll down to the Name secion. So start scrolling, it’s not far and it’s the last section.
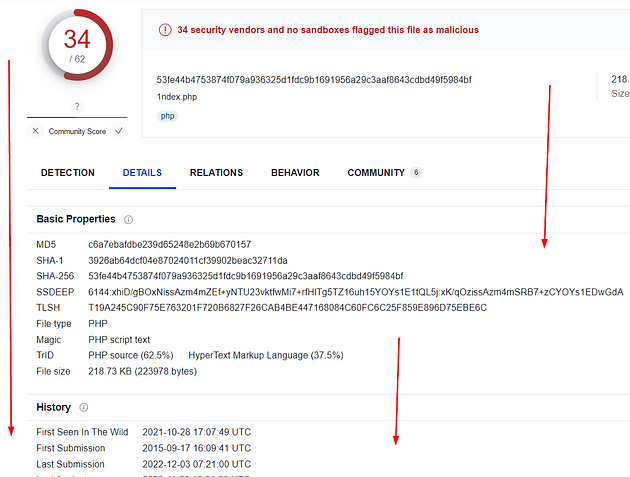
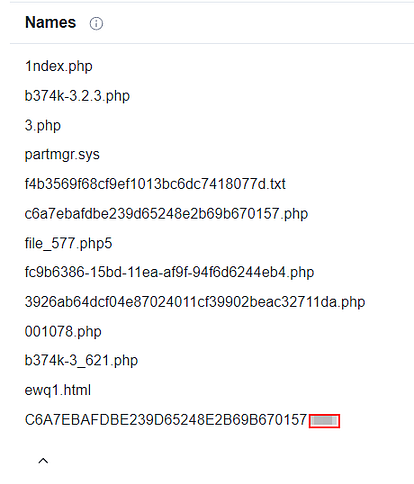
Ok, now that we are here it doesn’t show us all the names let us, click the down carrot to expose the rest.
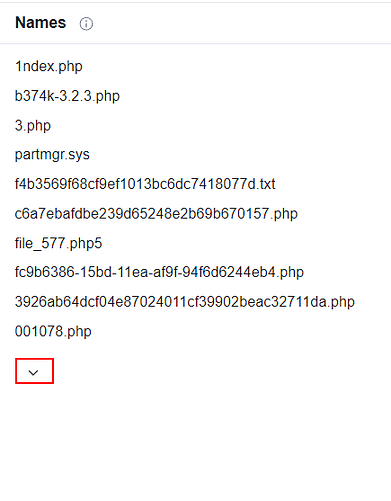
Looking at the full list of names with the file extensions, most of them are php. But we have a couple of outlairs, one of the different extensions doesn’t fit the answer type that TryHackMe is asking, it can only be three letters. So it only leaves us three choices. Once you figure it out type the answer into the TryHackMe answer field and click submit.
Answer: exe
What JavaScript library is used by file 2?
We are done with VirusTotal, so head back the the Valhalla search results for file2. This time click on the chainlink icon, this will take you to the github, which will give us lots of information.
Once the page loads, we are going to use the find feature of the broswer. Press ctrl + f to open the find bar.
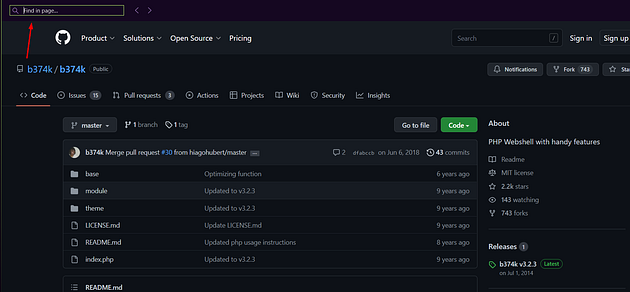
Since it is a Javascript library we are looking for, the file most likely ends with .js, so type .js into the find bar. We get three possible hits, cycle through them, the second two should be what you are looking for. Once you find it, highlight copy (ctrl + c) and paste (ctrl + v) or type, the answer into the TryHackMe Answer field and click submit.
Answer: Zepto
Is this Yara rule in the default Yara file Loki uses to detect these type of hack tools? (Yay/Nay)
For the last time, head back to the Valhalla site. Highlight and copy (ctrl + c) the rule name that we have been looking at.
| Going back to the terminal, lets see if we can find this Yara rule in our Loki directory. We can do this with, ls /home/cmnatic/tools/Loki/signature-base/yara/ | grep “Webshell_b374k_rule1” |

Nothing comes back so this should give you the answer, Once you figure it out type the answer into the TryHackMe answer field and click submit.

Answer: Nay
Task 11 Conclusion
In this room, we explored Yara, how to use Yara, and manually created basic Yara rules. We also explored various open-source tools to hit the ground running that utilizes Yara rules to detect evil on endpoints.
By going through the room scenario, you should understand the need (as a blue teamer) to know how to create Yara rules effectively if we rely on such tools. Commercial products, even though not perfect, will have a much richer Yara ruleset than an open-source product. Both commercial and open-source will allow you to add Yara rules to expand its capabilities further to detect threats.
If it is not clear, the reason why file 2 was not detected is that the Yara rule was not in the Yara file used by Loki to detect the hack tool (web shell) even though its the hack tool has been around for years and has even been attributed to at least 1 nation-state. The Yara rule is present in the commercial variant of Loki, which is Thor.
There is more that can be done with Yara and Yara rules. We encourage you to explore this tool further at your own leisure.
🎉🎉🎉Congrats!! You have completed the Yara Room!!!!🎉🎉🎉