If you haven’t done task 4, 5, & 6 yet, here is the link to my write-up of it: Task 4 CLI Kung-Fu Recall: Processing Zeek Logs, Task 5 Zeek Signatures, & Task 6 Zeek Scripts Fundamentals.
Getting the VM Started
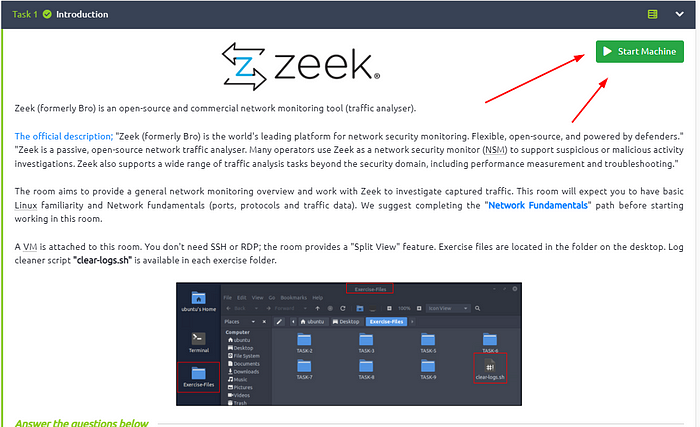
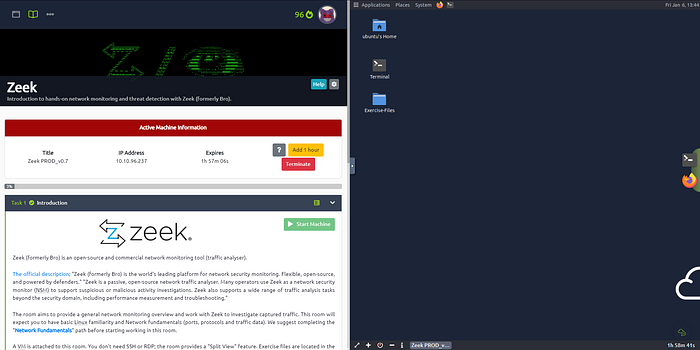
Click the green button labeled Start Machine, in the top of Task 1.
The screen should split in half, if it doesn’t go to the top of the page. You will see a blue button labeled Show Split View, click this button.

The screen should be split now, you just have to wait for the VM to load. When it is finshed loading it will look like it does below. You are ready to continue with the tasks ahead.
Task 7 Zeek Scripts | Scripts and Signatures
Scripts 101 - Write Basic Scripts
Scripts contain operators, types, attributes, declarations and statements, and directives. Let’s look at a simple example event called “zeek_init” and “zeek_done”. These events work once the Zeek process starts and stops. Note that these events don’t have parameters, and some events will require parameters.
Sample Script
1
2
3
4
5
6
7
8
9
10
11
event zeek_init()
    {
     print ("Started Zeek!");
    }
event zeek_done()
    {
    print ("Stopped Zeek!");
    }
# zeek_init: Do actions once Zeek starts its process.
# zeek_done: Do activities once Zeek finishes its process.
# print: Prompt a message on the terminal.
Run Zeek with the script
1
2
3
ubuntu@ubuntu$ zeek -C -r sample.pcap 101.zeek
Started Zeek!
Stopped Zeek!
The above output shows how the script works and provides messages on the terminal. Zeek will create logs in the working directory separately from the scripts tasks.
Let’s print the packet data to the terminal and see the raw data. In this script, we are requesting details of a connection and extracting them without any filtering or sorting of the data. To accomplish this, we are using the “new_connection” event. This event is automatically generated for each new connection. This script provides bulk information on the terminal. We need to get familiar with Zeek’s data structure to reduce the amount of information and focus on the event of interest. To do so, we need to investigate the bulk data.
Sample Script
1
2
3
4
5
6
7
8
9
event new_connection(c: connection)
{
 print c;
}

Run Zeek with the script

ubuntu@ubuntu$ zeek -C -r sample.pcap 102.zeek
[id=[orig_h=192.168.121.40, orig_p=123/udp, resp_h=212.227.54.68, resp_p=123/udp], orig=[size=48, state=1, num_pkts=0, num_bytes_ip=0, flow_label=0, l2_addr=00:16:47:df:e7:c1], resp=[size=0, state=0, num_pkts=0, num_bytes_ip=0, flow_label=0, l2_addr=00:00:0c:9f:f0:79], start_time=1488571365.706238, duration=0 secs, service={}, history=D, uid=CajwDY2vSUtLkztAc, tunnel=, vlan=121, inner_vlan=, dpd=, dpd_state=, removal_hooks=, conn=, extract_orig=F, extract_resp=F, thresholds=, dce_rpc=, dce_rpc_state=, dce_rpc_backing=, dhcp=, dnp3=, dns=, dns_state=, ftp=, ftp_data_reuse=F, ssl=, http=, http_state=, irc=, krb=, modbus=, mysql=, ntlm=, ntp=, radius=, rdp=, rfb=, sip=, sip_state=, snmp=, smb_state=, smtp=, smtp_state=, socks=, ssh=, syslog=]
The above terminal provides bulk data for each connection. This style is not the best usage, and in real life, we will need to filter the information for specific purposes. If you look closely at the output, you can see an ID and field value for each part.
To filter the event of interest, we will use the primary tag (in this case, it is c — comes from “c: connection” — ), id value (id=), and field name. You should notice that the fields are the same as the fields in the log files.
Sample Script
1
2
3
4
5
6
7
8
9
10
11
12
event new_connection(c: connection)
{
 print ("###########################################################");
 print ("");
 print ("New Connection Found!");
 print ("");
 print fmt ("Source Host: %s # %s --->", c$id$orig_h, c$id$orig_p);
 print fmt ("Destination Host: resp: %s # %s <---", c$id$resp_h, c$id$resp_p);
 print ("");
}
# %s: Identifies string output for the source.
# c$id: Source reference field for the identifier.
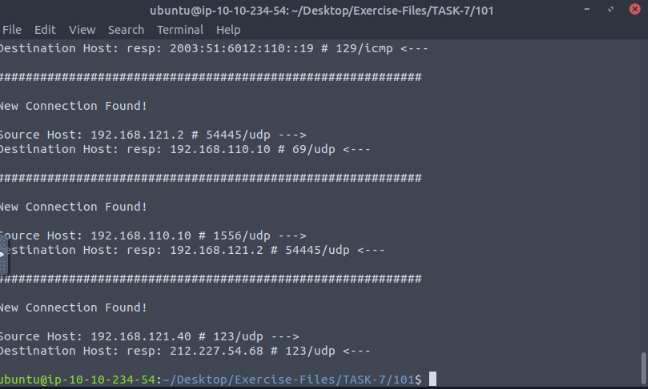
Now you have a general idea of running a script and following the provided output on the console. Let’s look closer to another script that extracts specific information from packets. The script above creates logs and prompts each source and destination address for each connection.
Let’s see this script in action.
1
2
3
4
5
ubuntu@ubuntu$ zeek -C -r sample.pcap 103.zeek
###########################################################
New Connection Found! Source Host: 192.168.121.2 # 58304/udp --->
Destination Host: resp: 192.168.120.22 # 53/udp <---
###########################################################
The above output shows that we successfully extract specific information from the events. Remember that this script extracts the event of interest (in this example, a new connection), and we still have logs in the working directory. We can always modify and optimise the scripts at any time.
Scripts 201 - Use Scripts and Signatures Together
Up to here, we covered the basics of Zeek scripts. Now it is time to use scripts collaboratively with other scripts and signatures to get one step closer to event correlation. Zeek scripts can refer to signatures and other Zeek scripts as well. This flexibility provides a massive advantage in event correlation.
Let’s demonstrate this concept with an example. We will create a script that detects if our previously created “ftp-admin” rule has a hit.
Sample Script
1
2
3
4
5
6
7
event signature_match (state: signature_state, msg: string, data: string)
{
if (state$sig_id == "ftp-admin")
    {
    print ("Signature hit! --> #FTP-Admin ");
    }
}
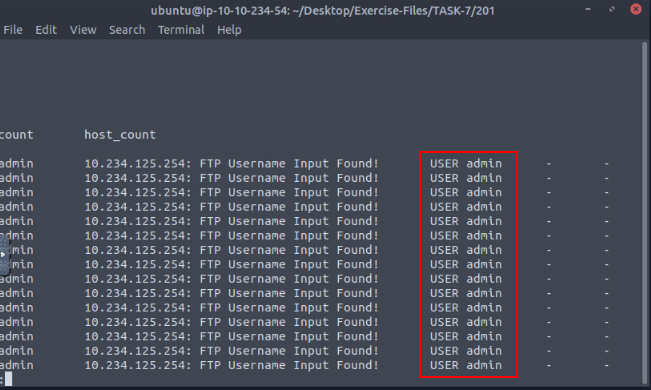
This basic script quickly checks if there is a signature hit and provides terminal output to notify us. We are using the “signature_match” event to accomplish this. You can read more about events here. Note that we are looking only for “ftp-admin” signature hits. The signature is shown below.
Sample Script
1
2
3
4
5
signature ftp-admin {
    ip-proto == tcp
    ftp /.*USER.*admin.*/
    event "FTP Username Input Found!"
}
Let’s see this script in action.
1
2
3
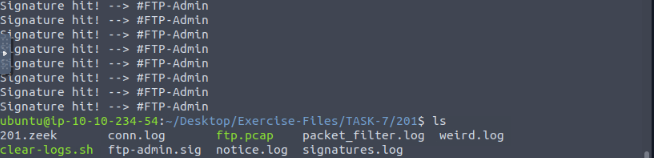
ubuntu@ubuntu$ zeek -C -r ftp.pcap -s ftp-admin.sig 201.zeek
Signature hit! --> #FTP-Admin Signature hit! --> #FTP-Admin
Signature hit! --> #FTP-Admin Signature hit! --> #FTP-Admin
The above output shows that we successfully combined the signature and script. Zeek processed the signature and logs then the script controlled the outputs and provided a terminal output for each rule hit.
Scripts 202 - Load Local Scripts
Load all local scripts
We mentioned that Zeek has base scripts located in “/opt/zeek/share/zeek/base”. You can load all local scripts identified in your “local.zeek” file. Note that base scripts cover multiple framework functionalities. You can load all base scripts by easily running the local command.
1
2
3
4
ubuntu@ubuntu$ zeek -C -r ftp.pcap local
ubuntu@ubuntu$ ls
101.zeek  103.zeek          clear-logs.sh  ftp.pcap            packet_filter.log  stats.log
102.zeek  capture_loss.log  conn.log       loaded_scripts.log  sample.pcap        weird.log
The above output demonstrates how to run all base scripts using the “local” command. Look at the above terminal output; Zeek provided additional log files this time. Loaded scripts generated loaded_scripts.log, capture_loss.log, notice.log, stats.log files. Note that, in our instance, 465 scripts loaded and used by using the “local” command. However, Zeek doesn’t provide log files for the scripts doesn’t have hits or results.
Load Specific Scripts
Another way to load scripts is by identifying the script path. In that case, you have the opportunity of loading a specific script or framework. Let’s go back to FTP brute-forcing case. We created a script that detects multiple admin login failures in previous steps. Zeek has an FTP brute-force detection script as well. Now let’s use the default script and identify the differences.
1
2
3
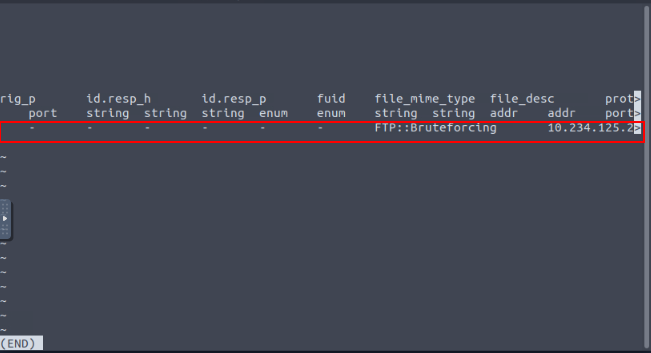
ubuntu@ubuntu$ zeek -C -r ftp.pcap /opt/zeek/share/zeek/policy/protocols/ftp/detect-bruteforcing.zeek
ubuntu@ubuntu$ cat notice.log | zeek-cut ts note msg
1024380732.223481 FTP::Bruteforcing 10.234.125.254 had 20 failed logins on 1 FTP server in 0m1s
Answer the questions below
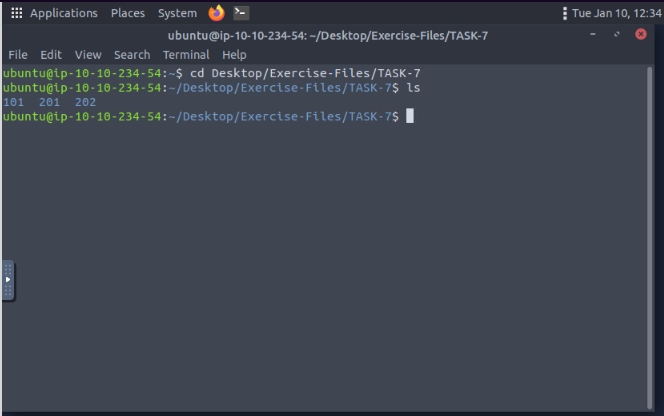
Each exercise has a folder. Ensure you are in the right directory to find the pcap file and accompanying files. Desktop/Exercise-Files/TASK-7
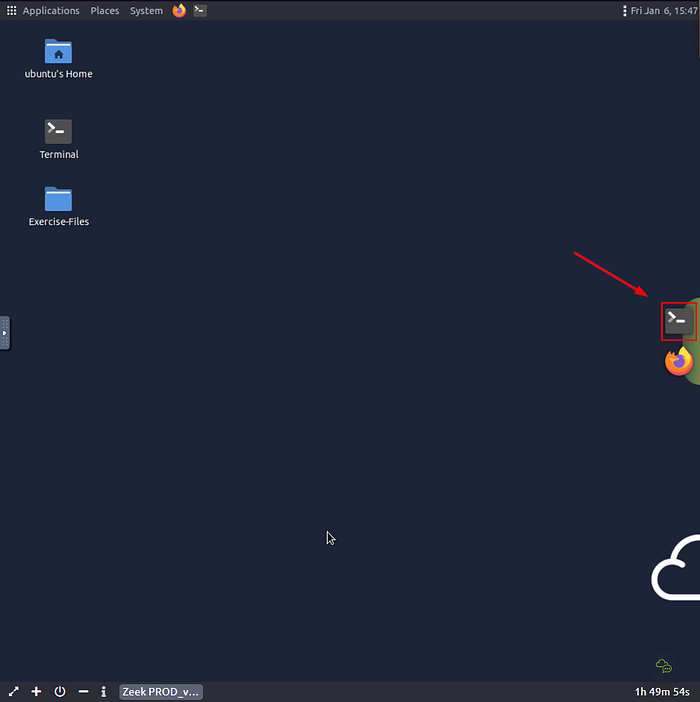
On the VM, you will see a terminal icon in the middle of the VM screen on the right. Click on it.
A terminal window will pop-up, time to move to the TASK-7 directory. To do this we will use the cd command, which stands for change directory. We will using this command in combination with Tab completion. With Tab complete, you only have to press Tab after starting to type, and if it only has one entry that matches, it will auto complete it. So let’s type out the command cd Desktop/Exercise-Files/TASK-7, then press enter to run the command. Follow up with the ls command to see the contents of the directory.
Go to folder TASK-7/101.
Investigate the sample.pcap file with 103.zeek script. Investigate the terminal output. What is the number of the detected new connections?
Move into directory 101 with cd 101/, the press enter. Then use ls to look at the contents of the directory.

So as we have done before we want to run Zeek against the sample.pcap file. To do this we use the command zeek -C -r sample.pcap 103.zeek, and press enter to run it.

First thing we notice is that there is a lot of output to try and count. So let’s have the terminal do the counting for us.
We can do this by using some commands that we have used before and piping. The full command is zeek -C -r sample.pcap 103.zeek | grep "New Connections Found!" | uniq -c`then press enter to run. The output will give you the count of the total number of new connections found, and thus the answer to the question. Type it into the TryHackMe answer field, then click submit.

Answer: 87
Go to folder TASK-7/201.
Investigate the ftp.pcap file with ftp-admin.sig signature and 201.zeek script. Investigate the signatures.log file. What is the number of signature hits?
We have to move back the forward again, first use the command cd .., then move forward with the command cd 201/. Finally use ls, to see the contents of the directory.

Let’s run Zeek against the ftp.pcap file. We will use the command zeek -C -r ftp.pcap 201.zeek -s ftp-admin.sig, the press enter to run.

After it is done running we will use the ls command to see the contents of the directory.
Now we can parse the signature file and find out how many times it was hit. So using zeek-cut, piping, and uniq -c. The command is cat signatures.log | zeek-cut sig_id | uniq -c, then press enter. You will have the count in the output, and thus the answer to the question. Type it into the TryHackMe answer field, then click submit.

Answer: 1401
Investigate the signatures.log file. What is the total number of “administrator” username detections?
We need to figure out what column this we need to cut and inspect. To do this we will use the command cat signatures.log | less, then press enter.

When the log file is open in less, use the right arrow to scroll to the right. Do this to you reach the last column.
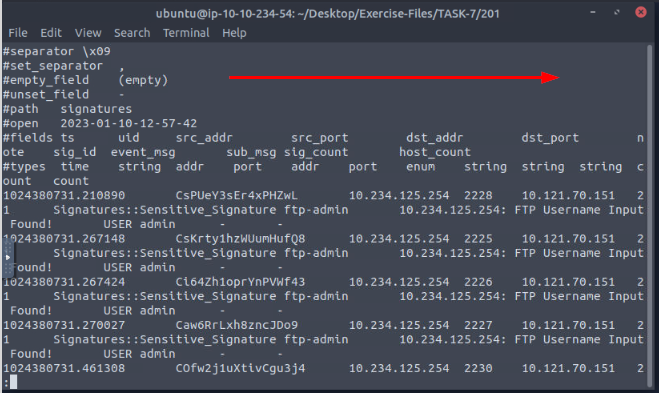
So the column we want is the third from the last, so now that we know what column, we want to look at the column names. You might have to scroll to the left one press, I do.
Count the column names till you reach the third one, we now have the name of the column to run through zeek-cut. Then press q to exit less.
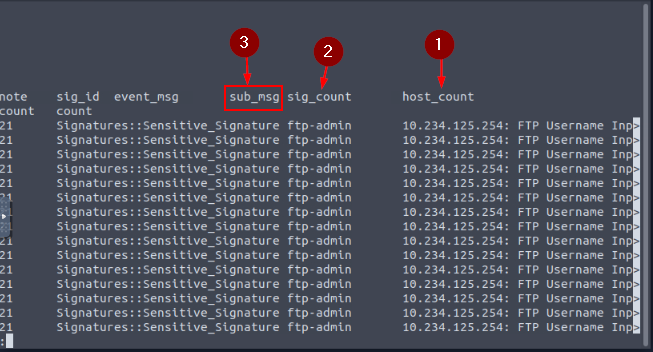
Time to run some zeek-cut and piping, the command we want to run is cat signatures.log | zeek-cut sub_msg | sort | uniq -c, then press enter to run. You will have the count for the amount of times User administrator was hit in the output, and thus the answer to the question. Type it into the TryHackMe answer field, then click submit.

Answer: 731
Investigate the ftp.pcap file with all local scripts, and investigate the loaded_scripts.log file. What is the total number of loaded scripts?
Time to run zeek with local, the command we want to run is zeek -C -r ftp.pcap local, the press enter. Then use ls to see the contents of the directory.

We need to figure out what how we need to filter and count the log file. To do this we can pipe the loaded_scripts.log file through less, with command cat loaded_scripts.log | less, then press enter to run.

So we can see that the loaded scripts seem to have the same path, this gives us a good filter we can use. Press q to exit less.
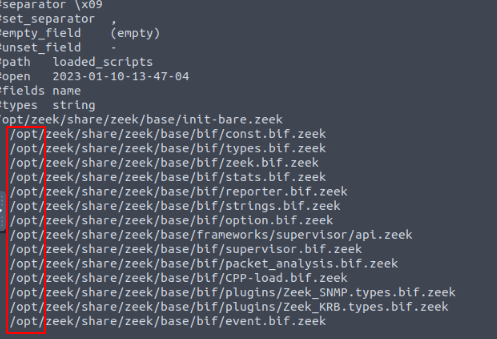
Time to use grep and wc -l. The command we want to use is cat loaded_scripts.log | grep "/opt/*" | wc -l, then press enter to run. You will have the count for the amount loaded scripts in the output, and thus the answer to the question. Type it into the TryHackMe answer field, then click submit.

Answer: 498
Go to folder TASK-7/202.
Investigate the ftp-brute.pcap file with “/opt/zeek/share/zeek/policy/protocols/ftp/detect-bruteforcing.zeek” script. Investigate the notice.log file. What is the total number of brute-force detections?
To start we need to move over to the proper directory, we can do this will the command cd .., to move back. Then move forward with cd 202/. We finish off with the ls command to see the contents of the directory.

TryHackMe gives us all we need for the command in the question. The command then being zeek -C -r ftp-brute.pcap /opt/zeek/share/zeek/policy/protocols/ftp/detect-bruteforcing.zeek, then press enter to run the command. Then ls to see the changes to the contents of the directory.

Time to pipe some zeek-cut! The command I ran was cat notice.log | zeek-cut uid, then press enter to run. The out was only 1 dash (-), but when I typed that into the TryHackMe answer field it said that answer was not correct.

So I then ran cat notice.log | less, then pressed enter, to see what I could be doing wrong. When the log file loads into less, press the right arrow once.
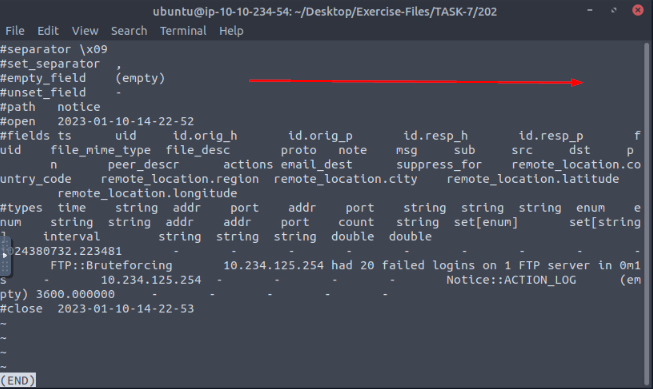
As you can see from my results below, the results are 1. So not sure. So for the answer I tried the next number in the sequence and got it right. I also made a post in the TryHackMe discord about it. If you get a different result I’d love to know!!
Answer: 2
Task 8 Zeek Scripts - Frameworks
Scripts 203 - Load Frameworks
Zeek has 15+ frameworks that help analysts to discover the different events of interest. In this task, we will cover the common frameworks and functions. You can find and read more on the prebuilt scripts and frameworks by visiting Zeek’s online book here.
File Framework - Hashes
Not all framework functionalities are intended to be used in CLI mode. The majority of them are used in scripting. You can easily see the usage of frameworks in scripts by calling a specific framework as load @ $PATH/base/frameworks/framework-name. Now, let’s use a prebuilt function of the file framework and have MD5, SHA1 and SHA256 hashes of the detected files. We will call the “File Analysis” framework’s “hash-all-files” script to accomplish this. Before loading the scripts, let’s look at how it works.
1
2
3
ubuntu@ubuntu$ cat hash-demo.zeek
### Enable MD5, SHA1 and SHA256 hashing for all files.
@load /opt/zeek/share/zeek/policy/frameworks/files/hash-all-files.zeek
The above output shows how frameworks are loaded. In earlier tasks, we mentioned that Zeek highly relies on scripts, and the frameworks depend on scripts. Let’s have a closer look at the file hash framework and see the script behind it.
1
2
3
4
5
6
7
8
9
10
ubuntu@ubuntu$ cat /opt/zeek/share/zeek/policy/frameworks/files/hash-all-files.zeek
# Enable MD5, SHA1 and SHA256 hashing for all files.

@load base/files/hash
event file_new(f: fa_file)
 {
 Files::add_analyzer(f, Files::ANALYZER_MD5);
 Files::add_analyzer(f, Files::ANALYZER_SHA1);
 Files::add_analyzer(f, Files::ANALYZER_SHA256);
 }
Now let’s execute the script and investigate the log file.
1
2
3
4
5
6
ubuntu@ubuntu$ zeek -C -r case1.pcap hash-demo.zeek
ubuntu@ubuntu$ zeek -C -r case1.pcap /opt/zeek/share/zeek/policy/frameworks/files/hash-all-files.zeek
ubuntu@ubuntu$ cat files.log | zeek-cut md5 sha1 sha256
cd5a4d3fdd5bffc16bf959ef75cf37bc 33bf88d5b82df3723d5863c7d23445e345828904 6137f8db2192e638e13610f75e73b9247c05f4706f0afd1fdb132d86de6b4012
b5243ec1df7d1d5304189e7db2744128 a66bd2557016377dfb95a87c21180e52b23d2e4e f808229aa516ba134889f81cd699b8d246d46d796b55e13bee87435889a054fb
cc28e40b46237ab6d5282199ef78c464 0d5c820002cf93384016bd4a2628dcc5101211f4 749e161661290e8a2d190b1a66469744127bc25bf46e5d0c6f2e835f4b92db18
Look at the above terminal outputs. Both of the scripts provided the same result. Here the preference is up to the user. Both of the usage formats are true. Prebuilt frameworks are commonly used in scriptings with the “@load” method. Specific scripts are used as practical scripts for particular use cases.
File Framework - Extract Files
The file framework can extract the files transferred. Let’s see this feature in action!
1
2
3
ubuntu@ubuntu$ zeek -C -r case1.pcap /opt/zeek/share/zeek/policy/frameworks/files/extract-all-files.zeek
ubuntu@ubuntu$ ls
101.zeek  102.zeek  103.zeek  case1.pcap  clear-logs.sh  conn.log  dhcp.log  dns.log  extract_files  files.log  ftp.pcap  http.log  packet_filter.log  pe.log
We successfully extracted files from the pcap. A new folder called “extract_files” is automatically created, and all detected files are located in it. First, we will list the contents of the folder, and then we will use the file command to determine the file type of the extracted files.
1
2
3
4
5
6
7
8
9
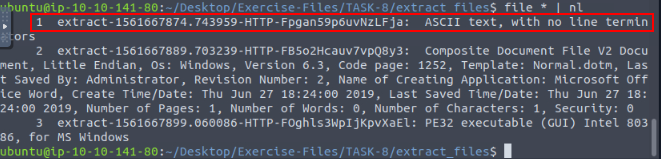
ubuntu@ubuntu$ ls extract_files | nl
1 extract-1561667874.743959-HTTP-Fpgan59p6uvNzLFja
2 extract-1561667889.703239-HTTP-FB5o2Hcauv7vpQ8y3
3 extract-1561667899.060086-HTTP-FOghls3WpIjKpvXaEl
ubuntu@ubuntu$ cd extract_files
ubuntu@ubuntu$ file *| nl
1 extract-1561667874.743959-HTTP-Fpgan59p6uvNzLFja: ASCII text, with no line terminators
2 extract-1561667889.703239-HTTP-FB5o2Hcauv7vpQ8y3: Composite Document File V2 Document, Little Endian, Os: Windows, Version 6.3, Code page: 1252, Template: Normal.dotm, Last Saved By: Administrator, Revision Number: 2, Name of Creating Application: Microsoft Office Word, Create Time/Date: Thu Jun 27 18:24:00 2019, Last Saved Time/Date: Thu Jun 27 18:24:00 2019, Number of Pages: 1, Number of Words: 0, Number of Characters: 1, Security: 0
3 extract-1561667899.060086-HTTP-FOghls3WpIjKpvXaEl: PE32 executable (GUI) Intel 80386, for MS Windows
Zeek extracted three files. The “file” command shows us one .txt file, one .doc/.docx file and one .exe file. Zeek renames extracted files. The name format consists of four values that come from conn.log and files.log files; default “extract” keyword, timestamp value (ts), protocol (source), and connection id (conn_uids). Let’s look at the files.log to understand possible anomalies better and verify the findings. Look at the below output; files.log provides the same results with additional details. Let’s focus on the .exe and correlate this finding by searching its connection id (conn_uids).
The given terminal output shows us that there are three files extracted from the traffic capture. Let’s look at the file.log and correlate the findings with the rest of the log files.
1
2
3
4
5
6
7
8
9
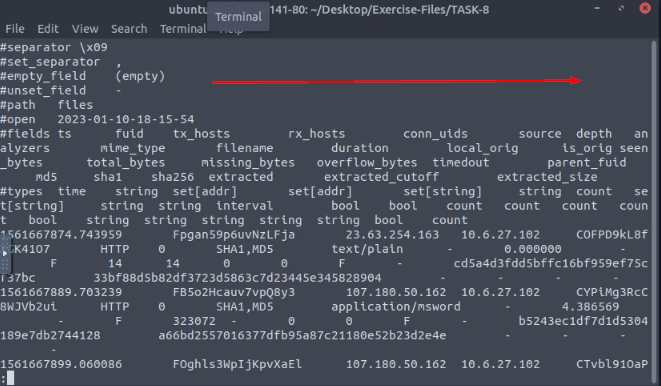
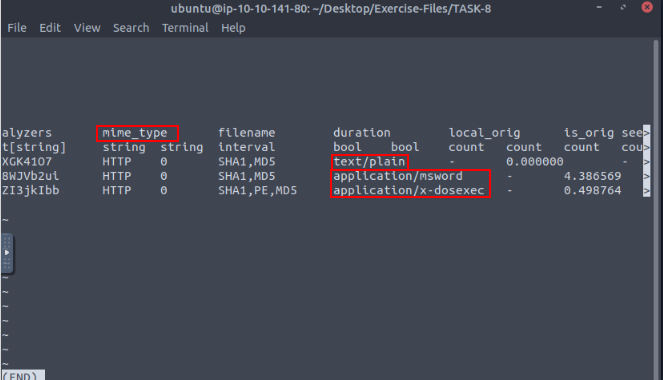
ubuntu@ubuntu$ cat files.log | zeek-cut fuid conn_uids tx_hosts rx_hosts mime_type extracted | nl
1 Fpgan59p6uvNzLFja CaeNgL1QzYGxxZPwpk 23.63.254.163 10.6.27.102 text/plain extract-1561667874.743959-HTTP-Fpgan59p6uvNzLFja
2 FB5o2Hcauv7vpQ8y3 CCwdoX1SU0fF3BGBCe 107.180.50.162 10.6.27.102 application/msword extract-1561667889.703239-HTTP-FB5o2Hcauv7vpQ8y3
3 FOghls3WpIjKpvXaEl CZruIO2cqspVhLuAO9 107.180.50.162 10.6.27.102 application/x-dosexec extract-1561667899.060086-HTTP-FOghls3WpIjKpvXaEl
ubuntu@ubuntu$ grep -rin CZruIO2cqspVhLuAO9 * | column -t | nl | less -S
#NOTE: The full output is not shown here!. Redo the same actions in the attached VM!
1 conn.log:43:1561667898.852600 CZruIO2cqspVhLuAO9 10.6.27.102 49162 107.180.50.162 80 tcp http
2 files.log:11:1561667899.060086 FOghls3WpIjKpvXaEl 107.180.50.162 10.6.27.102 CZruIO2cqspVhLuAO9 HTTP 0 EXTRACT,PE
3 http.log:11:1561667898.911759 CZruIO2cqspVhLuAO9 10.6.27.102 49162 107.180.50.162 80 1 GET
The “grep” tool helps us investigate the particular value across all available logs. The above terminal output shows us that the connection id linked with .exe appears in conn.log, files.log, and http.log files. Given example demonstrates how to filter some fields and correlate the findings with the rest of the logs. We’ve listed the source and destination addresses, file and connection id numbers, MIME types, and file names. Up to now, provided outputs and findings show us that record number three is a .exe file, and other log files provide additional information.
Notice Framework - Intelligence
The intelligence framework can work with data feeds to process and correlate events and identify anomalies. The intelligence framework requires a feed to match and create alerts from the network traffic. Let’s demonstrate a single user-generated threat intel file and let Zeek use it as the primary intelligence source.
Intelligence source location: /opt/zeek/intel/zeek_intel.txt
There are two critical points you should never forget. First, the source file has to be tab-delimited. Second, you can manually update the source and adding extra lines doesn’t require any re-deployment. However, if you delete a line from the file, you will need to re-deploy the Zeek instance.
Let’s add the suspicious URL gathered from the case1.pcap file as a source intel and see this feature in action! Before executing the script, let’s look at the intelligence file and the script contents.
Investigate intel file and script
1
2
3
4
5
6
7
8
ubuntu@ubuntu$ cat /opt/zeek/intel/zeek_intel.txt
#fields indicator indicator_type meta.source meta.desc
smart-fax.com Intel::DOMAIN zeek-intel-test Zeek-Intelligence-Framework-Test
ubuntu@ubuntu$ cat intelligence-demo.zeek
# Load intelligence framework!
@load policy/frameworks/intel/seen
@load policy/frameworks/intel/do_notice
redef Intel::read_files += { "/opt/zeek/intel/zeek_intel.txt" };
The above output shows the contents of the intel file and script contents. There is one intelligence input, and it is focused on a domain name, so when this domain name appears in the network traffic, Zeek will create the “intel.log” file and provide the available details.
1
2
3
4
ubuntu@ubuntu$ zeek -C -r case1.pcap intelligence-demo.zeek
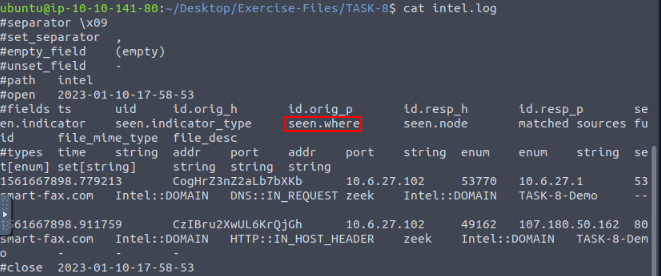
ubuntu@ubuntu$ cat intel.log | zeek-cut uid id.orig_h id.resp_h seen.indicator matched
CZ1jLe2nHENdGQX377 10.6.27.102 10.6.27.1 smart-fax.com Intel::DOMAIN
C044Ot1OxBt8qCk7f2 10.6.27.102 107.180.50.162 smart-fax.com Intel::DOMAIN
The above output shows that Zeek detected the listed domain and created the intel.log file. This is one of the easiest ways of using the intelligence framework. You can read more on the intelligence framework here and here.
Answer the questions below
Each exercise has a folder. Ensure you are in the right directory to find the pcap file and accompanying files. Desktop/Exercise-Files/TASK-8
So we will back out of two directories, then move forward into the TASK-8 directory. To do this start with the command cd .., do this twice. Then cd TASK-8/, and finish up with ls to list the contents of the directory.

Investigate the case1.pcap file with intelligence-demo.zeek script. Investigate the intel.log file. Look at the second finding, where was the intel info found?
Start by running zeek with the command zeek -C -r case1.pcap intelligence-demo.zeek, and press enter. Then use ls to view the contents of the directory.

Using the command cat intel.log, and pressing enter to output it to the terminal, we can look through the output and see one of the fields is called seen.where. The question wants to know where the intel was from, so this seems like a good start. Let’s move onto zeek-cut.
Time to use zeek-cut!! The command being cat intel.log | zeek-cut seen.where, then press enter to run. You will have two results in the output, the question is asking for the second one. So the answer can be found after the double colon. Once you find it, type the answer into the TryHackMe answer field, then click submit.

Answer: IN_HOST_HEADER
Investigate the http.log file. What is the name of the downloaded .exe file?
This one can easly be found by using grep. The command being cat http.log | grep ".exe", then press enter. You will only have one possible executable file found and the .exe will be in red, and thus the answer to the question. Once you find it, type the answer into the TryHackMe answer field, then click submit.

Answer: knr.exe
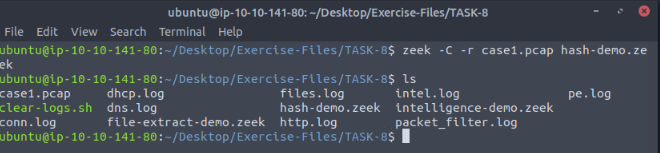
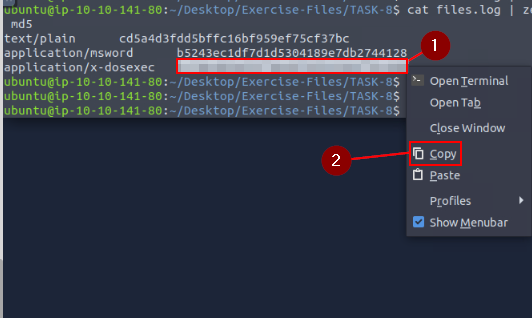
Investigate the case1.pcap file with hash-demo.zeek script. Investigate the files.log file. What is the MD5 hash of the downloaded .exe file?
So we have to run Zeek against the case1.pcap file, this time with the hash-demo.zeek framework. The command being zeek -C -r case1.pcap hash-demo.zeek, press enter to run. Use ls to check the contents of the directory.
Let’s pipe the files.log file through less to figure out the column we want.

When the log file is open in less, use the right arrow to scroll to the right.
Do this twice till you see file descriptions, these are what you are looking for. After looking over the field the one we want is mime_type. So time for some zeek-cutting, press q to exit less.
Back in the terminal, we use the command cat files.log | zeek-cut mime_type md5, the press enter to run. We will have three results, only one give us info that it is an executable, that is the x-dosexec, so the md5 next to this is the answer. Highlight the hash.

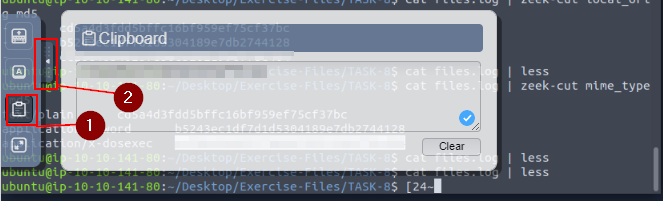
After you have highlight the answer, right click on it. When the drop-down menu appears click on Copy.
In the middle of the VM is a tab, click on it.

Click the clipboard icon on the slide-out tab.
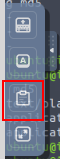
The Clipboard Window will appear in the middle of the VM with the hash on it. Highlight the hash and copy with the keyboard shortcut ctrl + c, then paste (ctrl + v) into the TryHackMe answer field, and click submit.

Answer: cc28e40b46237ab6d5282199ef78c464
Investigate the case1.pcap file with file-extract-demo.zeek script. Investigate the “extract_files” folder. Review the contents of the text file. What is written in the file?
Close out the Clipboard window by clicking the clipboard icon again, and the slide-out tab.
Start by running zeek with the command zeek -C -r case1.pcap file-extract-demo.zeek, and press enter. Then use ls to view the contents of the directory.

Let’s move into the directory with cd extract_files/, then we can check the contents of the extract_files directory with ls, and press enter.

To figure out which file is the text file we will use the command file * | nl, this will first run the file command, which outputs to the terminal information about what the file is. Next the * , is a wildcard, which means it will run the file command on everything in the current directory. Lastly we pipe that into nl, which will put each result onto a new line. After running the command we can see that the first file is the one we want to look at.
So all we need to do is cat the file and we should get our answer. So using the command cat extract-1561667874.743959-HTTP-Fpgan59p6uvNzLFja, and pressing enter, the answer will be output to the terminal. You don’t have to type it all out, don’t forget about tab complete, start typing the file name and press tab. Since this one has others similar to it, just add a digit to it after the similarity and it will complete the rest. Now you should have your answer, type it into the TryHackMe answer field, then click submit.

Answer: Microsoft NCSI
Task 9 Zeek Scripts | Packages
Scripts 204 - Package Manager
Zeek Package Manager helps users install third-party scripts and plugins to extend Zeek functionalities with ease. The package manager is installed with Zeek and available with the zkg command. Users can install, load, remove, update and create packages with the “zkg” tool. You can read more on and view available packages here and here. Please note that you need root privileges to use the “zkg” tool.
Basic usage of zkg;
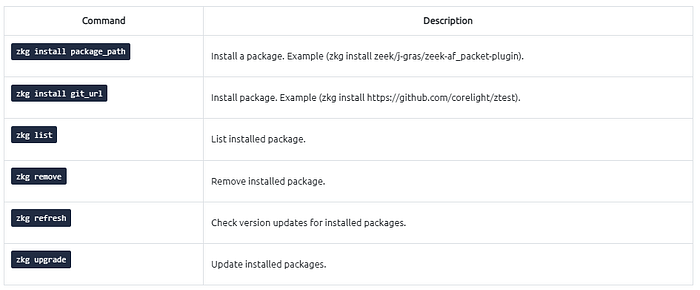
There are multiple ways of using packages. The first approach is using them as frameworks and calling specific package path/directory per usage. The second and most common approach is calling packages from a script with the “@load” method. The third and final approach to using packages is calling their package names; note that this method works only for packages installed with the “zkg” install method.
Packages - Cleartext Submission of Password
Let’s install a package first and then demonstrate the usage in different approaches.
Note: The package is installed in the given VM.
1
2
3
4
5
6
7
8
9
ubuntu@ubuntu$ zkg install zeek/cybera/zeek-sniffpass
The following packages will be INSTALLED:
  zeek/cybera/zeek-sniffpass (master)
Proceed? [Y/n] Y
Installing "zeek/cybera/zeek-sniffpass"
Installed "zeek/cybera/zeek-sniffpass" (master)
Loaded "zeek/cybera/zeek-sniffpass"
ubuntu@ubuntu$ zkg list
zeek/cybera/zeek-sniffpass (installed: master) - Sniffpass will alert on cleartext passwords discovered in HTTP POST requests
The above output shows how to install and list the installed packages. Now we successfully installed a package. As the description mentions on the above terminal, this package creates alerts for cleartext passwords found in HTTP traffic. Let’s use this package in three different ways!
Calling with script
1
ubuntu@ubuntu$ zeek -Cr http.pcap sniff-demo.zeek
View script contents
1
2
ubuntu@ubuntu$ cat sniff-demo.zeek
@load /opt/zeek/share/zeek/site/zeek-sniffpass
Calling from path
1
ubuntu@ubuntu$ zeek -Cr http.pcap /opt/zeek/share/zeek/site/zeek-sniffpass
Calling with package name
1
ubuntu@ubuntu$ zeek -Cr http.pcap zeek-sniffpass
The above output demonstrates how to execute/load packages against a pcap. You can use the best one for your case. The “zeek-sniffpass” package provides additional information in the notice.log file. Now let’s review the logs and discover the obtained data using the specific package.
1
2
3
ubuntu@ubuntu$ cat notice.log | zeek-cut id.orig_h id.resp_h proto note msg
10.10.57.178 44.228.249.3 tcp SNIFFPASS::HTTP_POST_Password_Seen Password found for user BroZeek
10.10.57.178 44.228.249.3 tcp SNIFFPASS::HTTP_POST_Password_Seen Password found for user ZeekBro
The above output shows that the package found cleartext password submissions, provided notice, and grabbed the usernames. Remember, in TASK-5 we created a signature to do the same action. Now we can do the same activity without using a signature file. This is a simple demonstration of the benefit and flexibility of the Zeek scripts.
Packages - Geolocation Data
Let’s use another helpful package called “geoip-conn”. This package provides geolocation information for the IP addresses in the conn.log file. It depends on “GeoLite2-City.mmdb” database created by MaxMind. This package provides location information for only matched IP addresses from the internal database.
1
2
3
ubuntu@ubuntu$ zeek -Cr case1.pcap geoip-conn
ubuntu@ubuntu$ cat conn.log | zeek-cut uid id.orig_h id.resp_h geo.orig.country_code geo.orig.region geo.orig.city geo.orig.latitude geo.orig.longitude geo.resp.country_code geo.resp.region geo.resp.city
Cbk46G2zXi2i73FOU6 10.6.27.102 23.63.254.163 - - - - - US CA Los Angeles
Up to now, we’ve covered what the Zeek packages are and how to use them. There are much more packages and scripts available for Zeek in the wild. You can try ready or third party packages and scripts or learn Zeek scripting language and create new ones.
Answer the questions below
Each exercise has a folder. Ensure you are in the right directory to find the pcap file and accompanying files. Desktop/Exercise-Files/TASK-9
So we will back out of two directories, then move forward into the TASK-9 directory. To do this start with the command cd .., do this twice. Then cd TASK-9/, and finish up with ls to list the contents of the directory.

Investigate the http.pcap file with the zeek-sniffpass module. Investigate the notice.log file. Which username has more module hits?
First move into the cleartext-pass directory with cd cleartext-pass, then press enter.

So we have to run Zeek against the http.pcap file, this time with the zeek-sniffpass module. The command being zeek -C -r http.pcap zeek-sniffpass, press enter to run. Use ls to check the contents of the directory.

Use the command notice.log | less, and press enter to run.

Once in less, use the right arrow to move to the right till you reach the column with Password found.

When you reach this column, you will see Password found for user, followed by a user name. The name that occurs the most here is the answer to the question. Once you figure it out, type the answer into the TryHackMe answer field, then click submit.
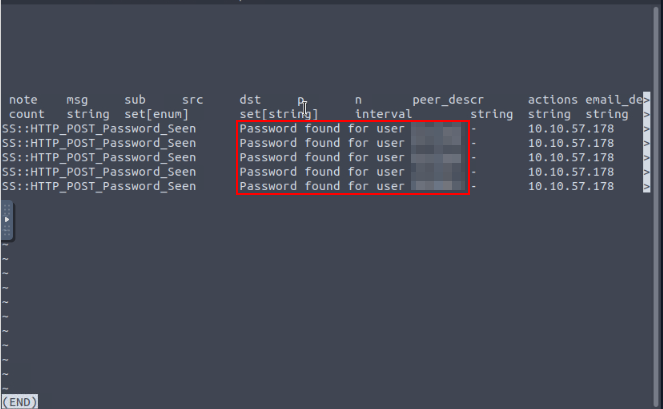
Answer: BroZeek
Investigate the case2.pcap file with geoip-conn module. Investigate the conn.log file. What is the name of the identified City?
Press q to exit out of less. Now we have to move back then forward into the geoip-conn directory. This can be done with the command cd .., followed up with cd geoip-conn/ to move into said directory. Finally ls to list the contents of the current directory.

So we have to run Zeek again against the case2.pcap file, this time with the hash-demo.zeek framework. The command being zeek -C -r case2.pcap geoip-conn, press enter to run. Use ls to check the contents of the directory.

Running cat conn.log, we can scroll up to see to see the fields we can use. After looking the field that looks the most promising is geo.resp.city . Time for some zeek-cut!!!
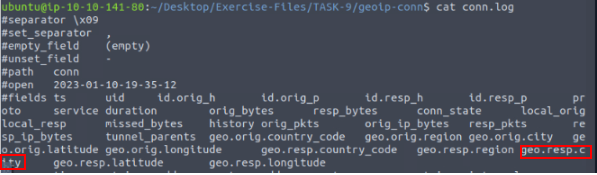
Using zeek-cut, piping, grep, and uniq, let’s get this answer. The command we want to use is cat conn.log | zeek-cut geo.resp.city | grep -v "-" | uniq, then press enter. The output will only have one result, the answer. Once you see it, type it into the TryHackMe answer field, then click submit.

Answer: Chicago
Which IP address is associated with the identified City?
Running cat conn.log, we can scroll up to see to see the fields we can use. After looking the field that looks the most promising is id.resp_h . Time for some zeek-cut!!!
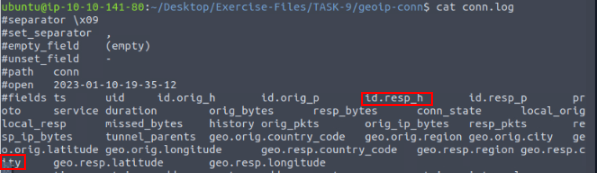
Again using zeek-cut, piping, grep, and uniq, let’s get this answer. The command we want to use is cat conn.log | zeek-cut id.resp_h geo.resp.city | grep -v "-" | uniq, then press enter. The output will only have one result and to the left of the previous answer. Once you see it, type it into the TryHackMe answer field, then click submit.

Answer: 23.77.86.54
Investigate the case2.pcap file with sumstats-counttable.zeek script. How many types of status codes are there in the given traffic capture?
So we have to run Zeek again against the case2.pcap file, this time with the sumstats-countable.zeek script. The command being zeek -C -r case2.pcap sumstats-counttable.zeek, press enter to run. The status codes will be output to the terminal, count the different status codes to get the answer. Once you have figured it out, type it into the TryHackMe answer field, then click submit.
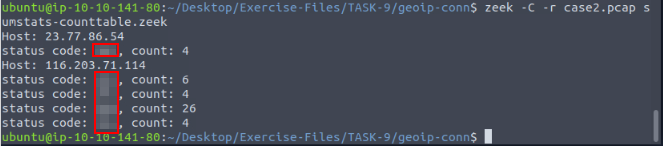
Answer: 4
Task 10 Conclusion
Congratulations! You just finished the Zeek room. In this room, we covered Zeek, what it is, how it operates, and how to use it to investigate threats.
Now, we invite you to complete the Zeek Exercise room: ZeekExercises
🎉🎉🎉CONGRATS!!! You have completed the Zeek Room!!!🎉🎉🎉